Integrate OpenLDAP with Keycloak
This guide explains how to integrate OpenLDAP with Portworx Backup Keycloak for centralized user authentication and authorization. This integration allows you to use your existing LDAP directory for user management in Portworx Backup.
Prerequisites
Before you begin, ensure you have:
-
OpenLDAP server installed and configured
- Server accessible from the Portworx Backup cluster
- Administrative access to the LDAP server
- LDAP service running on standard ports (389 for LDAP, 636 for LDAPS)
-
LDAP directory structure with:
- Users organized in a specific organizational unit (OU)
- Groups organized in a specific organizational unit (OU)
- Proper LDAP schema for user and group objects
-
Portworx Backup installed and running with:
- Access to Keycloak admin console
- Administrative privileges in Keycloak
-
Network connectivity between Keycloak and LDAP server with:
- Firewall rules allowing LDAP traffic
- DNS resolution for LDAP server hostname (if using FQDN)
LDAP directory structure example
For this integration, your LDAP directory should follow a structure similar to:
dc=example,dc=com
├── ou=users,dc=example,dc=com
│   ├── uid=john,ou=users,dc=example,dc=com
│   ├── uid=jane,ou=users,dc=example,dc=com
│   └── uid=admin,ou=users,dc=example,dc=com
└── ou=groups,dc=example,dc=com
    ├── cn=pxb-admins,ou=groups,dc=example,dc=com
    ├── cn=pxb-users,ou=groups,dc=example,dc=com
    └── cn=pxb-operators,ou=groups,dc=example,dc=com
Configure LDAP user federation
-
Navigate to the Keycloak admin console:
https://<px-backup-web-console-url>/admin/noteFor Portworx Backup 2.8.x and earlier, the Keycloak URL uses the
/auth/prefix:https://<px-backup-web-console-url>/auth/admin/. For information on finding the Portworx Backup web console URL, see Configure access to web console. -
Log in with administrator credentials
-
In the left navigation pane, click User Federation.
-
Click Add provider and select ldap:
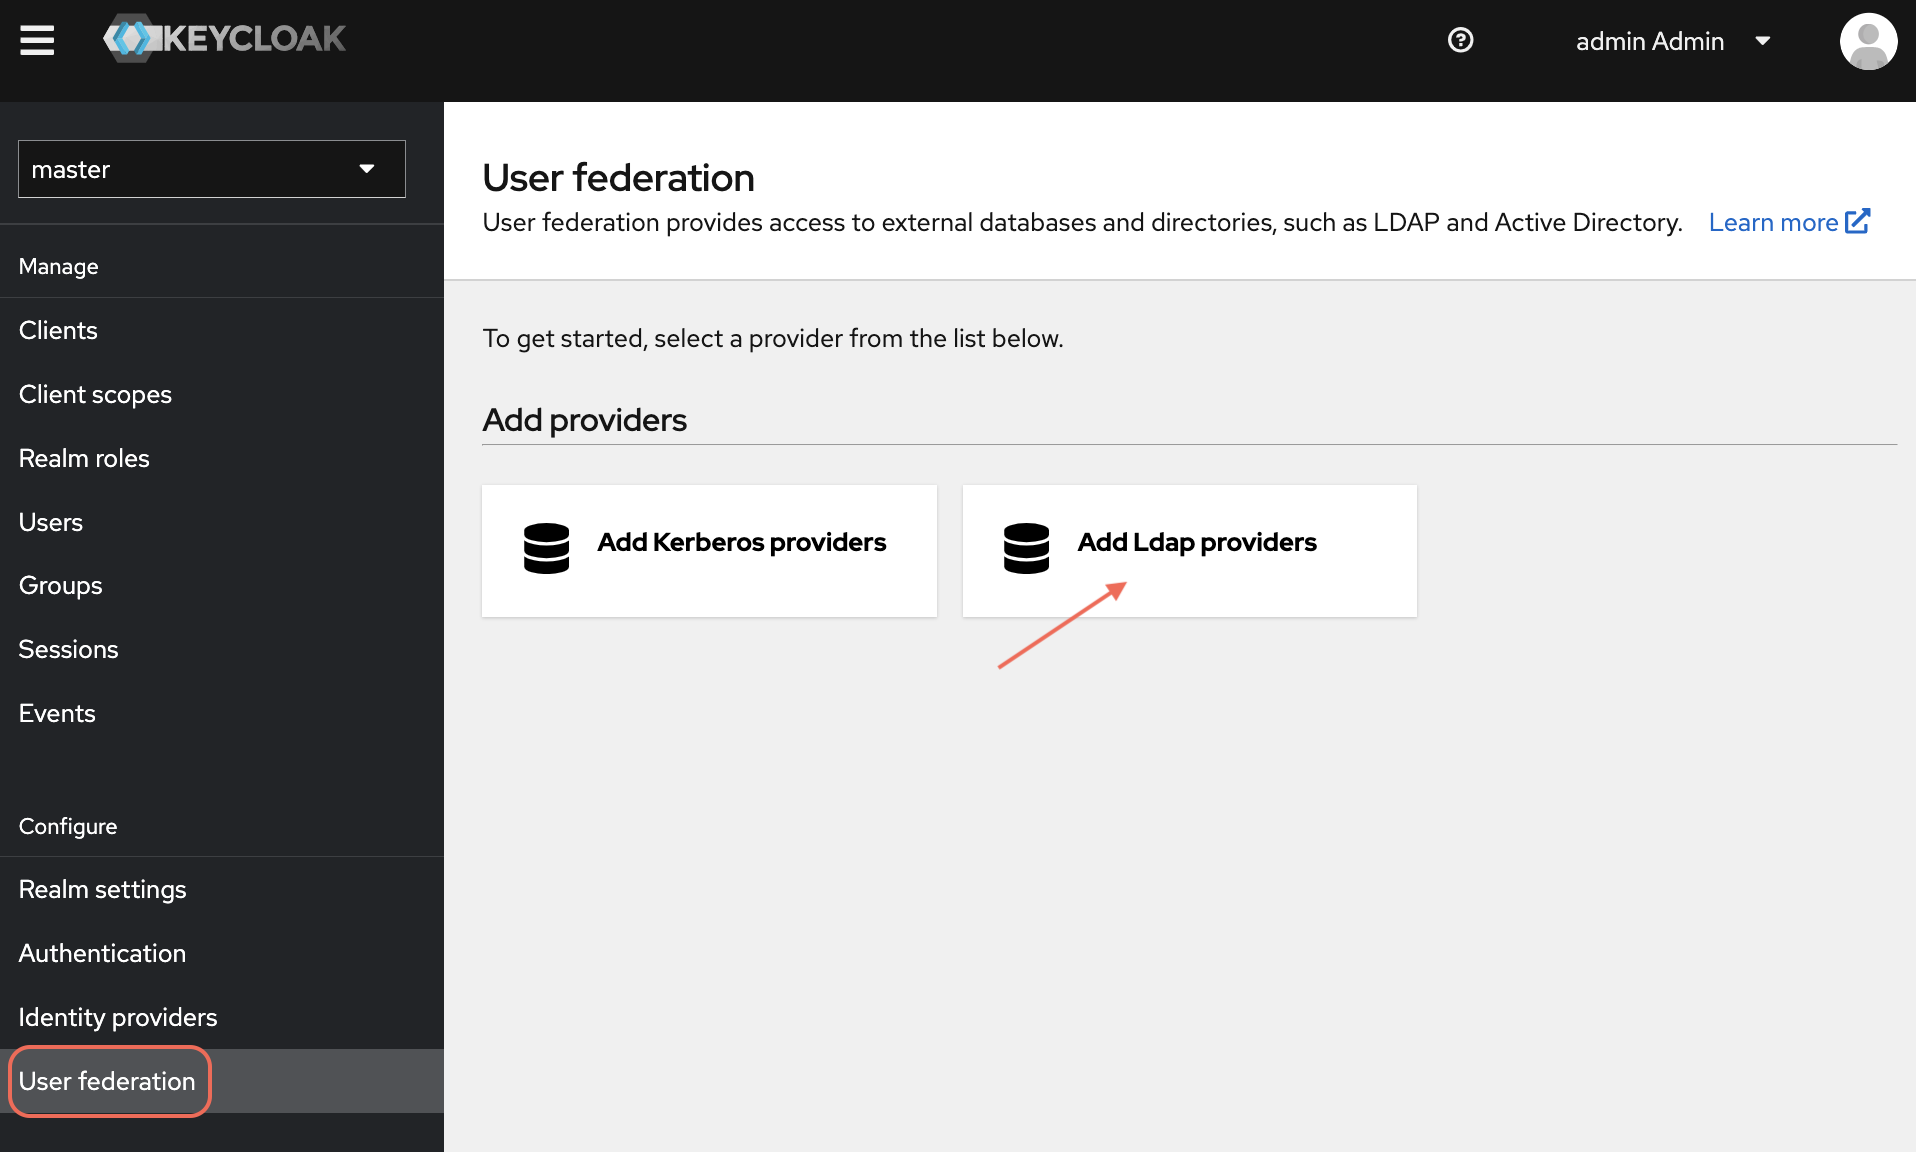
-
In the Add user federation provider page, configure the following:
General options
- Console Display Name:
OpenLDAP - Vendor: Select
Otherfrom the dropdown - Priority:
0(default priority)
Connection settings
- Connection URL:
ldap://<LDAP_SERVER_IP>:389- For secure connections:
ldaps://<LDAP_SERVER_IP>:636 - Example:
ldap://192.168.1.100:389
- For secure connections:
- Enable StartTLS:
OFF(unless using StartTLS) - Use Truststore SPI:
Only for ldaps(for LDAPS connections) - Connection Pooling:
ON(recommended for performance) - Connection Timeout:
5000(milliseconds)
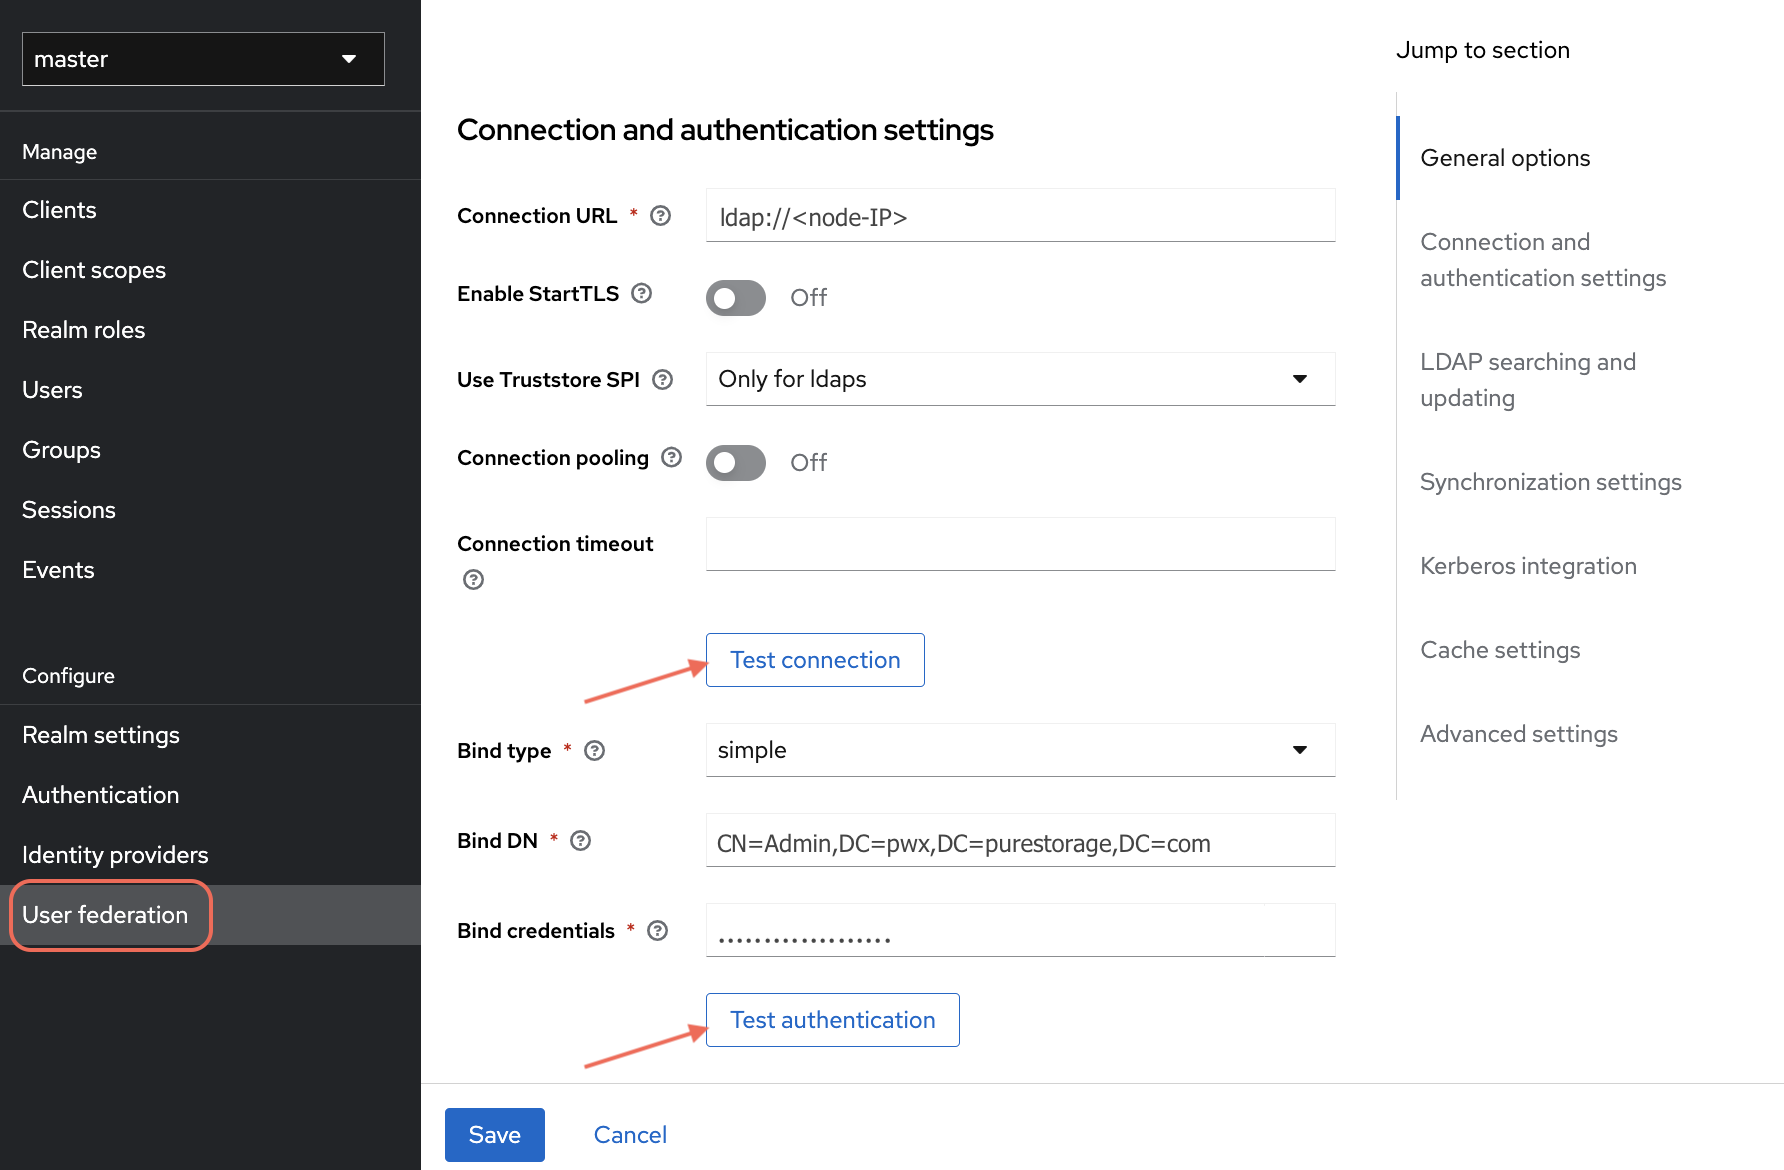
- Console Display Name:
-
Click Test connection to verify the connection settings
Authentication settings
- Bind Type:
simple - Bind DN:
cn=admin,dc=example,dc=com- Replace with your LDAP admin user DN
- Bind Credential: Enter the password for the bind DN user
- Bind Type:
-
Click Test authentication to verify the bind credentials
-
Configure the following search and update settings:
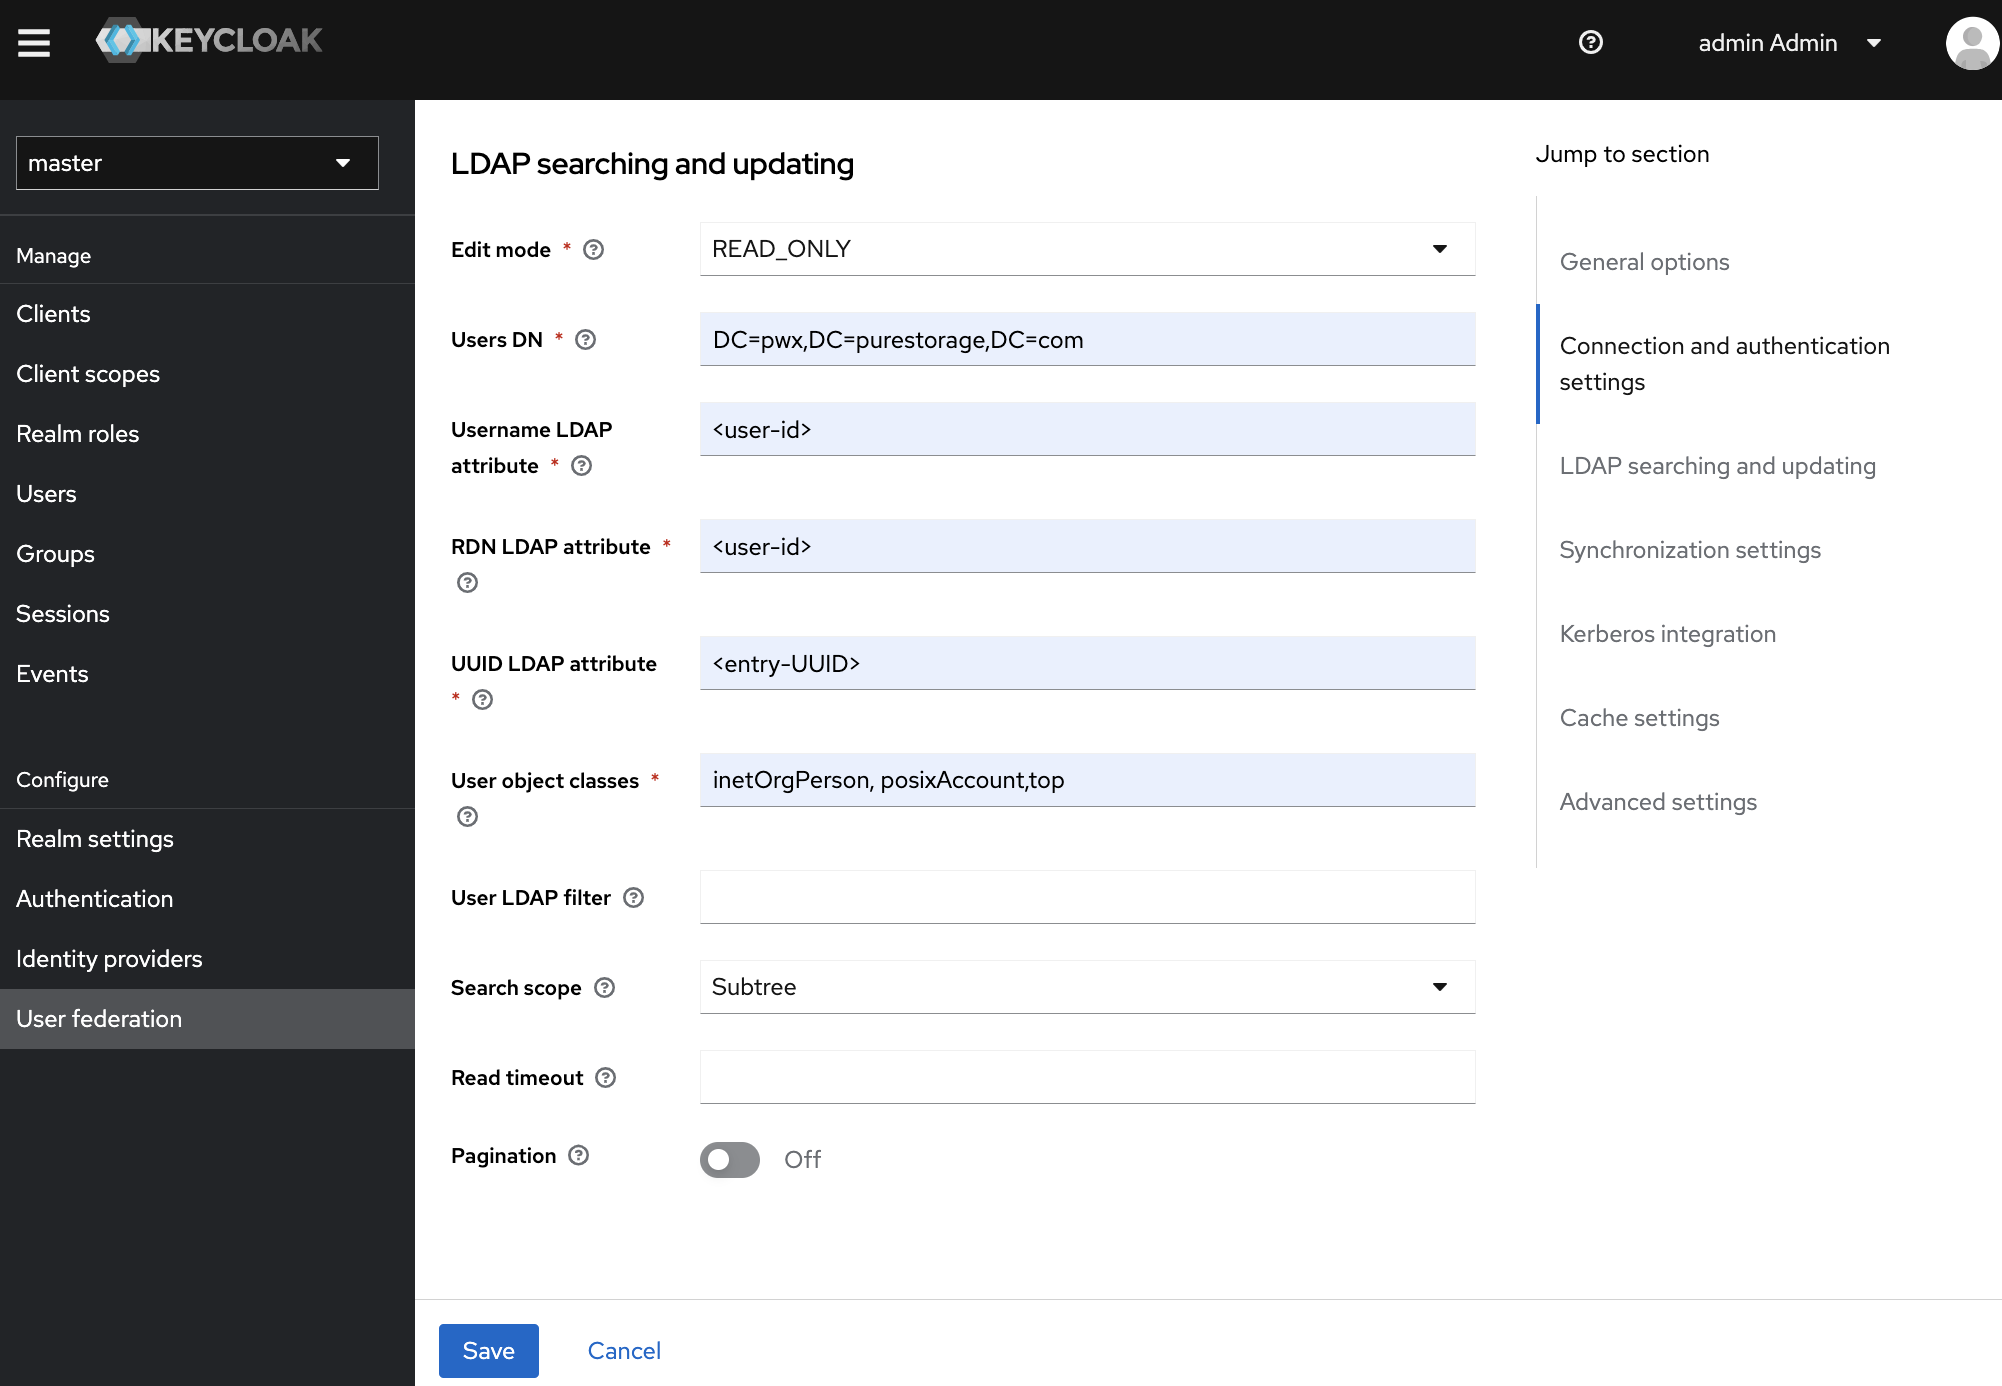
LDAP searching and updating
-
Edit Mode:
READ_ONLY(recommended for production) -
Users DN:
ou=users,dc=example,dc=com- The DN where user entries are located
-
Username LDAP Attribute:
uid- Attribute used for username (common:
uid,cn,sAMAccountName)
- Attribute used for username (common:
-
RDN LDAP Attribute:
uid- Relative Distinguished Name attribute
-
UUID LDAP Attribute:
entryUUID- For OpenLDAP, use
entryUUID; for Active Directory, useobjectGUID
- For OpenLDAP, use
-
User Object Classes:
inetOrgPerson,organizationalPerson,person- Object classes for user entries
-
User LDAP Filter:
(objectClass=inetOrgPerson)- Optional filter to limit user search
-
Search Scope:
One Level- Search only direct children of Users DN
-
Read Timeout:
10000(milliseconds) -
Pagination:
ON(recommended for large directories)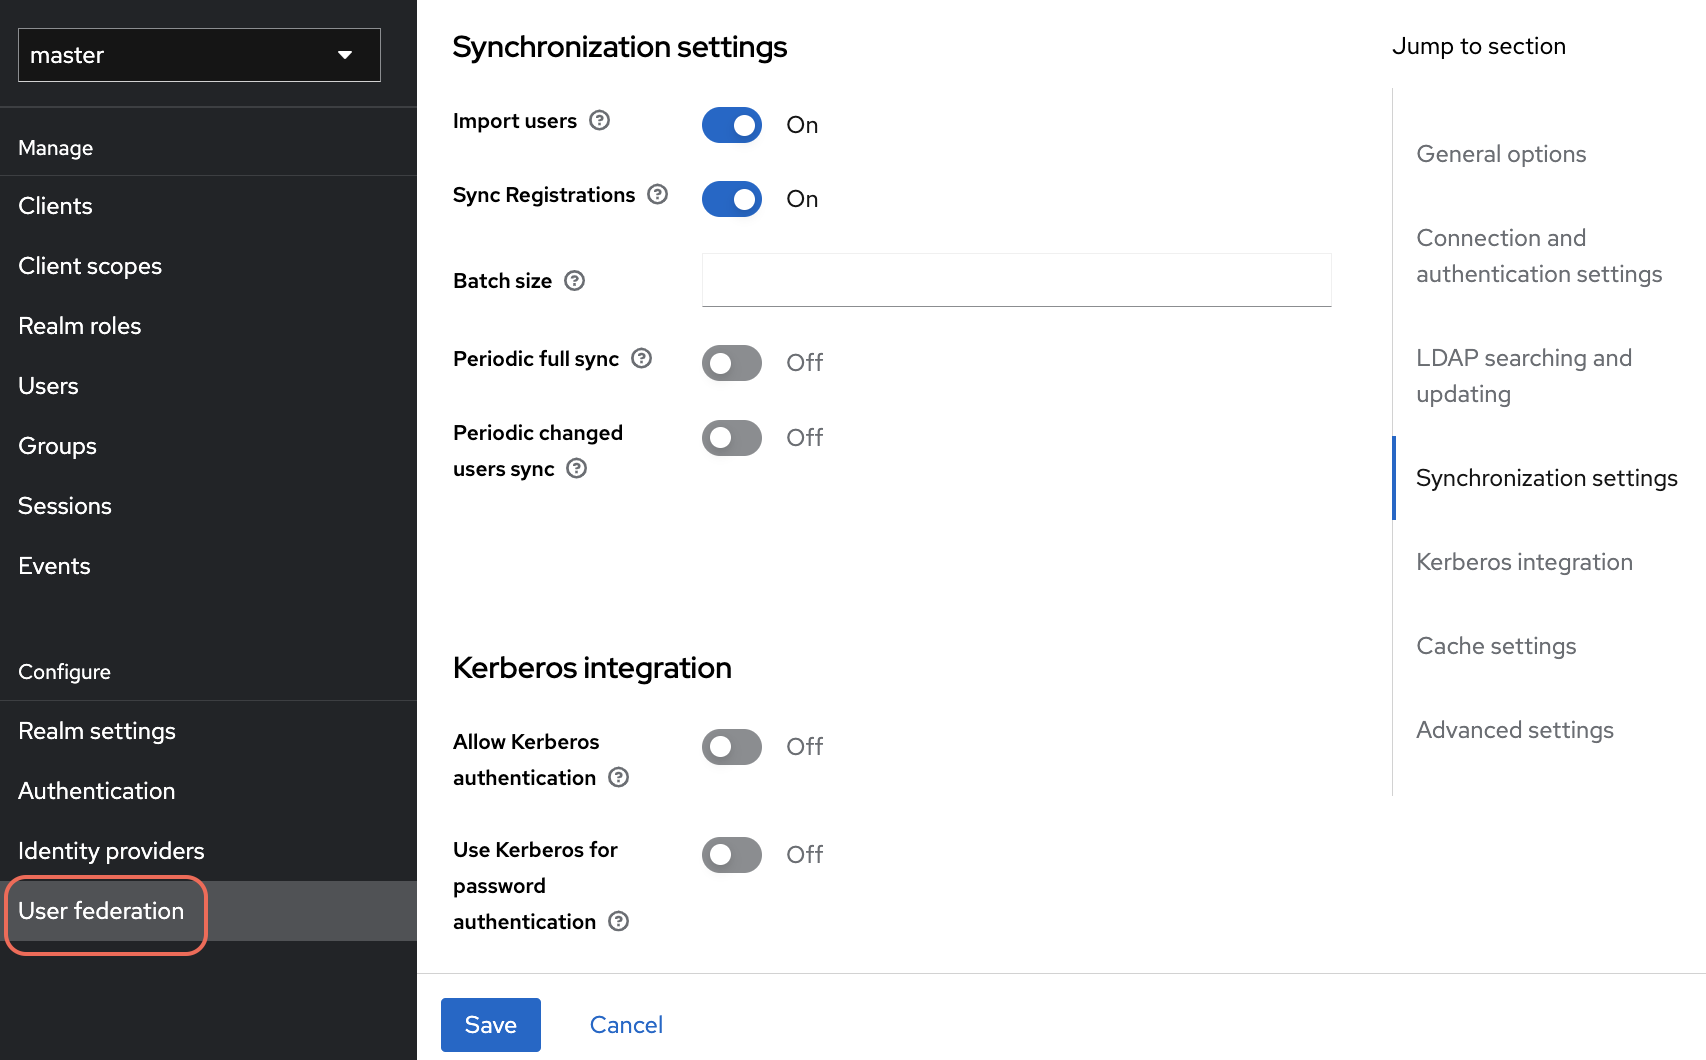
Synchronization settings
- Import Users:
ON- Import existing LDAP users into Keycloak
- Sync Registrations:
OFF- Disable if you don't want new Keycloak users created in LDAP
- Batch Size:
1000- Number of users to sync in each batch
- Periodic Full Sync:
ON(optional)- Full Sync Period:
604800(7 days in seconds)
- Full Sync Period:
- Periodic Changed Users Sync:
ON(optional)- Changed Users Sync Period:
86400(24 hours in seconds)
- Changed Users Sync Period:
Kerberos integration
- Allow Kerberos Authentication:
OFF - Use Kerberos for Password Authentication:
OFF

Cache settings
- Cache Policy:
DEFAULT - Eviction Day: Leave empty
- Eviction Hour: Leave empty
- Eviction Minute: Leave empty
- Max Lifespan:
3600000(1 hour in milliseconds)
Advanced settings
- Enable the LDAPv3 Password Modify Extended Operation:
OFF - Validate Password Policy:
OFF - Trust Email:
ON- Enable if LDAP email addresses are trusted
-
-
Click Test connection to verify connectivity.
-
Click Test authentication to verify bind credentials.
-
Click Save to create the LDAP provider.
Your OpenLDAP server is now integrated with Keycloak. Before LDAP users can access Portworx Backup, you must map their groups to Portworx Backup roles. See Next Steps.
Configure group mappers
After creating the LDAP provider, configure mappers to synchronize groups and user attributes.
-
Navigate to User Federation in the left navigation pane.
-
Select your OpenLDAP provider.
-
Click the Mappers tab.
-
Click Add Mapper to add a new mapper.
-
Configure the following settings:
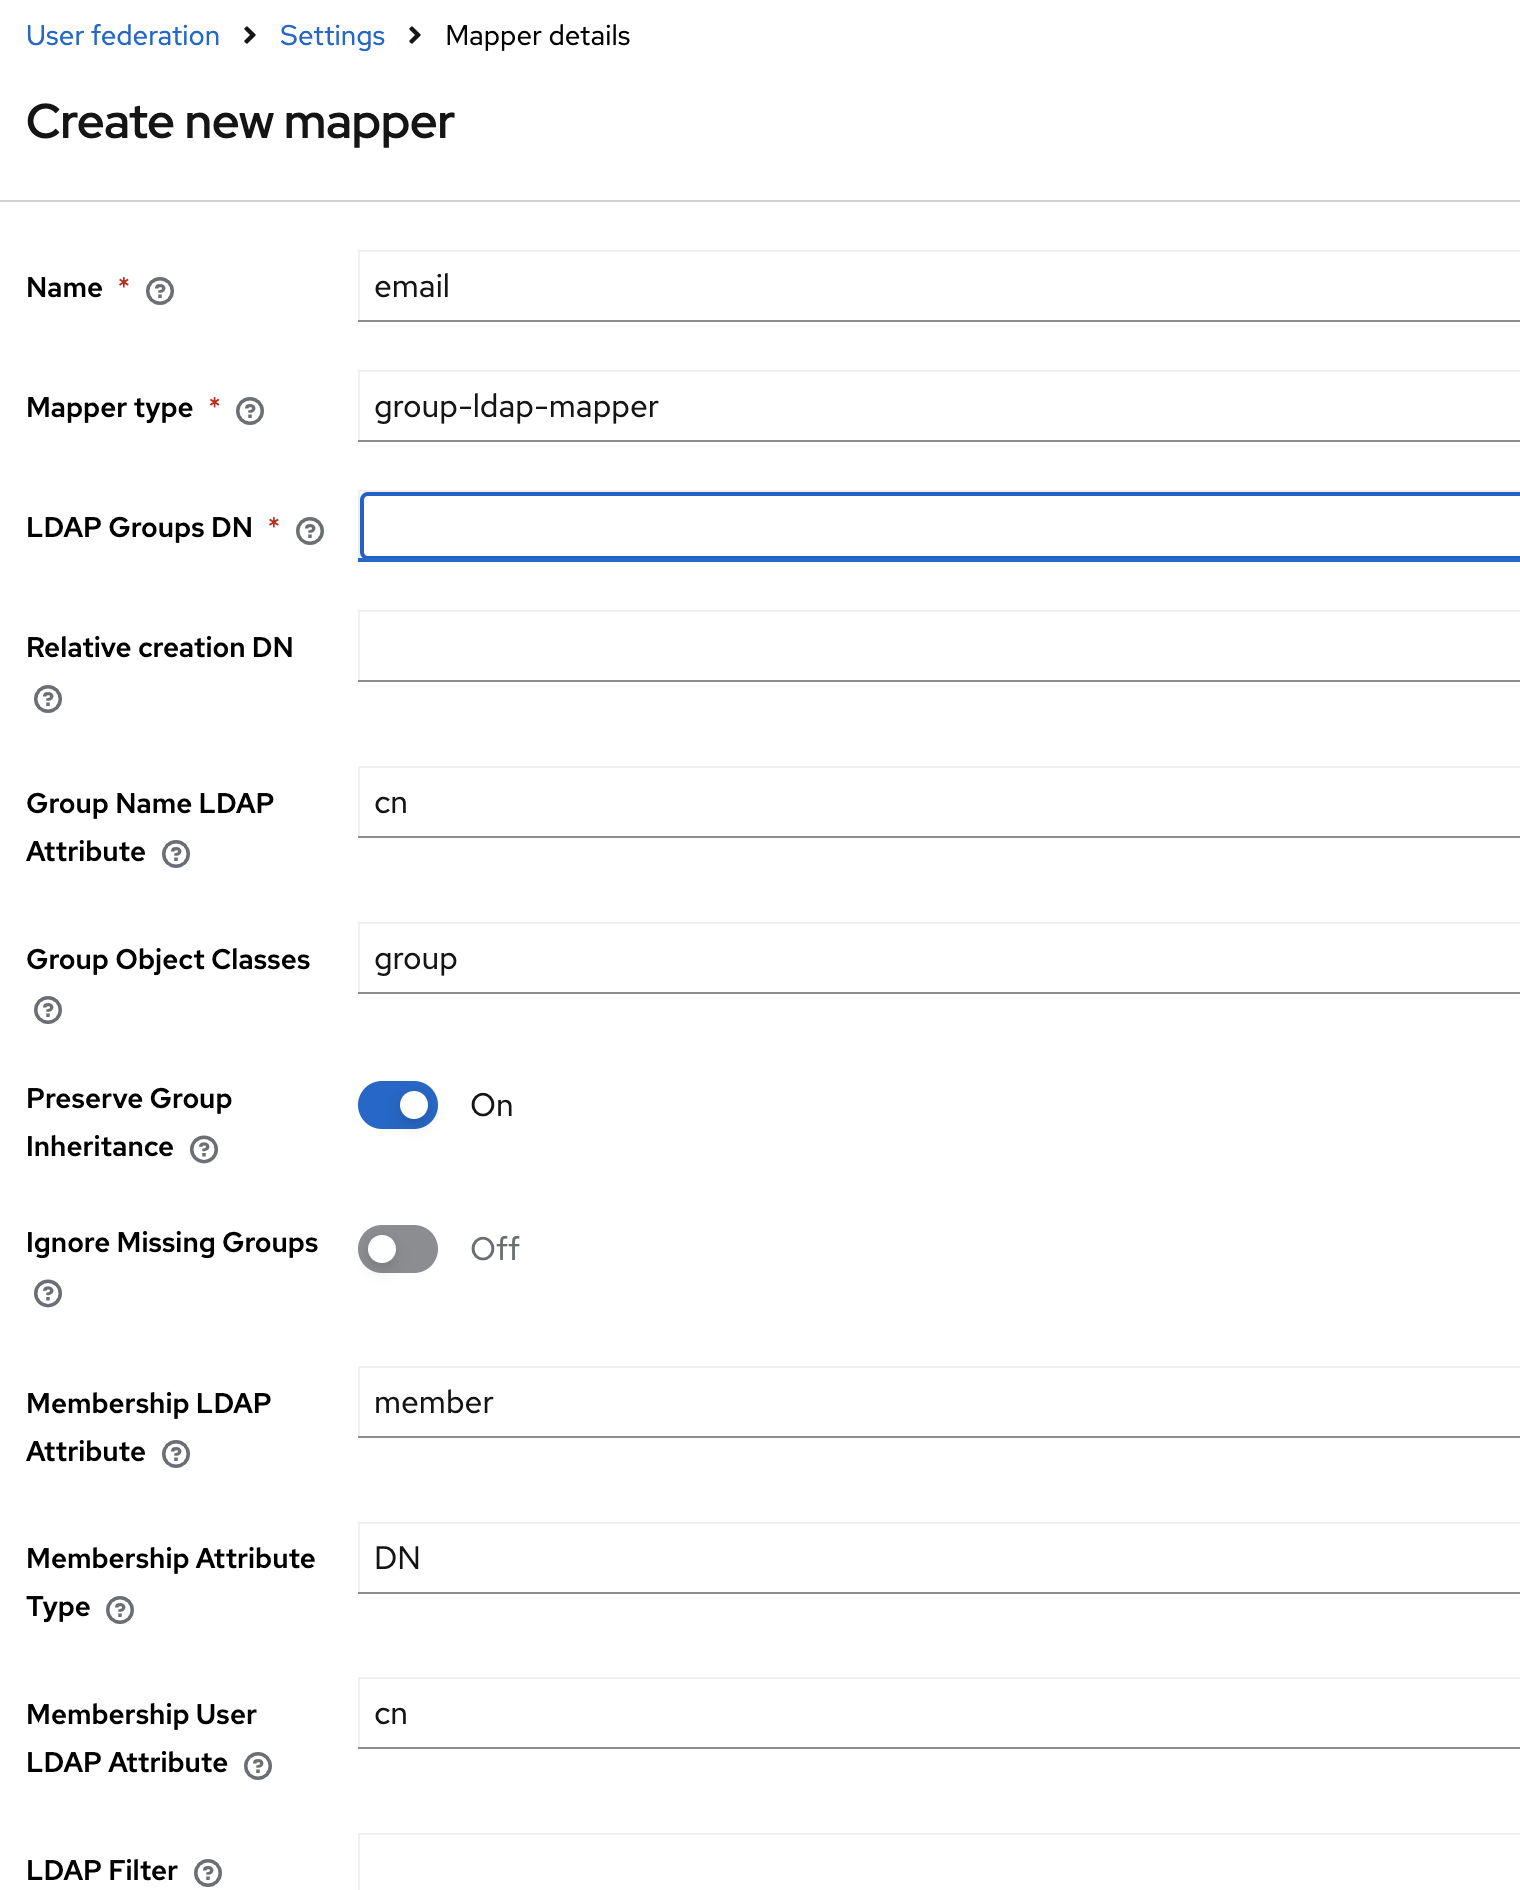
Basic settings
- Name:
ldap-group-mapper - Mapper Type:
group-ldap-mapper
Group settings
- LDAP Groups DN:
ou=groups,dc=example,dc=com- The DN where group entries are located
- Group Name LDAP Attribute:
cn- Attribute used for group name
- Group Object Classes:
groupOfNames,top- Object classes for group entries
- Preserve Group Inheritance:
OFF- Set to ON if you have nested groups
- Ignore Missing Groups:
OFF - Membership LDAP Attribute:
member- Attribute that contains group members
- Membership Attribute Type:
DN- How members are referenced (DN or UID)
- Membership User LDAP Attribute:
uid- User attribute for membership mapping
- LDAP Filter:
(objectClass=groupOfNames)- Optional filter for group search
- Mode:
READ_ONLY - User Groups Retrieve Strategy:
LOAD_GROUPS_BY_MEMBER_ATTRIBUTE
- Name:
-
Click Save to create the group mapper.
-
In the Mappers tab, under Actions select the required sync option to sync the users and groups.
-
Verify that groups are imported successfully.
-
You can create additional mappers for user attributes:
Email mapper
- Name:
email - Mapper Type:
user-attribute-ldap-mapper - User Model Attribute:
email - LDAP Attribute:
mail - Read Only:
ON
First name mapper
- Name:
first name - Mapper Type:
user-attribute-ldap-mapper - User Model Attribute:
firstName - LDAP Attribute:
givenName - Read Only:
ON
Last name mapper
- Name:
last name - Mapper Type:
user-attribute-ldap-mapper - User Model Attribute:
lastName - LDAP Attribute:
sn - Read Only:
ON
- Name:
Troubleshooting
Connection problems
- Verify LDAP server is accessible from Keycloak
- Check firewall rules and network connectivity
- Ensure correct LDAP server URL and port
Authentication failures
- Verify bind DN and credentials are correct
- Check LDAP server logs for authentication errors
- Ensure bind user has sufficient privileges
User/group sync issues
- Verify Users DN and Groups DN are correct
- Check LDAP filters and object classes
- Review LDAP directory structure and permissions
Performance issues
- Enable connection pooling
- Adjust batch size for synchronization
- Consider using pagination for large directories
Log analysis
Check Keycloak server logs for detailed error messages.
Next steps
After successfully integrating OpenLDAP with Keycloak:
-
Map LDAP Groups to Portworx Backup Roles (Required): Importing LDAP groups into Keycloak alone does not grant users any access in Portworx Backup. You must explicitly map each LDAP group to a Portworx Backup role. To do this:
- Log in to the Portworx Backup web console as an administrator.
- Navigate to Settings > Users and Groups > Groups.
- Select the LDAP group and assign it a Portworx Backup role (for example,
px-backup-app.adminorpx-backup-app.user).
Until role mappings are configured, authenticated users will have no authorization and cannot access any resources.
-
Set up Rancher integration: If using Rancher, configure RBAC integration.
-
Test user access: Verify users can access Portworx Backup with appropriate permissions.
-
Monitor synchronization: Set up periodic sync to keep users and groups updated.