Restore a VM Backup
You can restore a VM backup in the following ways:
- Full Restore - Restore all VMs and their associated resources from the VM backup to the destination cluster. For more information, see Full restore of a VM backup.
- Specific VMs Restore - Restore the selected VMs from a VM backup to the destination cluster. For more information, see Restore specific VMs from a VM backup.
Full restore of a VM backup
Portworx Backup provides the full restore functionality to restore all VMs and their associated resources from the VM backup to the destination cluster. The full restore replaces all the VMs and their associated resources in the destination cluster. Additionally, you can use the full restore functionality to recover a large number of resources or resource sets from the backup to the destination cluster.
Requirements
Ensure that the following prerequisites are met before you perform a full restore of a VM backup:
- A VM backup is available.
- The destination cluster must have KubeVirt (for Vanilla Kubernetes or EKS/GKE) or OpenShift Virtualization (for OpenShift) installed and running. Restoring VM resources to a cluster without these components will fail.
- The destination cluster has the same or a later Stork version as the backup cluster. For example, if the namespace backup is taken from a backup cluster running stork version 26.2.0, the destination cluster must be running stork version 26.2.0 or later. For information on how to install and upgrade Stork, see Install Stork.
- Observe the restore feasibility matrix for VM backup. For more information, see Supported restore types based on VM backup status.
Procedure
You can perform a full restore of all the VMs from a VM backup.
To perform a full restore of a VM backup, follow these steps:
-
Log in to Portworx Backup web console.
-
From the left navigation pane, click the Clusters icon
 .
. -
On the Clusters page, click the application cluster for which you have taken the backup.
The system displays the application cluster page. -
Click the Backups tab, and select VM to view the backups.
tipUse the timeframe filter to list the backups based on the required timeline such as last 24 hours, 1 week, one month, or a custom timeframe.
-
Click the Actions icon for the required VM backup, and select Restore from the list of available actions.
The system displays the Restore Options page, and prompts you to select the restore option.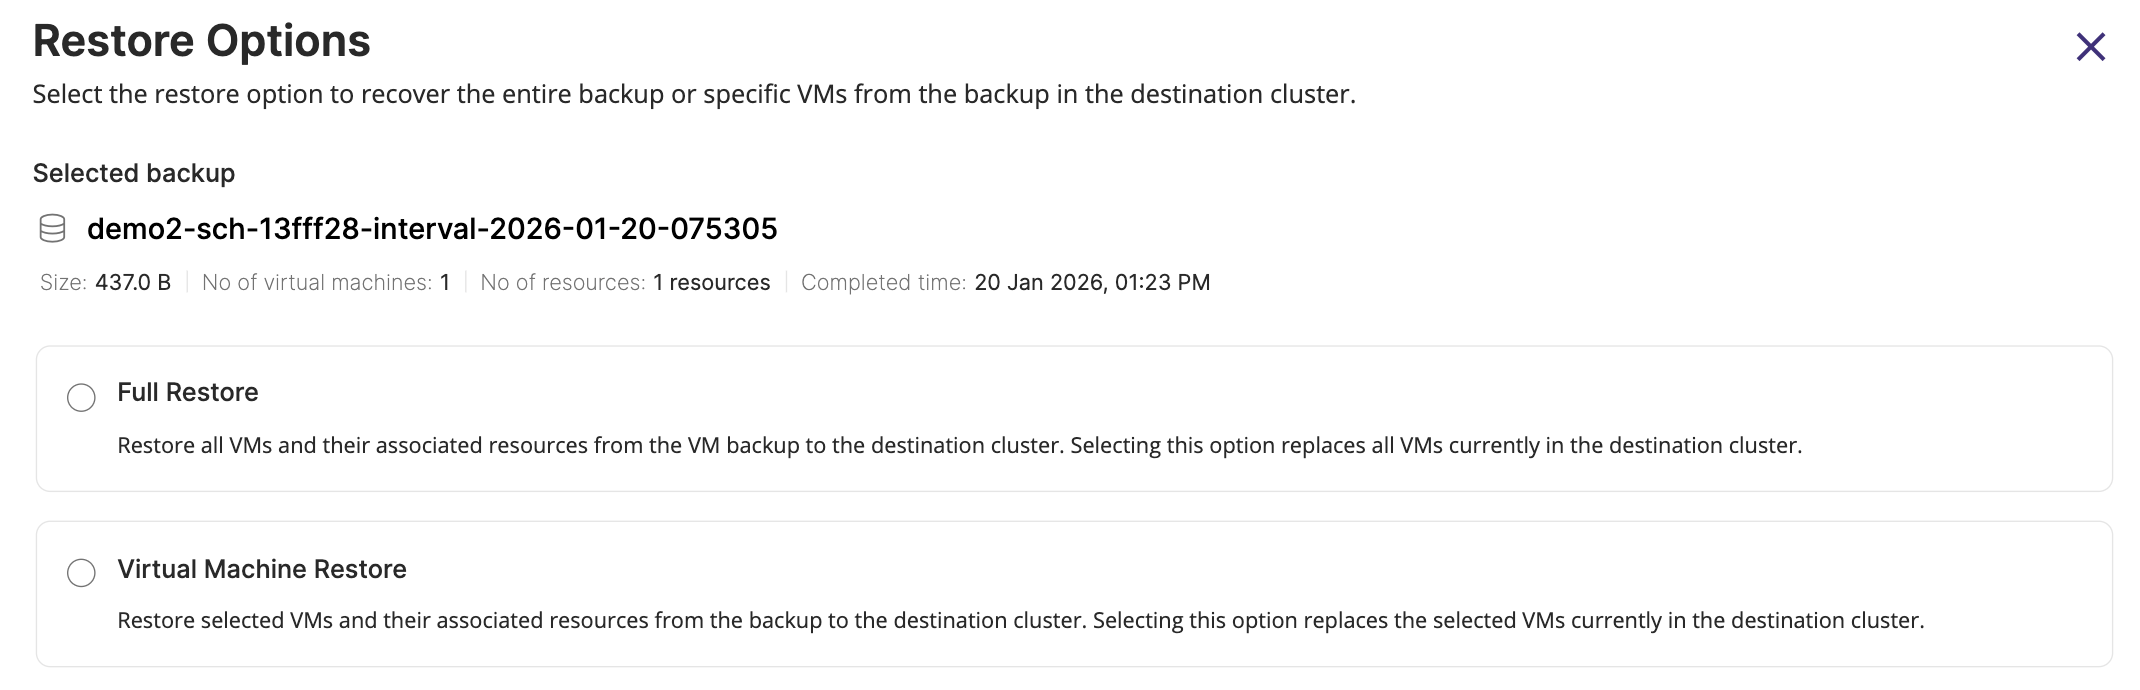
-
Select the Full Restore option.
For information on the Virtual Machine Restore option, see Restore Specific VMS from a VM Backup.
The system displays the Restore (Backup) page. -
On the Restore (Backup) page, specify the following information, and click Restore:
- Enter the restore name: Enter a unique name for the restore. You can use this name to identify the restore operation in the Restore tab.
- Choose the destination cluster: Select the destination cluster to restore the backup.
- Replace existing resources?
- Select this checkbox to replace existing resources in the destination cluster with the latest backup data.
- Clear this checkbox to skip restoring resources that already exist in the destination cluster.
- VM options
- Skip MAC address masking: Select this checkbox to retain the original MAC address from the backup during restore.
For more information, see Preserve Static IP and MAC address for VM Backup and Restore. - Skip virtual machine restart after restore: Select this checkbox to skip restarting of VMs after restore.
- Skip MAC address masking: Select this checkbox to retain the original MAC address from the backup during restore.
The progress bar in the Restore tab displays the percentage completion of the restore.
To obtain detailed status or information during restore, click on the required restore.
After Portworx Backup successfully completes the restore, you can view the resource details in the Restore Details page through Vertical ellipsis >> Show Details at the end of the restore row.
For large resource restores, the Restore Details page does not display individual resource details due to the high resource count. If a full restore of a non-large backup is treated as a large backup restore, the Restore Details window does not list restored resources or indicate the success or failure of individual resources because the restore is partial. However, you can check the Restore Custom Resource (restore CR) JSON file to identify the failed resources. For more information, see View Detailed Restore Failures from the Backup Location.
Restore specific VMs from a VM backup
Portworx Backup facilitates you to restore the selected VMs from a VM backup to the destination cluster. The specific VMs restore replaces the selected VMs and their associated resources in the destination cluster.
Requirements
Ensure that the following prerequisites are met before you restore specific VMs from a VM backup:
- A VM backup is available
- Observe the restore feasibility matrix for VM backup. For more information, see Supported restore types based on VM backup status.
Procedure
You can perform a restore of specific VMs from a VM backup to the same source cluster or to a new destination cluster, using the configured source-to-destination mapping criteria. To restore specific VMs from a VM backup, follow these steps:
-
Log in to Portworx Backup web console.
-
From the left navigation pane, click the Clusters icon
. -
On the Clusters page, click the application cluster for which you have taken the backup.
The system displays the application cluster page. -
Click the Backups tab, and select VM to view the backups.
tipUse the timeframe filter to list the backups based on the required timeline such as last 24 hours, 1 week, one month, or a custom timeframe.
-
Click the Actions icon for the required backup, and select Restore from the list of available actions.
The system displays the Restore Options page, and prompts you to select the restore option.
-
Select the Virtual Machine Restore option.
For information on the Full Restore option, see Full restore of a VM backup.
The system displays the Restore (Backup) page. -
On the Restore (Backup) page, perform the following actions:
- On the Basic Information page, specify the following information, and click Next.
- Enter the restore name: Enter a unique name for the restore. You can use this name to identify the restore operation in the Restore tab.
- Choose the destination cluster: Select the destination cluster to restore the backup.
- Select or clear the Replace existing resources? checkbox.
- Select this checkbox to replace existing resources in the destination cluster with the latest backup data.
- Clear this checkbox to skip restoring resources that already exist in the destination cluster.
noteIf you are restoring only PVCs with the Replace existing resources option, scale down the deployment before initiating the restore; otherwise, existing pods will continue to use the current PVCs.
After you scale down the deployment, the existing PVCs are deleted automatically without any manual intervention, and the restore succeeds.
Once the restore is complete, scale the deployment back up. - Select or clear the following VM options:
- Skip MAC address masking - Select this checkbox to retain the original MAC address from the backup during restore.
For more information, see Preserve Static IP and MAC address for VM Backup and Restore. - Skip virtual machine restart after restore - Select this checkbox to skip restarting of VMs after restore.
- Skip MAC address masking - Select this checkbox to retain the original MAC address from the backup during restore.
- On the Select Virtual Machines page, select the VMs to restore from the backup, and click Next.
- On the Source and Destination Mapping page, specify the following mappings, and click Next.
- Namespace mapping: If the specified namespace does not exist on the destination cluster, a new namespace is created for the restore. By default, the system uses the same namespace name for both the source and destination clusters. However, you can edit this value to map the namespace to an existing namespace on the destination cluster or specify a new namespace name.
- Storageclass mapping: By default, the system uses the same storage class for both the source and destination clusters. If a storage class from the source cluster does not exist in the destination cluster, the system displays it as NA. To proceed with the restore process, you must map the storage class to an existing storage class in the destination cluster.
note
The StorageClass Mapping options appear, only when you restore the backups created using Portworx or the KDMP driver. These options do not appear when you restore backups that are created using the native cloud driver.
- Project mapping: By default, the system uses the same project name for both the source and destination clusters. If a project from the source cluster does not exist in the destination cluster, the system displays it as NA. To proceed with the restore process, you must map the project to an existing project in the destination cluster.
note
-
Portworx Backup allows one-to-one mapping of multiple projects during the restore. You can also restore the backups from a Rancher source cluster to a non-Rancher destination cluster without mapping any projects.
For more information on mapping projects during restore, see Project mapping in Rancher Cluster.
-
When the resource limit is exceeded at the project level on a Rancher cluster, applications on the destination cluster might not start as expected.
-
- On the Review & Restore page, review the restore configuration summary, and click Restore.
- On the Basic Information page, specify the following information, and click Next.
The progress bar in the Restore tab displays the percentage completion of the restore.
To obtain detailed status or information during restore, click on the required restore.
After Portworx Backup successfully completes the restore, you can view the resource details in the Restore Details page through Vertical ellipsis >> Show Details at the end of the restore row.
For large resource restores, the Restore Details page does not display individual resource details due to the high resource count. If a full restore of a non-large backup is treated as a large backup restore, the Restore Details window does not list restored resources or indicate the success or failure of individual resources because the restore is partial. However, you can check the Restore Custom Resource (restore CR) JSON file to identify the failed resources. For more information, see View Detailed Restore Failures from the Backup Location.
Supported restore types based on VM backup status
This table provides the restore feasibility for VMs and their files and folders based on the backed-up entities (single VM or multiple VMs) and the status of the backup operation.
| Backup Entities | Backup Status | Restore Possible? | Supported Restore Types | Restore Details |
|---|---|---|---|---|
| Single VM | Failed | ❌ No | NA | Restore is not supported. |
| Single VM | Success | ✅ Yes | Full Restore Specific Files or Folders Restore | Both full restore and restore of specific files or folders of the VM are supported. |
| Multiple VMs | Failed | ❌ No | NA | Restore is not supported. |
| Multiple VMs | Partial Success (some VMs successful) | ✅ Yes | Full Restore Specific VMs Restore Specific Files or Folders Restore | Full Restore is supported for VMs that were successfully backed up. |
| Multiple VMs | Success | ✅ Yes | Full Restore Specific VMs Restore Specific Files or Folders Restore | Full restore, specific VMs restore, and specific files or folders restore are supported. |