Restore an Individual VM
Portworx Backup enables you to restore all resources of an individual VM from a selected VM backup to the destination cluster. A complete restore of an individual VM replaces all VM resources in the destination cluster.
You can use any of the following methods to restore all resources of an individual VM:
- Default Restore – Enables you to restore all VM resources without specifying the source-to-destination mapping criteria.
- Custom Restore – Enables you to restore all VM resources using the configured source-to-destination mapping criteria.
Requirements
Ensure that the following prerequisites are met before you restore all resources of an individual VM:
- A VM backup is available.
Procedure
To restore all resources of an individual VM, follow these steps:
-
Log in to Portworx Backup web console.
-
From the left navigation pane, click the Clusters icon
 .
. -
On the Clusters page, click the application cluster for which you have taken the backup.
The system displays the application cluster page. -
Click the Applications tab, and select VM to view the VMs in the cluster.
-
Click Restore from the ACTIONS column for the target VM.
The system displays the Restore Options page, and prompts you to select the restore option.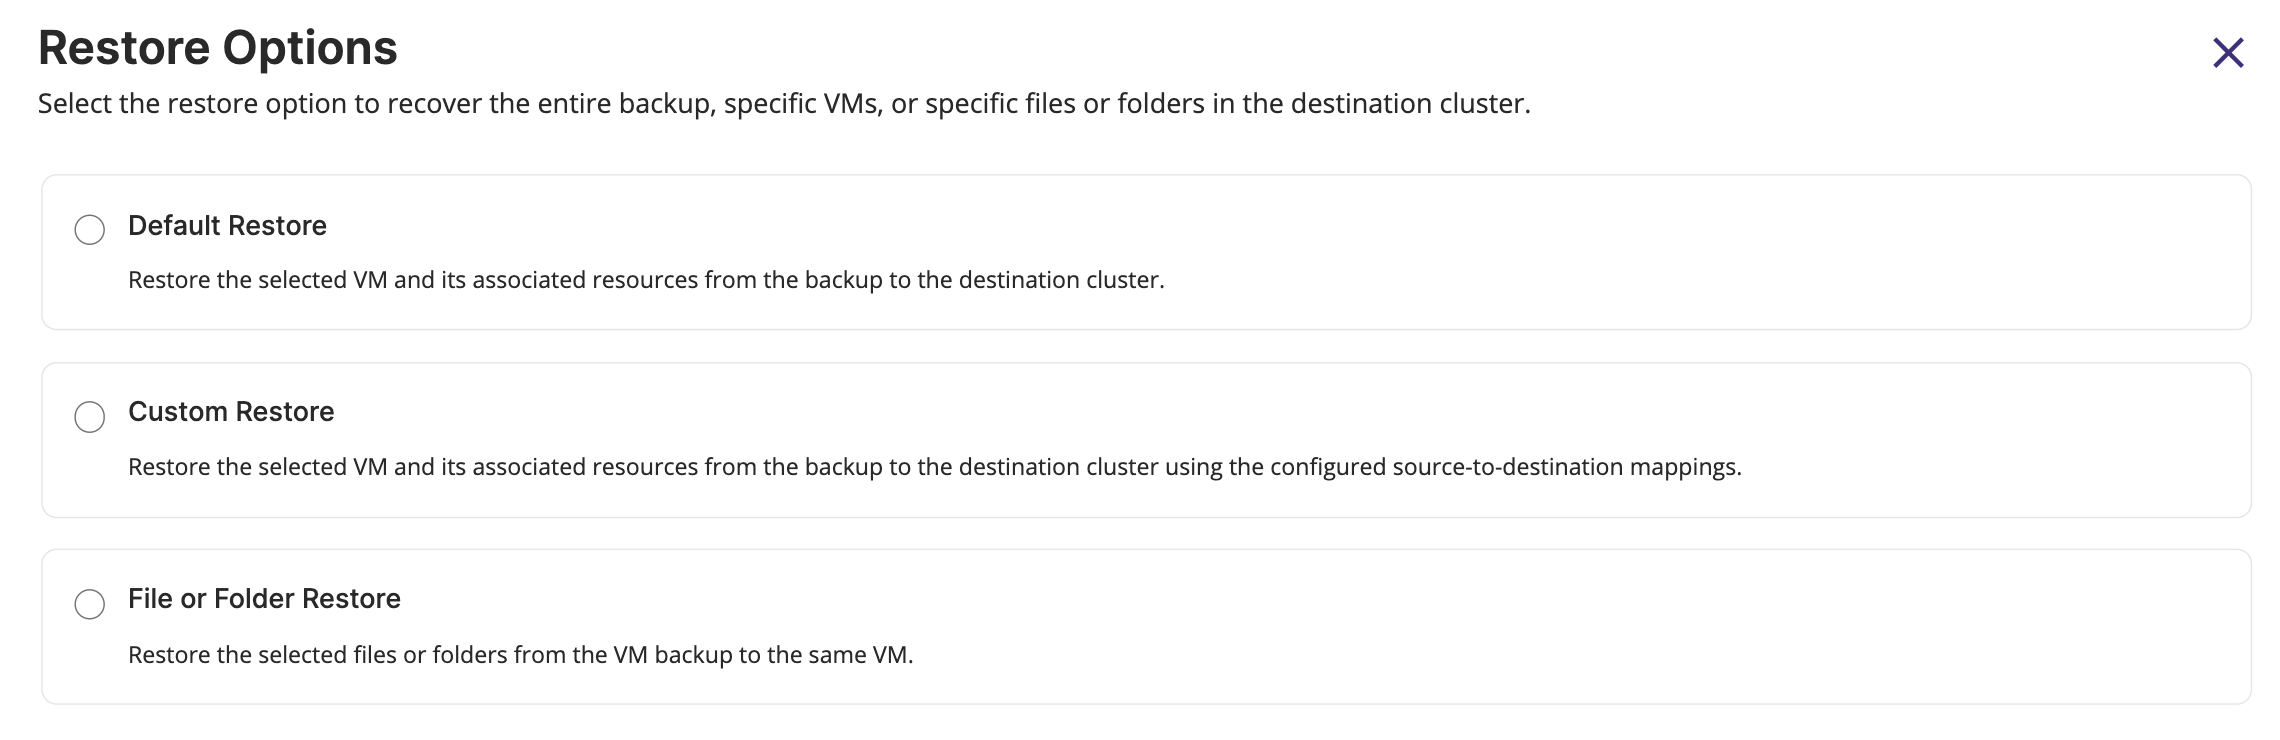
-
Select one of the following options on the Restore Options page, and click Next.
- Default Restore: Restore all the VM resources to the destination cluster. Selecting this option replaces all the VM resources in the destination cluster.
- Custom Restore: Restore all the VM resources to the destination cluster. Selecting this option replaces all the VM resources in the destination cluster based on the configured source-to-destination mapping criteria which involves namespaces, storage classes, and rancher projects mappings to the destination cluster.
For information on the File or Folder Restore option, see Restore Specific Files or Folders of a VM.
-
On the Restore (VM) page, perform the following actions based on the selected restore option:
- For the Default Restore option, specify the following information on the Basic Information page, and click Restore:
- Enter the restore name: Enter a unique name for the restore. You can use this name to identify the restore operation in the Restore tab.
- Choose the destination cluster: Select the destination cluster to restore the backup.
- Choose the backup: Select the backup for VM restore.
- Replace existing resources? checkbox:
- Select this checkbox to replace existing resources in the destination cluster with the latest backup data.
- Clear this checkbox to skip restoring resources that already exist in the destination cluster.
- VM restore options:
- Skip MAC address masking – Select this checkbox to retain the original MAC address from the backup during restore.
For more information, see Preserve Static IP and MAC address for VM Backup and Restore. - Skip virtual machine restart after restore – Select this checkbox to skip restarting of VMs after restore.
- Skip MAC address masking – Select this checkbox to retain the original MAC address from the backup during restore.
- For the Custom Restore option, follow these steps:
- On the Basic Information page, specify the following information, and click Next.
- Enter the restore name: Enter a unique name for the restore. You can use this name to identify the restore operation in the Restore tab.
- Choose the destination cluster: Select the destination cluster to restore the backup.
- Choose the backup: Select the backup for VM restore.
- Replace existing resources? checkbox:
- Select this checkbox to replace existing resources in the destination cluster with the latest backup data.
- Clear this checkbox to skip restoring resources that already exist in the destination cluster.
- VM restore options:
- Skip MAC address masking – Select this checkbox to retain the original MAC address from the backup during restore.
For more information, see Preserve Static IP and MAC address for VM Backup and Restore. - Skip virtual machine restart after restore – Select this checkbox to skip restarting of VMs after restore.
- Skip MAC address masking – Select this checkbox to retain the original MAC address from the backup during restore.
- On the Source and Destination Mapping page, specify the following mappings, and click Next.
- Namespace mapping: If the specified namespace does not exist on the destination cluster, a new namespace is created for the restore. By default, the system uses the same namespace name for both the source and destination clusters. However, you can edit this value to map the namespace to an existing namespace on the destination cluster or specify a new namespace name.
- Storageclass mapping: By default, the system uses the same storage class for both the source and destination clusters. If a storage class from the source cluster does not exist in the destination cluster, the system displays it as NA. You can map the storage class to an existing storage class in the destination cluster.
note
The StorageClass Mapping options appear, only when you restore the backups created using Portworx or the KDMP driver. These options do not appear when you restore backups that are created using the native cloud driver.
- Project mapping: By default, the system uses the same project name for both the source and destination clusters. If a project from the source cluster does not exist in the destination cluster, the system displays it as Nil. You can map the project to an existing project in the destination cluster.
note- Portworx Backup allows one-to-one mapping of multiple projects during the restore. You can also restore the backups from a Rancher source cluster to a non-Rancher destination cluster without mapping any projects. For more information on mapping projects during restore, see Project mapping in Rancher Cluster.
- When the resource limit is exceeded at the project level on a Rancher cluster, applications on the destination cluster might not start as expected.
- On the Review & Restore page, review the restore configuration summary, and click Restore.
- On the Basic Information page, specify the following information, and click Next.
- For the Default Restore option, specify the following information on the Basic Information page, and click Restore: