Deploy a data service
This section provides a comprehensive guide on deploying data services within the PDS platform.
Prerequisites
- A target cluster
- A configured or sample data service configuration template, resource settings template, and storage options template added to a project
- An existing project
- A labeled namespace that has been added to the project
Deploy a data service
To deploy a data service:
-
In the PDS platform, select Data Services Overview in the left pane.
-
In the Data Service Overview page, select the Deploy Data Service button.
-
From the list of data services, select one to deploy.
-
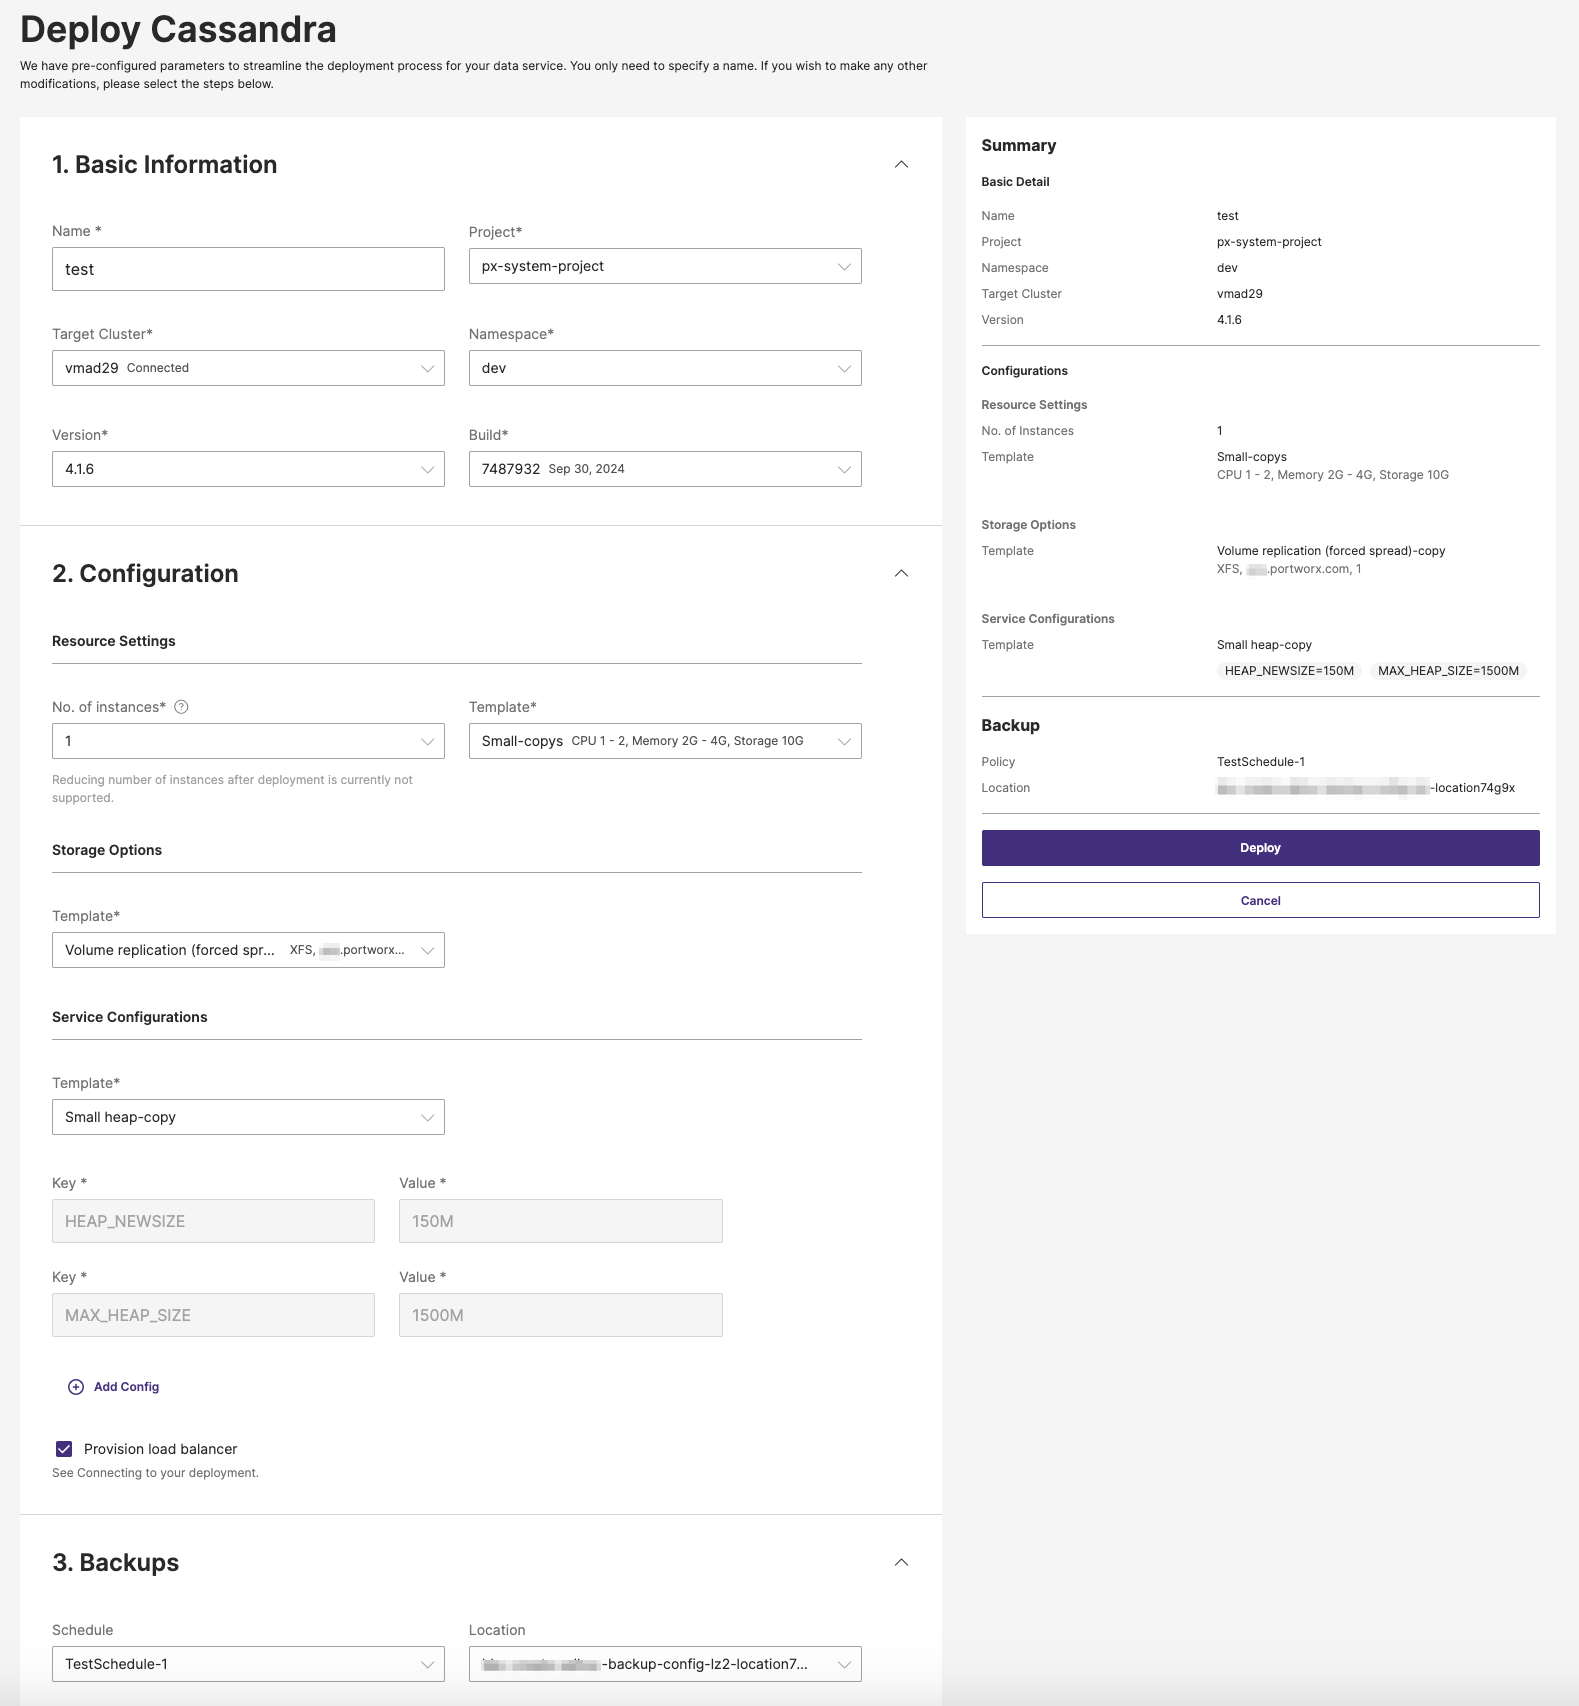
In the Deploy (data-service-name) page that appears -> Basic Information section -> Name field, enter a unique name for your data service deployment.
-
(Optional) The Project, Target Cluster, Namespace, Version, and Build (the build version associated with the chosen data service version) are pre-populated with default values. You can select a different value from each dropdown if required.
note- In the Target Cluster dropdown, PDS filters and displays only clusters with a Connected or Partially Available connection status. This ensures that you can select a healthy cluster suitable for deploying a data service. If a cluster does not appear in the list, it likely indicates that the cluster is either unhealthy or not properly connected. In such cases, navigate to the Cluster Overview page to investigate and resolve any health issues with the cluster before proceeding with the deployment.
- By default, the Version and Build dropdowns display the most recent data service version and the corresponding build for that version. For more information about the supported versions for each data service, go to the respective data service and see the supported versions section. For example, the Cassandra supported versions are here.
-
Select the Namespace from the dropdown where you want the data service to reside within the target cluster.
noteYou cannot modify the previous deployment parameters, after deploying a data service.
-
In the Configuration section -> Resource Settings:
- From the No. of instances dropdown, choose the nodes required for your data service. See the Node restrictions section to know the supported instances for each data service.
- From the Template dropdown, choose a predefined resource settings template that match your performance and sizing requirements. For more information about creating a resource settings template, see the Create a template section.
-
In the Storage Options section -> Template dropdown, select an existing template that suits your storage needs. For more information about adding a storage option template, see the Create a template section.
-
In the Service Configurations section:
- Template dropdown: Choose a template that meets your application's configuration requirements. For more information about adding a service configuration template, see the Create a template section.
note- If you specified Key and Value pair(s) while setting up the service configuration template, those values will automatically populate when you select the template from the dropdown menu.
- When deploying data services, Key and Value pairs defined in the template created by the administrator will take precedence over those provided by users. This means that if a user specifies the same key and value pair as in the template, the values set by the admin will be applied during deployment. This allows administrators to enforce specific configuration parameters, ensuring all deployments comply with the values they set. Users cannot override or change these administrator defined values, maintaining consistency and compliance across all deployments.
-
(Optional) Click on the +Add Config label to define Key and Value pairs for the data service deployment configuration.
-
(Optional) Select the Provision load balancer check box, if your deployment needs external access. See the Provision Internal load balancer section for more information. If your service requires secure connections, then select the Require secure connection (TLS) check box.
-
(Optional) In the Backups section:
- Choose a schedule from the Schedule dropdown to perform a full backup of your data service.
- When you select a backup schedule, the Location dropdown appears. Choose a configured target location where you wish to backup your data service.
For more information about configuring a backup target, refer to the Locations section.
-
Review the Summary pane on the right-hand side of the page, ensuring all details are correct. Once you have confirmed the information is accurate, select the Deploy button to start the deployment process.
After clicking Deploy, monitor the deployment process and status through the PDS dashboard. Once the service is deployed, perform any additional setup steps such as configuring connections or setting up user access, as required by your service's configuration.
noteIf at any point before deploying you wish to abort the process, you can click the Cancel button to exit without saving any changes.
Provision load balancer
By default, this option is selected. PDS creates the loadbalancer for a deployed data service on a target Kubernetes cluster. The load balancer is internal (reachable within a Virtual Private Cloud) on AWS and Azure.
If you deselect this option, then PDS will not create any loadbalancer. Therefore, the deployed data service is reachable only within a target Kubernetes cluster unless you use a Container Network Interface (CNI) plugin supporting external connectivity.
The created service type is ClusterIP. For more information, refer to the ClusterIP and other allowed Kubernetes service types. Also, refer to the internal loadbalancer on EKS, AKS, OCP, and MetalLB for bare metal Kubernetes clusters.
Node restrictions
From the No. of nodes dropdown, you can select the number of nodes per target cluster you want your data service to deploy onto. PDS restricts the number of nodes for each data service that you can select:
Data service | Available number of nodes to select |
Cassandra | 1 to 10 |
Consul | 1 to 10 |
Couchbase | 1 to 10 |
Elasticsearch | 1 to 10 |
Kafka | 1 to 10 |
MongoDB Enterprise | 1 to 7 |
MS SQL Server | 1, 3, 5 |
MySQL | 1 to 10 |
Neo4j | 1 |
PostgreSQL | 1 to 10 |
RabbitMQ | 1 to 10 |
Redis | 1, 3, 4, 5, 6, 7, 8, 9, 10 Redis: 1 instanceRedis Sentinel: more than 1 instance (for high availability deployments) |
Redis Cluster | 6, 8, 10 |