Create Backups with Advanced Filters
Portworx Backup provides advanced filtering to include or exclude Namespaces in a backup operation, supporting more flexible Namespace selection. This feature allows you to narrow down or refine the number of Namespaces for a backup operation from a large list. It helps you tailor backup jobs more precisely by quickly selecting subsets of Namespaces using a combination of Namespace and resource labels.
Prerequisites
-
Advanced filtering requires Stork 25.2.1 or later. Make sure you run a Stork version that is both compatible with your Portworx Backup release and at this minimum. For the Stork versions supported by your Portworx Backup release, see the Compatibility Matrix; for the minimum Stork version required by advanced filtering, see the Feature Support Matrix. If you run an older Stork version, use the
key=valueorkey:valueformat to filter Namespaces by labels. -
Make sure that the required labels are applied to the Namespaces either through the web console or the CLI. For more information on labeling guidelines, see Kubernetes labels and selectors.
Two levels of selection
Label-based filtering operates at two distinct levels. Understand the difference before you build a selector:
- Namespace-level selection decides which Namespaces are part of the backup, based on labels applied to the Namespaces. Use this to narrow a large Namespace list down to the subset you want.
- Resource-level selection decides which resources within the selected Namespaces are part of the backup, based on labels applied to those resources. Use this when you want only a specific set of resources (for example, a particular application) rather than every resource in a Namespace.
A backup can use either level on its own or both together. When you apply both, Portworx Backup first selects the matching Namespaces and then, within those Namespaces, includes only the resources that match the resource-level selector.
Selector operators
Advanced filters use the standard Kubernetes label selector operators. The same four operators apply to both Namespace-level and resource-level selection:
| Operator | UI option | Meaning | Example |
|---|---|---|---|
in / = | Include | Matches objects that have the label with one of the listed values | app = nginx, region in (us-east-01) |
notin / != | Exclude | Matches objects that do not have the label with the listed values | tier notin (front-end) |
Exists | Include | Matches objects that have the label key, regardless of value | app |
DoesNotExist | Exclude | Matches objects that do not have the label key | !deprecated |
For full operator semantics, see Kubernetes labels and selectors.
How Include and Exclude combine
When you specify more than one requirement, Portworx Backup combines them with a logical AND: an object is selected only if it satisfies every requirement. There is no separate precedence rule between Include and Exclude — an Exclude requirement simply removes any object that matches it, even if that object also matches an Include requirement. In other words, an explicit exclusion always wins over an inclusion for the same object.
Excluding a Namespace with a notin / DoesNotExist selector excludes the Namespace and all resources within it; the resources in an excluded Namespace are never backed up. Resource-level exclusion (excluding specific resources while keeping the Namespace) applies only to resource labels, not Namespace labels.
This label-based filtering provides fine-grained control over what gets backed up, making backup configuration more aligned with your organization’s tagging strategy. Whether through scheduled automation or manual action, you can include or exclude Namespaces with precision.
When you attach a label selector to a scheduled backup, the selector is re-evaluated on every run. Any Namespace (or resource) that newly matches the selector after the schedule was created is automatically included in subsequent backup runs, and any object that no longer matches is dropped. This auto-inclusion of future matching objects is the key operational difference between scheduled and one-time manual label-based backups.
Back up namespaces by labels
The following procedure illustrates a common goal: creating a backup that contains only the Namespaces labeled app=nginx. At the end of the procedure you have a single backup whose contents are determined entirely by the label selector you apply, rather than by a fixed list of Namespaces. Adapt the selector in step 4 to match your own labeling strategy.
To back up a Namespace with specific labels:
-
From the home page, click the Clusters icon in the left navigation pane.
-
On the Clusters page, select the cluster that contains the Namespace or Namespaces you want to back up.
-
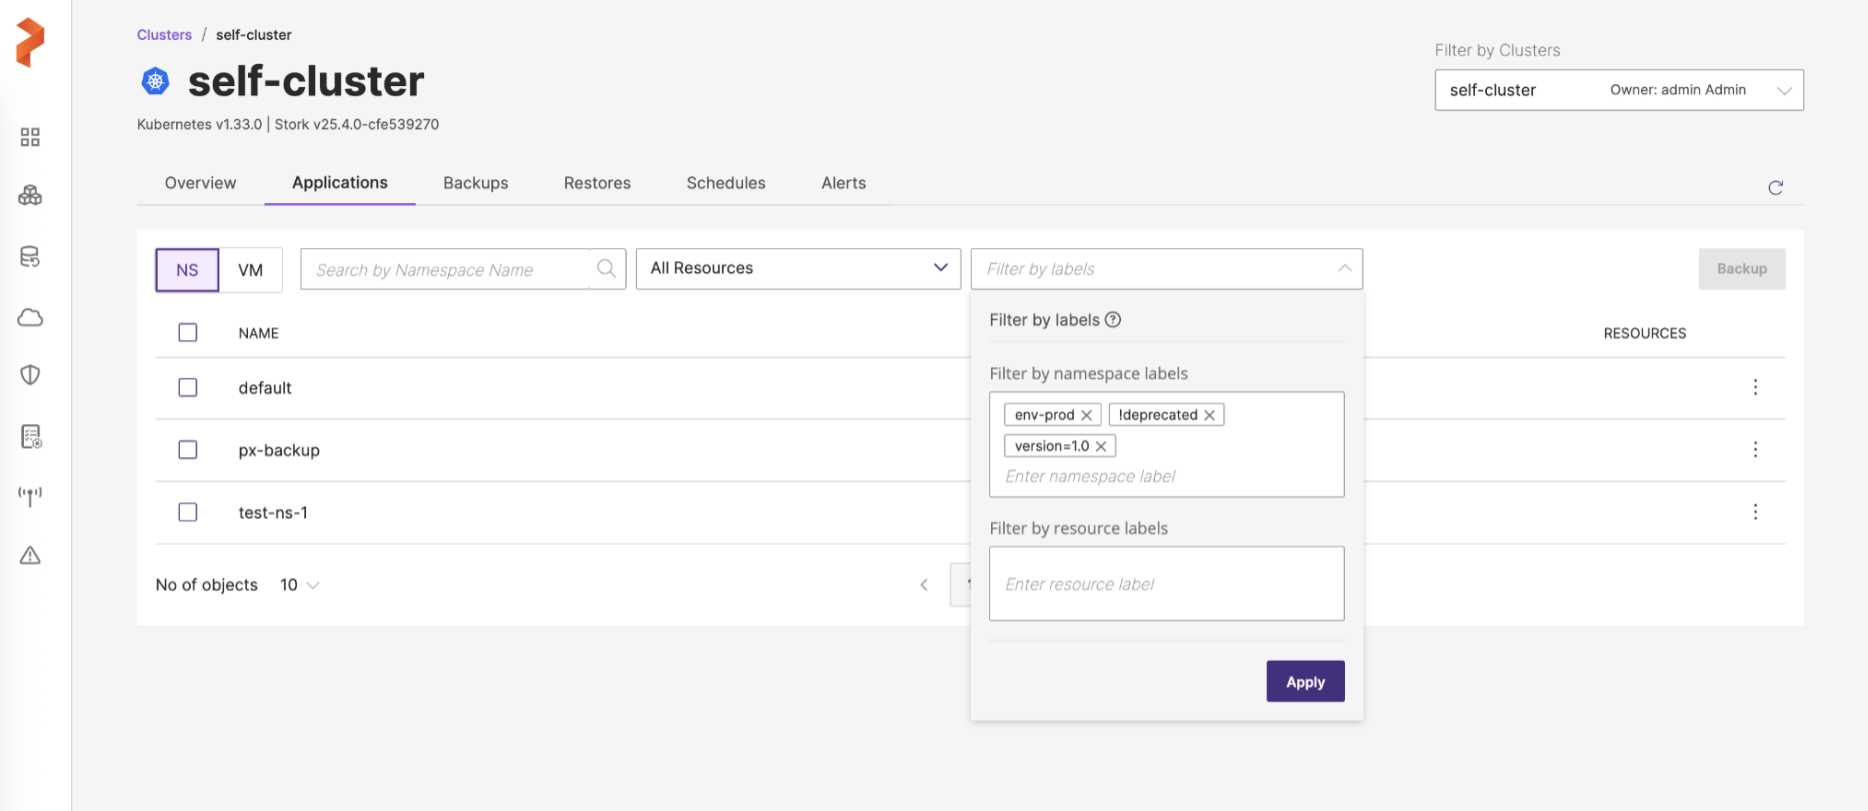
Navigate to the Backups tab and use the NS tab to back up Namespaces.
-
Select the required Namespaces to back up.
- If the Namespace list is long, you can search for the required Namespaces using the search option.
- You can select the required resources from the All resources drop-down.
- You can filter the required Namespaces and Namespace resources by labels.
-
After selecting the required Namespaces and their resources to back up, click Backup.
-
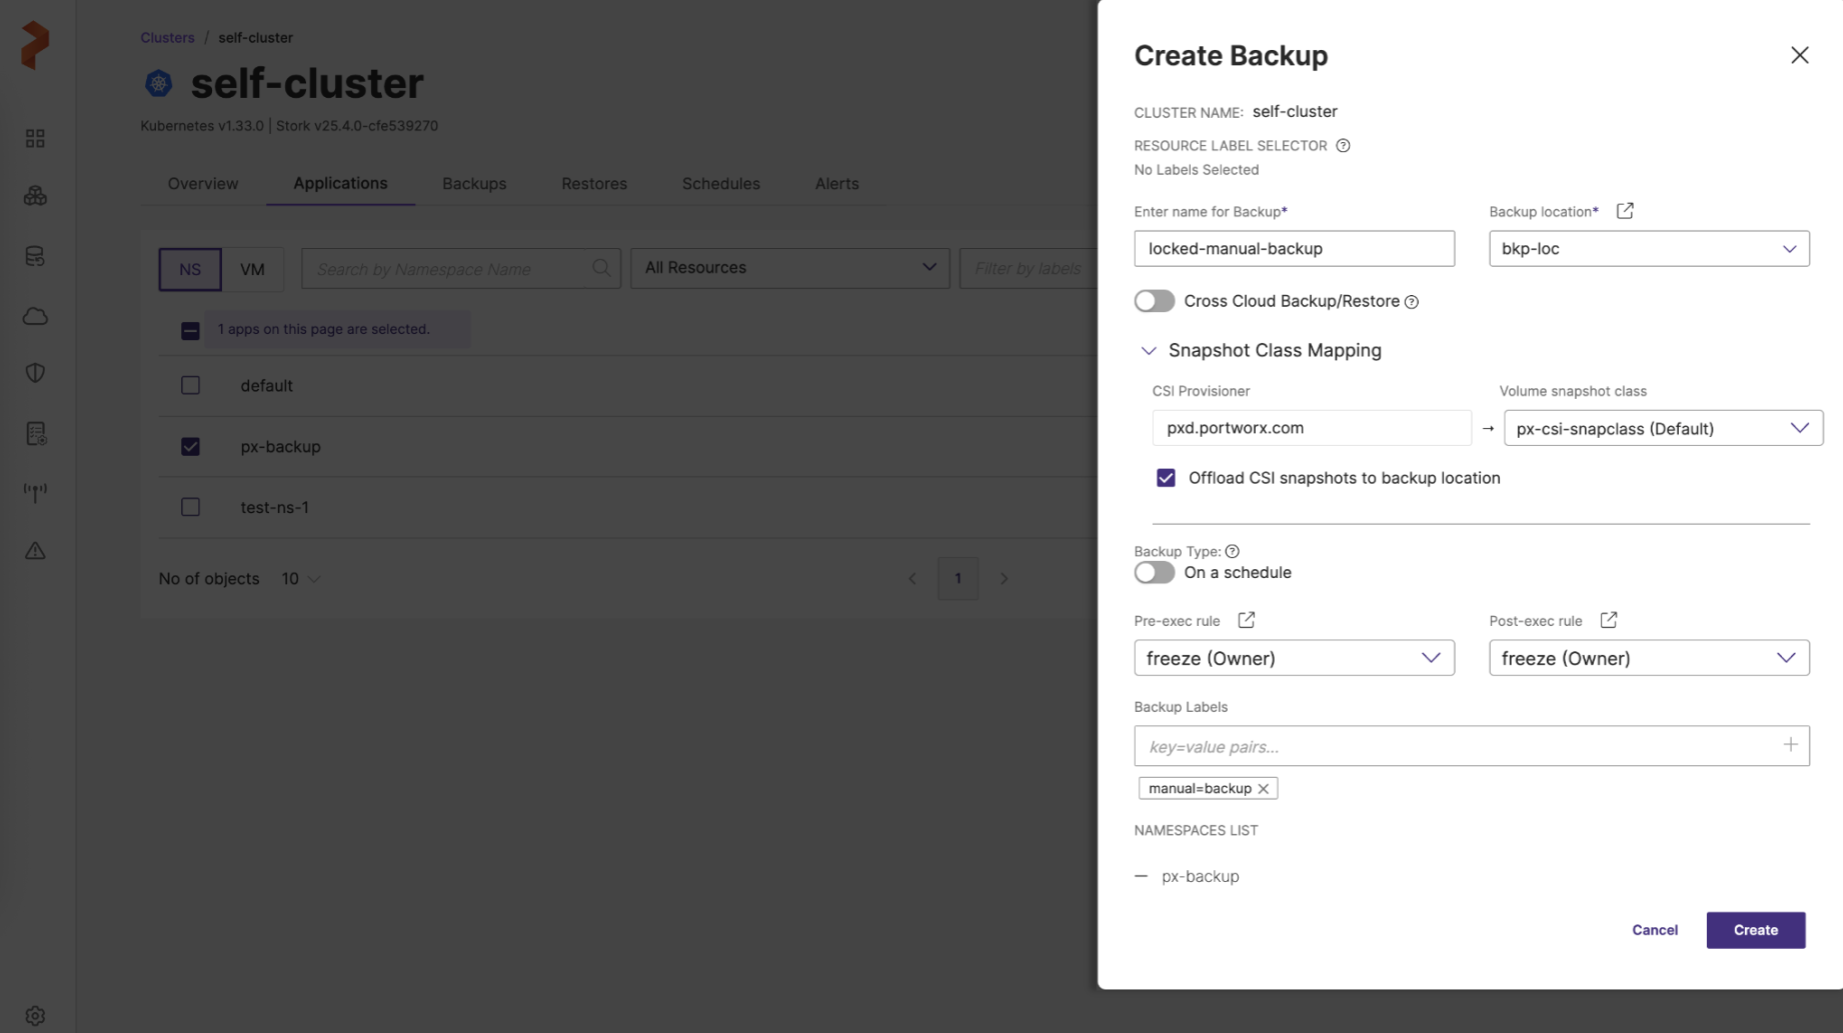
In the Create Backup window, specify the following fields. See Create a backup for more information on these fields.
-
Enter name for Backup: provide a relevant name for your backup
-
Backup location: search for and select the backup location you previously added. Enter a keyword to filter the list by name.
-
Cross Cloud Backup/Restore: you can enable or disable this option
-
Snapshot Class Mapping: facilitates mapping of your storage provisioner with volume snapshot class
-
CSI Provisioner: lists the CSI provisioners associated with the PVCs present in the Namespaces selected for the backup
-
Volume snapshot class: lists all the volume snapshot class (vsc) resources along with the default vsc
-
Offload CSI snapshots to backup location: offloads the CSI snapshot to the specified backup location. Enable this when you need an off-cluster copy that survives loss of the local snapshot or the cluster itself (required for cross-cluster and cross-cloud restore). Leaving it disabled keeps only a local snapshot, which is faster and avoids the data-transfer cost of uploading to the backup location, but it does not protect against cluster-level failures. This option has no effect on Portworx volumes, which always use the built-in Portworx cloudsnap mechanism.
-
-
Backup type: allows you to choose the type of backup required (manual or scheduled backup)
- On a schedule: disable this option to create a one-time manual backup
-
Pre-exec rule: select a rule from the drop-down to execute before the backup is created
-
Post-exec rule: select a post rule you want to execute after the backup is created
-
Backup Labels: any labels that you want to add to the backup you are going to create
-
NAMESPACES LIST: lists all the Namespaces selected for backup creation
-
-
Click Create.
Portworx Backup creates a backup of the Namespaces that match the filter options you selected at the time of backup creation.
-
Verify that the correct Namespaces were captured:
- On the Backups tab, open the backup you just created.
- Confirm that the NAMESPACES LIST (or the backup details) shows exactly the Namespaces you intended to include and none that you intended to exclude.
- Wait for the backup status to reach Success before relying on it for restore.
noteIf the label selector matches no Namespaces at backup creation time, Portworx Backup does not create a usable backup from an empty selection. Confirm that your selector matches at least one Namespace (using the preview in the selection step) before you click Create.
You can modify these Namespace labels only when your backup type is a scheduled backup. For more information, see Manage Labels.