Backup Schedules
The Backup schedules page provides a fleet-wide view of the backup schedules across all the clusters added to Portworx Backup. Instead of opening each cluster's Schedules tab, you can monitor, audit, and manage schedules for all clusters from a single page. This is useful for routine audits such as finding all suspended schedules in the fleet, or reviewing all schedules that use a specific backup location or schedule policy.
The page displays only the schedules that you have permission to view.
Navigation
Home page → Left navigation pane → Backups → Backup schedules
From Portworx Backup 3.2.0, the left navigation pane groups All Backups and Backup schedules under Backups.
Page components
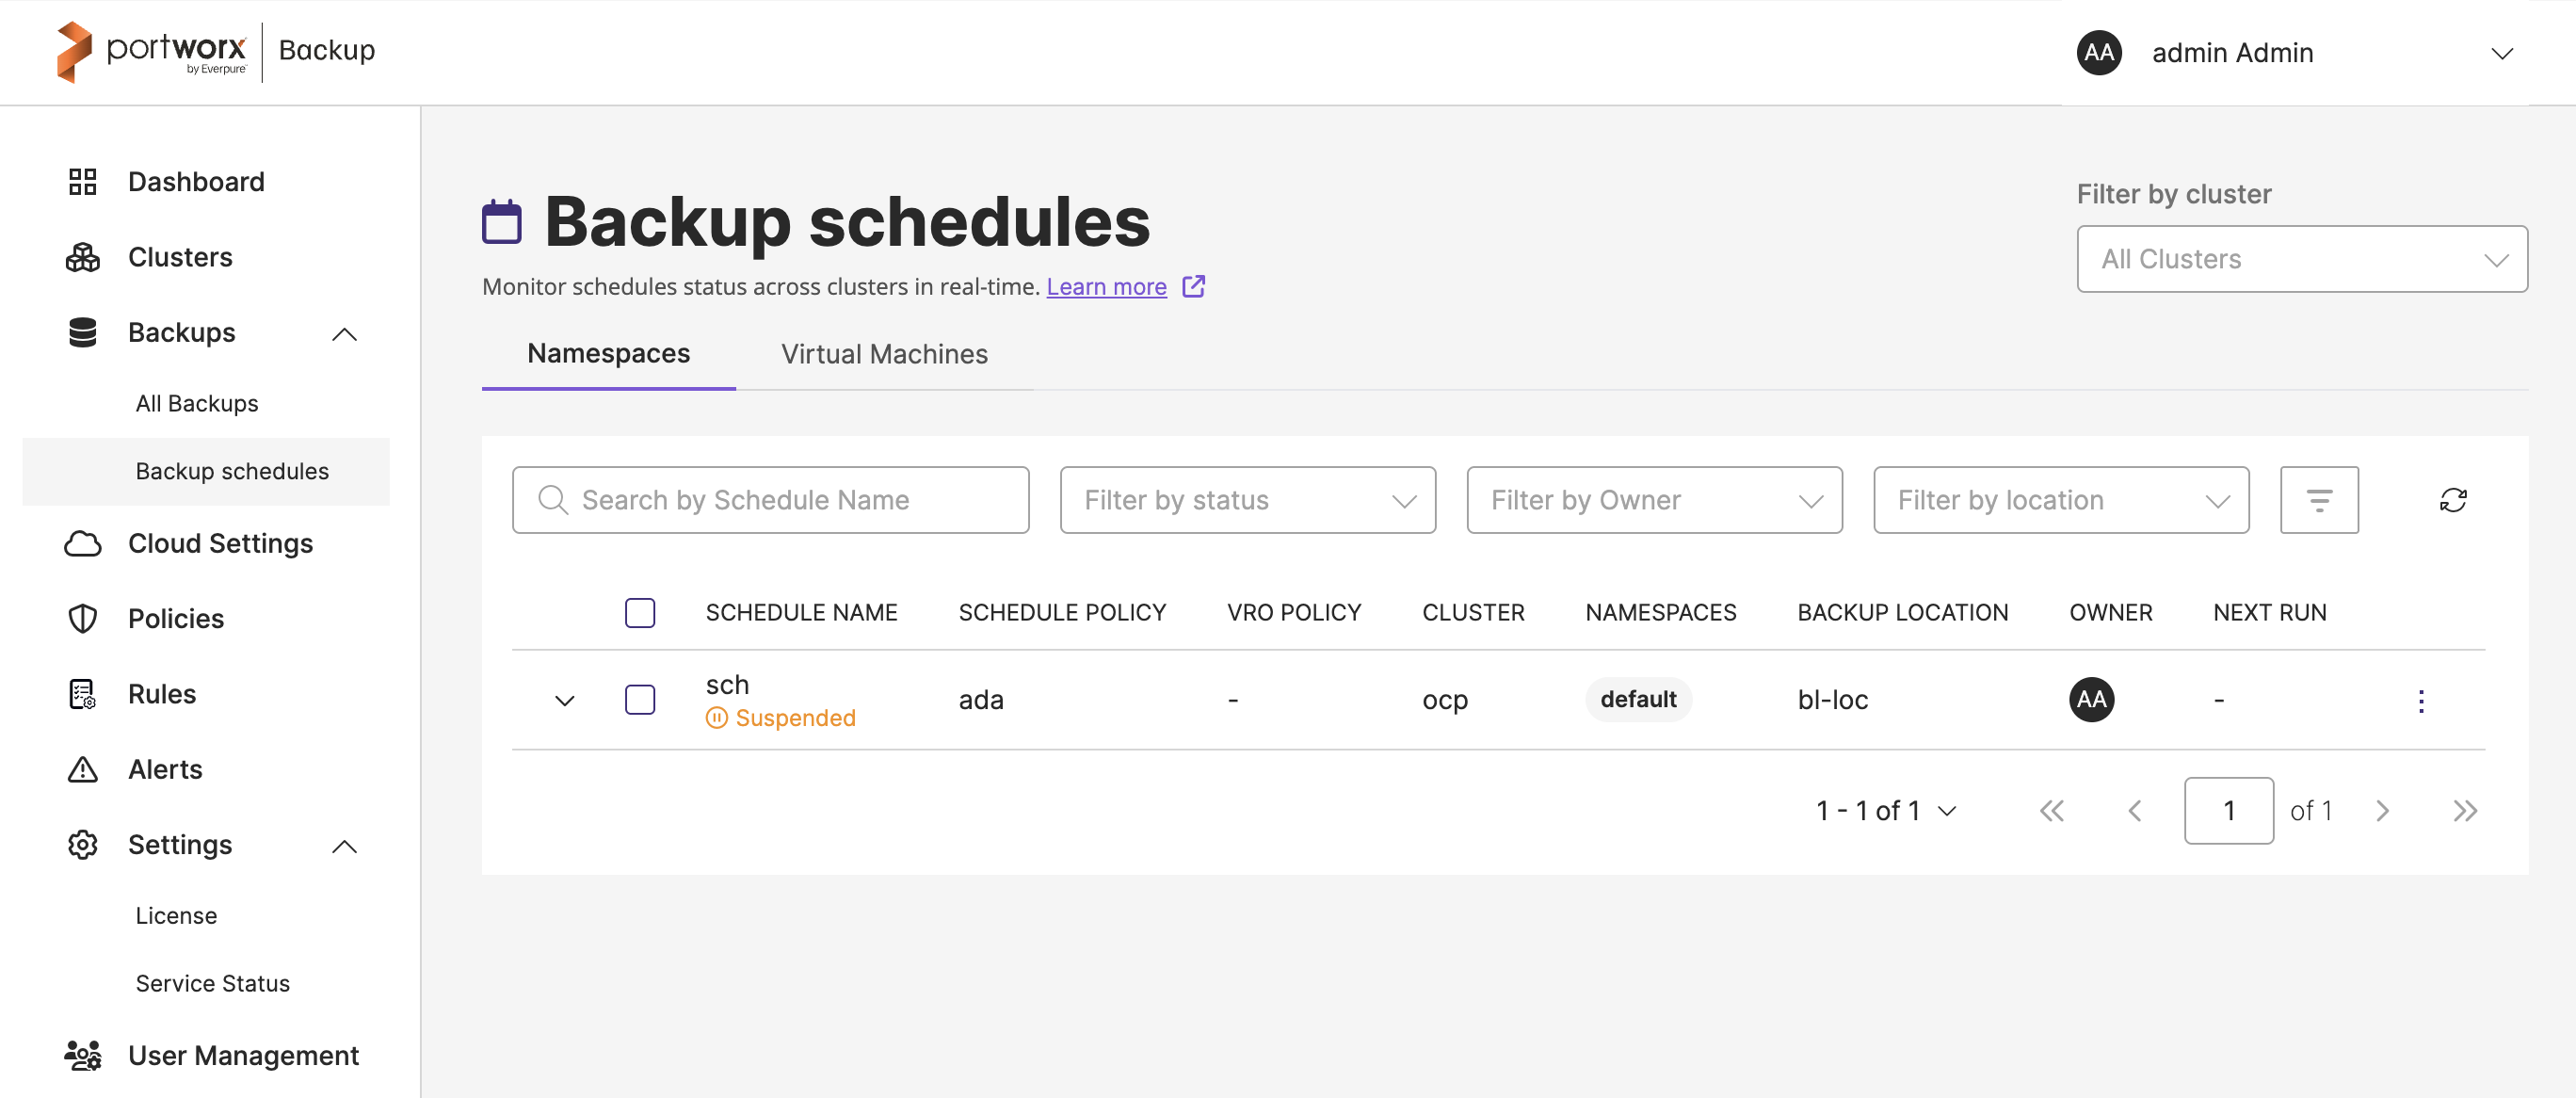
This page consists of the following components:
-
Filter by cluster: a drop-down at the top right of the page that limits the schedules list to a single cluster. By default, the page displays schedules from All Clusters. You can search the drop-down by cluster name, and clear the selection to view schedules from all clusters again.
-
Namespaces and Virtual Machines tabs:
-
Namespaces: lists the schedules associated with namespace backups.
-
Virtual Machines: lists the schedules associated with VM backups.
The page opens on the tab type (namespace or VM) that you last selected in Portworx Backup, and switching tabs here updates that preference for other pages. Switching tabs clears any schedules you have selected.
-
-
Search and filters:
-
Search by Schedule Name: displays only the schedules whose name matches the text you enter.
-
Filter by status: displays schedules with the selected status, either Running or Suspended.
-
Filter by Owner: displays schedules created by the selected users. This filter is available only to super administrators.
-
Filter by location: displays schedules that use the selected backup location.
-
Policy filter icon: opens a panel with Filter by schedule policies and Filter by VRO policies (volume resource only policies). Select the policies of your interest and click Apply to display only the schedules associated with those policies.
-
Refresh icon: reloads the schedules list with the current filters applied.
You can combine the cluster filter, search, and all the other filters to narrow down the list. Each filter can be cleared individually.
-
-
Schedules table:
-
Expand arrow: expands the row to display more details about the schedule. For more information, see Schedule details.
-
Selection checkbox: selects schedules for bulk operations. For more information, see Bulk operations.
-
Schedule name: name of the schedule, with its current status (for example, Running or Suspended) shown below the name.
-
Schedule policy: schedule policy associated with the schedule.
-
VRO policy: VRO policy associated with the schedule, if any.
-
Cluster: cluster on which the schedule runs. Hover over the cluster name to view the cluster UID, which helps you tell apart clusters with similar or identical names.
-
Namespaces (on the Namespaces tab) or Virtual machines (on the Virtual Machines tab): namespaces or VMs that the schedule backs up.
-
If the schedule backs up more than one item, click the count next to the first item to open the full list. You can search and page through the list.
-
Dynamic: indicates that the schedule selects namespaces (or VMs) by labels. Click Dynamic to view the labels.
-
All: indicates that the schedule backs up all namespaces.
-
-
Backup location: backup location where the schedule stores its backups.
-
Owner: user who created the schedule. Hover over the owner icon to view the user name and email.
-
Next Run: time remaining until the next scheduled backup. Hover over it to view the exact date and time. This column is empty for suspended schedules.
-
Object lock icon: appears when the schedule uses an object lock enabled schedule policy.
-
Remark icon: appears when a note has been added to the schedule. Click the icon to view the latest remark.
-
Vertical ellipsis: provides the following actions for the schedule:
-
View Json: displays the detailed metadata of the schedule.
-
Show Details: shows details such as the namespaces, volumes, and resources backed up by the schedule.
-
Suspend or Resume: pauses an active schedule or resumes a suspended schedule. You can add a note to inform other users about the reason.
-
Edit: opens the schedule for editing. For more information on the fields you can edit, see Schedules.
-
Remove: deletes the schedule. Existing backups created by this schedule are retained.
-
-
-
Pagination control: navigational controls to move through pages of the schedules list and to change the number of schedules displayed per page.
If no schedules match the applied filters, the page displays No schedules found. If the schedules list fails to load, the page displays an error message with a Retry option. Your filters are retained in both cases.
You cannot create a backup schedule from the Backup schedules page. To create a schedule, go to the required cluster. For more information, see Create scheduled backups.
Schedule details
When you expand a schedule row, the page displays the following details:
- Status: current status of the schedule.
- Remark: latest note added to the schedule.
- Create time: date and time when the schedule was created.
- Last ran: date and time when the schedule last ran.
- Pre rule and Post rule: pre-exec and post-exec rules associated with the schedule.
- Snapshot class mapping: volume snapshot classes mapped to the schedule. Click +N more to view all mappings.
- Depending on how the schedule selects resources, one of the following:
- No of Resources: number of resources selected for backup. Click the number to view the list of resources.
- Resource labels: labels used to select resources.
- Resource types: resource types selected for backup.
The expanded row also includes icons to Delete, Suspend or Resume, View Json, and Edit the schedule.
Bulk operations
You can suspend, resume, or delete multiple schedules, including schedules that belong to different clusters, in a single operation:
-
Optionally, apply the cluster filter, search, or other filters to narrow down the list.
-
Select the checkboxes of the schedules you want to manage, or select the checkbox in the table header to select all schedules on the current page. To select all the schedules that match the current filters across all pages, click Select all.
-
Click one of the following:
- Resume all: resumes the selected schedules.
- Suspend all: suspends the selected schedules.
- Delete: deletes the selected schedules.
To clear your selection, click Clear.
When you use Select all, the operation applies only to the schedules that match the filters currently applied on the page. For example, if you filter by Status = Suspended and then select all and click Resume all, Portworx Backup resumes only the suspended schedules that match your filters. If a cluster filter is applied, the operation applies only to schedules on that cluster.
Schedules that are in a transitional state cannot be selected. For more information on bulk schedule operations, see Manage Backup Schedules.
Share and bookmark filtered views
The Backup schedules page saves the selected tab, cluster filter, search text, other filters, page number, and page size in the page URL. As a result:
- When you open a cluster or another page and then click the browser Back button, the page returns with the same filters and page.
- When you refresh the page, your filters are retained.
- You can bookmark the URL or share it with other users. When another user opens the link, Portworx Backup displays the same filtered view, limited to the schedules that the user has permission to view.
If the URL contains a value that is no longer valid, such as a deleted cluster or policy, Portworx Backup ignores that value and applies the remaining filters.
Filters applied on a cluster's Schedules tab are not saved in the URL.