Backup using namespace labels
Namespace labels
Namespace labels are key-value pairs attached to namespaces to organize and identify them for various purposes like filtering, categorizing, or applying policies. The following shows the structure of key-value pairs for namespace labels:
metadata:
  name: <namespace-name>
  labels:
    <key1>: <value1>
    <key2>: <value2>
    ...
In Kubernetes labels, the key in a key-value pair follows specific conventions. The following guidelines describe how to define keys:
Key structure
Format: Keys can have up to two segments separated by a /, with the first segment being optional.
Example: prefix/name
Prefix:
Optional, but if used:
- Must start with an alphanumeric character
- Must be a DNS sub-domain (for example:
example.com/) - Must be 253 characters or less. If included, it can end with a
/
Name:
Required
- Must be 63 characters or less
- Must consist of lowercase alphanumeric characters, hyphens (
-), and periods (.) - Must start and end with an alphanumeric character.
Examples of valid keys:
- environment (without prefix)
- app.kubernetes.io/name
- example.com/owner
Examples of common keys:
Without prefix:
- environment: to specify the environment type (for example: production, staging)
- team: to indicate the responsible team (for example: backend, frontend)
With prefix:
- app.kubernetes.io/version: to specify the version of an app (for example: v1.0)
- cloud.example.com/region: to specify a region in multi-cloud setups (for example: us-west)
Using prefixes is helpful to avoid conflicts, especially in shared cluster environments.
For more information on labeling guidelines, refer to Kubernetes labels.
Prerequisites
You can apply labels to namespaces using the CLI, filter the labeled namespaces with the web console, and then back up all the labeled namespaces in a single click. The following prerequisites apply to namespace labels:
-
The Stork version on your application cluster must be 23.9.1 to use the namespace and resource label filters feature.
The Add Namespace label field is disabled if the required Stork version is not deployed on the cluster. The web console displays the minimum required Stork version.
Apply labels for namespaces
To apply labels for a namespace, from your CLI:
-
Run the following command:
kubectl label namespaces <name-of-namespace> <label_name_1> <label_name_2>………...<label_name_n>You can apply multiple unique labels (separated by a space) to a namespace in key-value format.
noteThe key-value pair label format takes equals sign (=) as a separator.
-
Run the following command to list the namespaces with the applied labels:
kubectl get namespaces --show-labelsnoteIf you apply the same labels to two different namespaces and list them with the applied labels, only the first one is listed.
-
To remove the labels from the namespace:
kubectl label namespaces <name-of-namespace> <key-of-the-label>-
Filter and back up labeled namespaces
To filter or view the namespaces with preset labels and then take a backup of the listed namespaces in the web console:
-
From the home page, go to the left navigation pane and click Clusters icon.
-
In the Clusters page, navigate to the required cluster.
-
Go to Applications tab and then click NS tab.
-
In the Search by backup label field, provide the required namespace label(s) that you applied through the CLI and then press Enter.
Portworx Backup lists and auto-selects all the namespaces with the preset labels. For more information on creating a backup with the listed namespaces, refer to Create a backup.
noteYou can search for a namespace with preset labels by providing either only the key or a key-value string in the Search by backup label field. If you have applied multiple labels to a namespace, you can provide all the applied labels in the Search by backup label field separated by commas (without spaces). The user interface displays the namespaces that match all the specified labels and auto-selects them for backup creation.
Example:
Consider an example where you create two namespaces,
ns1andns2, and apply the following labels to them:kubectl create ns ns1kubectl label namespaces ns1 a=bkubectl label namespaces ns1 c=dkubectl create ns ns2kubectl label namespaces ns2 c=dWhen you search with the string
a=b,c=din the Add Namespace label field in the Portworx Backup web console, the search applies anANDoperation to the provided labels and displays onlyns1, not bothns1andns2. -
Click Backup to back up all the namespaces with the preset label in a single-click.
Automate scheduled backups
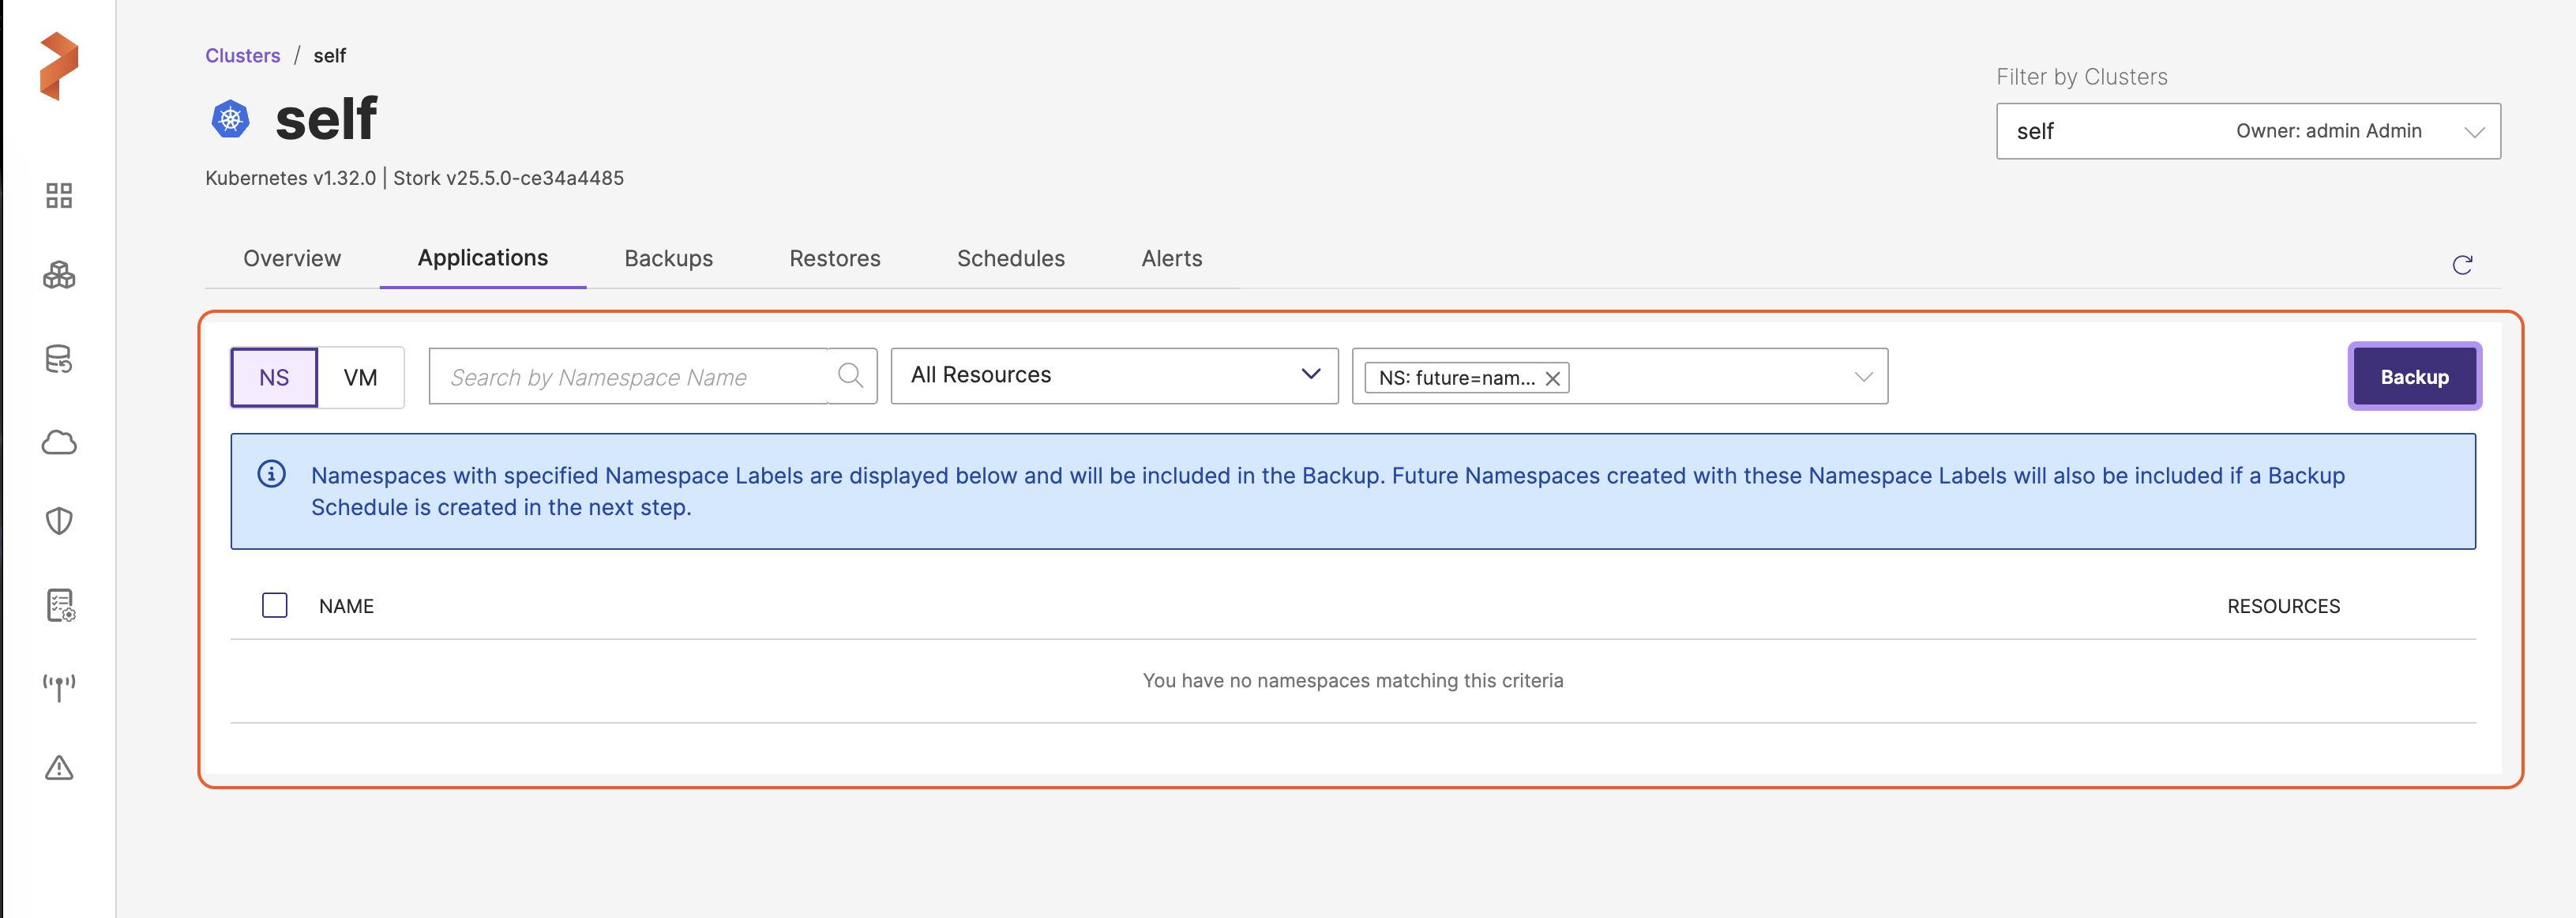
If a namespace has not yet been created, you can still create a backup schedule for the future namespace with a label. Portworx Backup picks up future namespaces with this label and automatically includes them as part of the schedule. In such a scenario, the manual backup option is disabled because no immediate backup is created.
If you have created a scheduled backup with one or a few namespaces that have preset labels and later add namespaces with the same label, the scheduler automatically includes these namespaces in the scheduled backup.
To create a backup schedule when a namespace has not yet been created:
-
Type the required label in the Add Namespace label field.
-
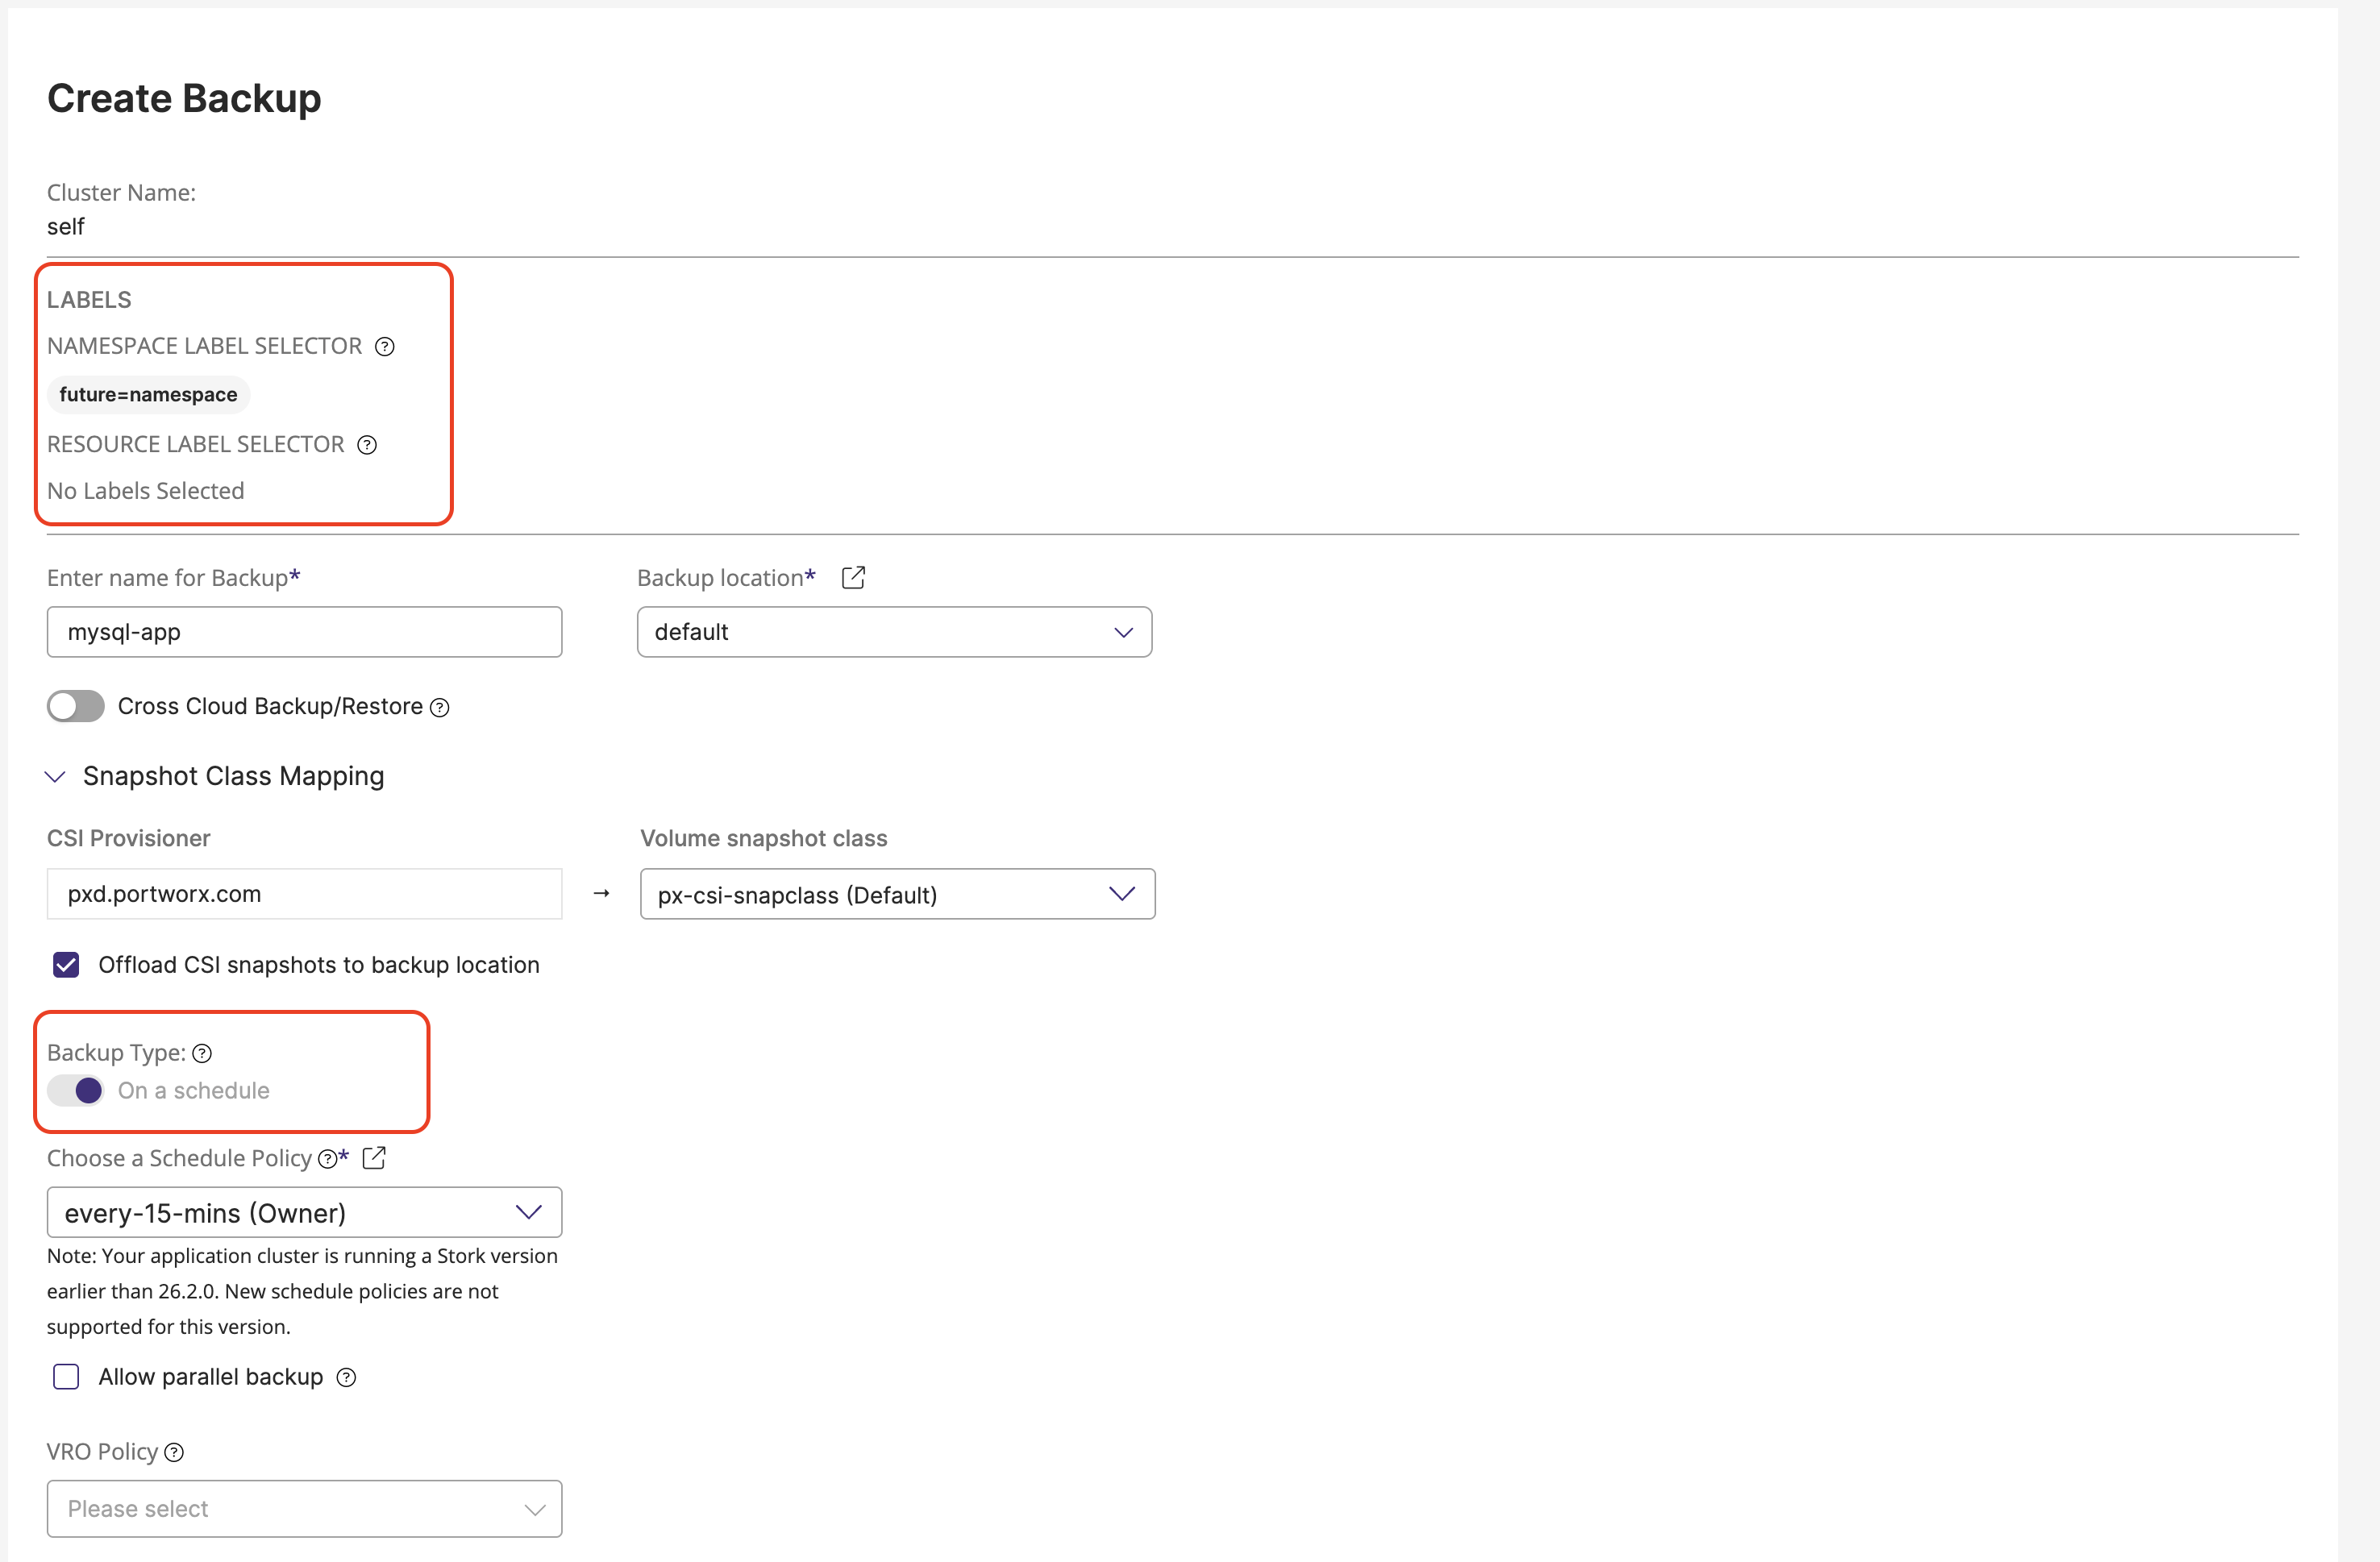
Click Backup. In the Create Backup window, enter the values for the required fields. Note that the manual backup option Now is disabled.
-
Click Create. For more information on how to create a backup, refer to Create a backup.
Portworx Backup creates a scheduled backup successfully without any namespace in it. You can modify the namespace labels you added during backup creation. For more information, refer to Manage labels.
-
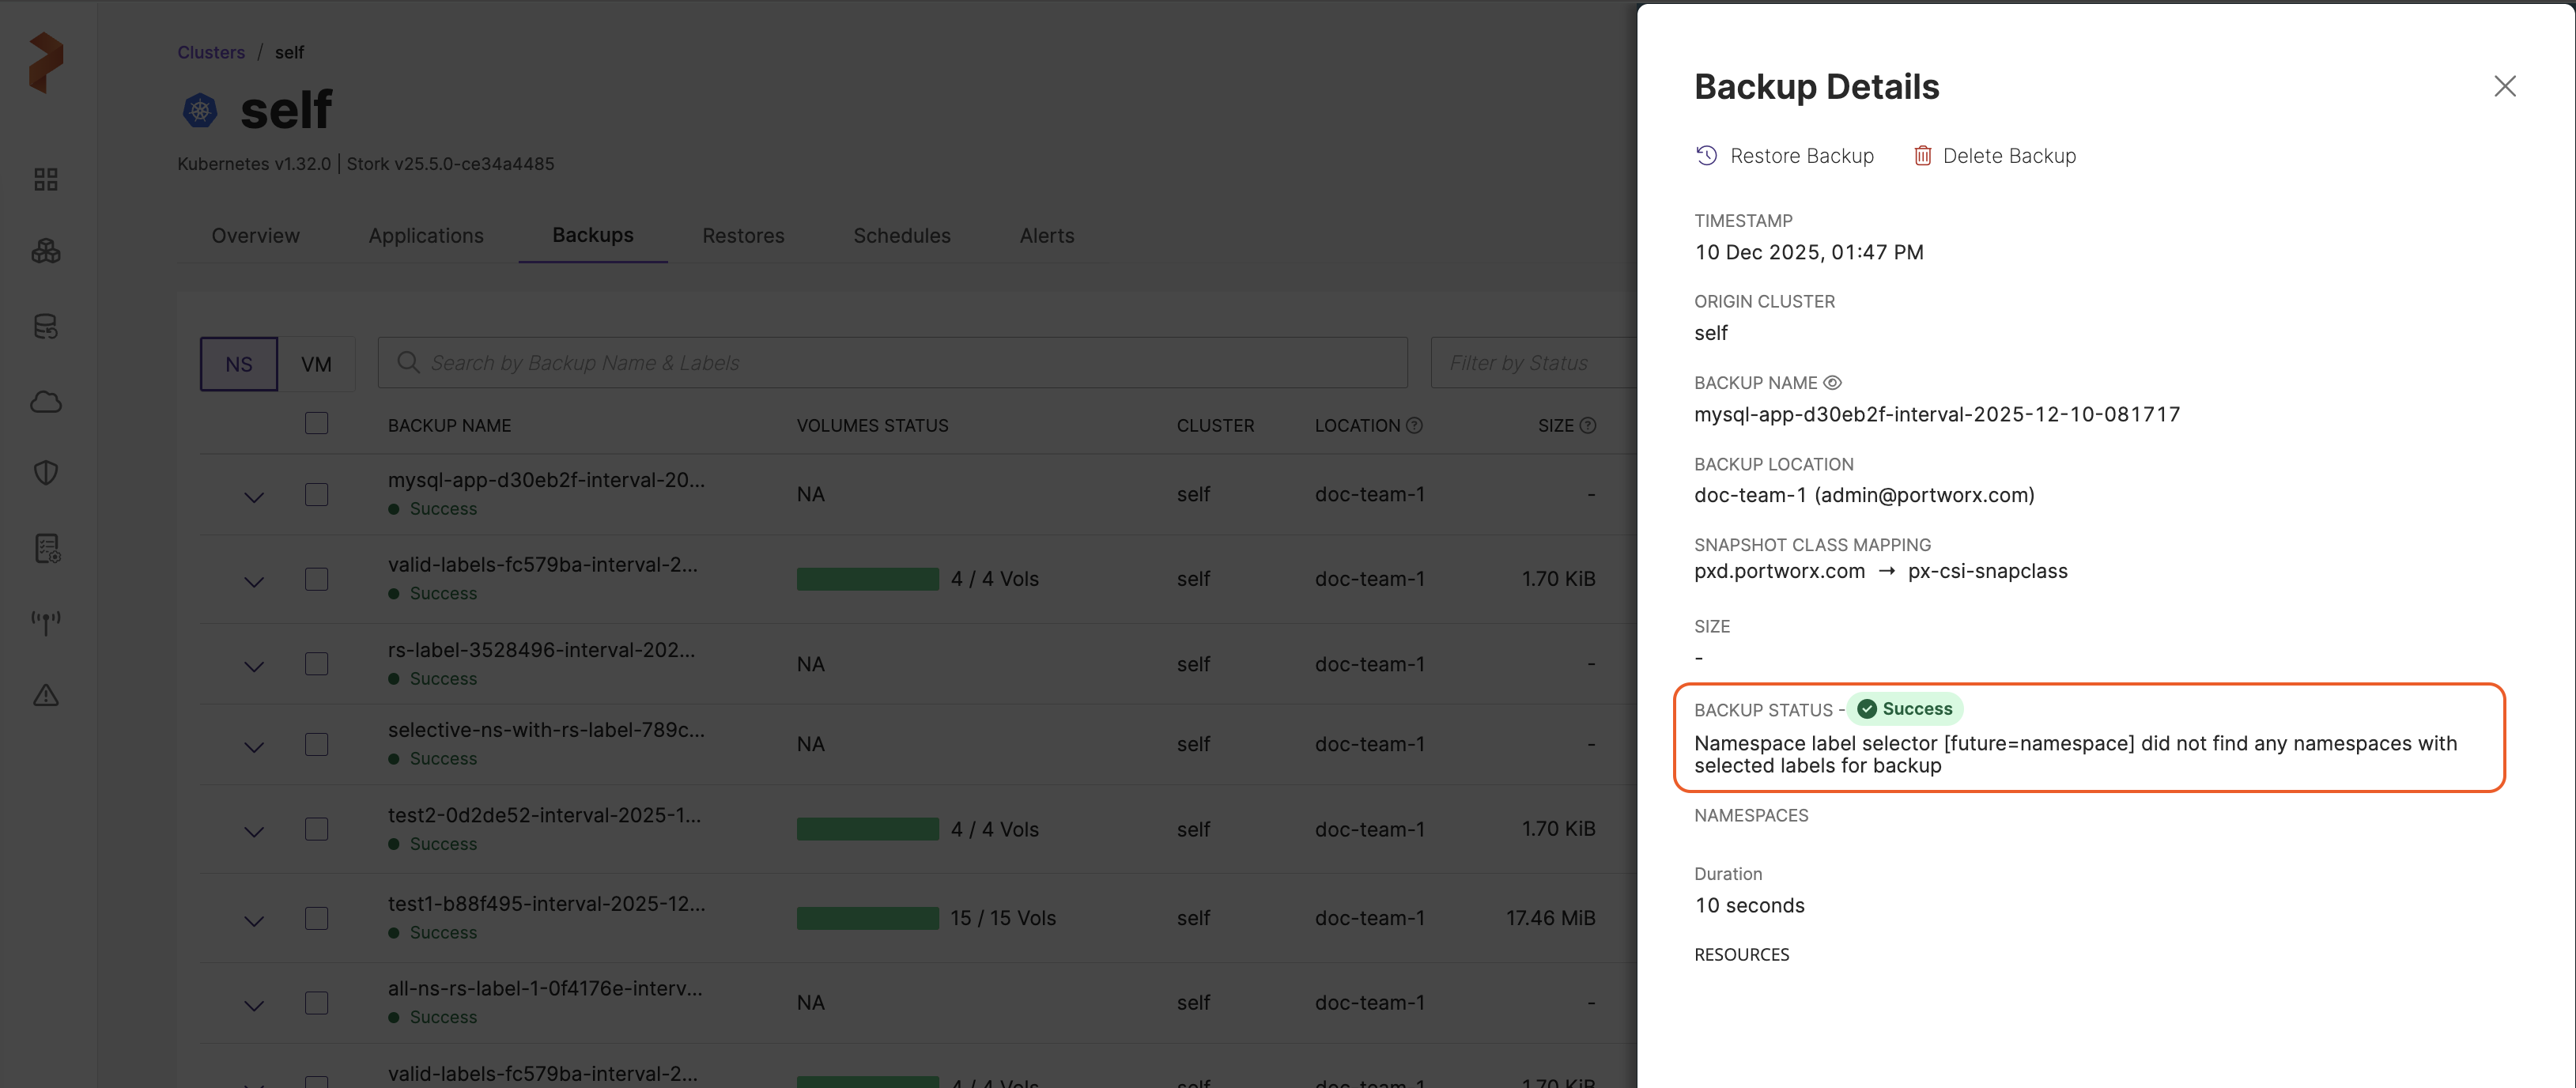
After the backup is created, navigate to the Backups tab of the application cluster, click the vertical ellipsis of the newly created scheduled backup, and choose Show details to view the backup details:
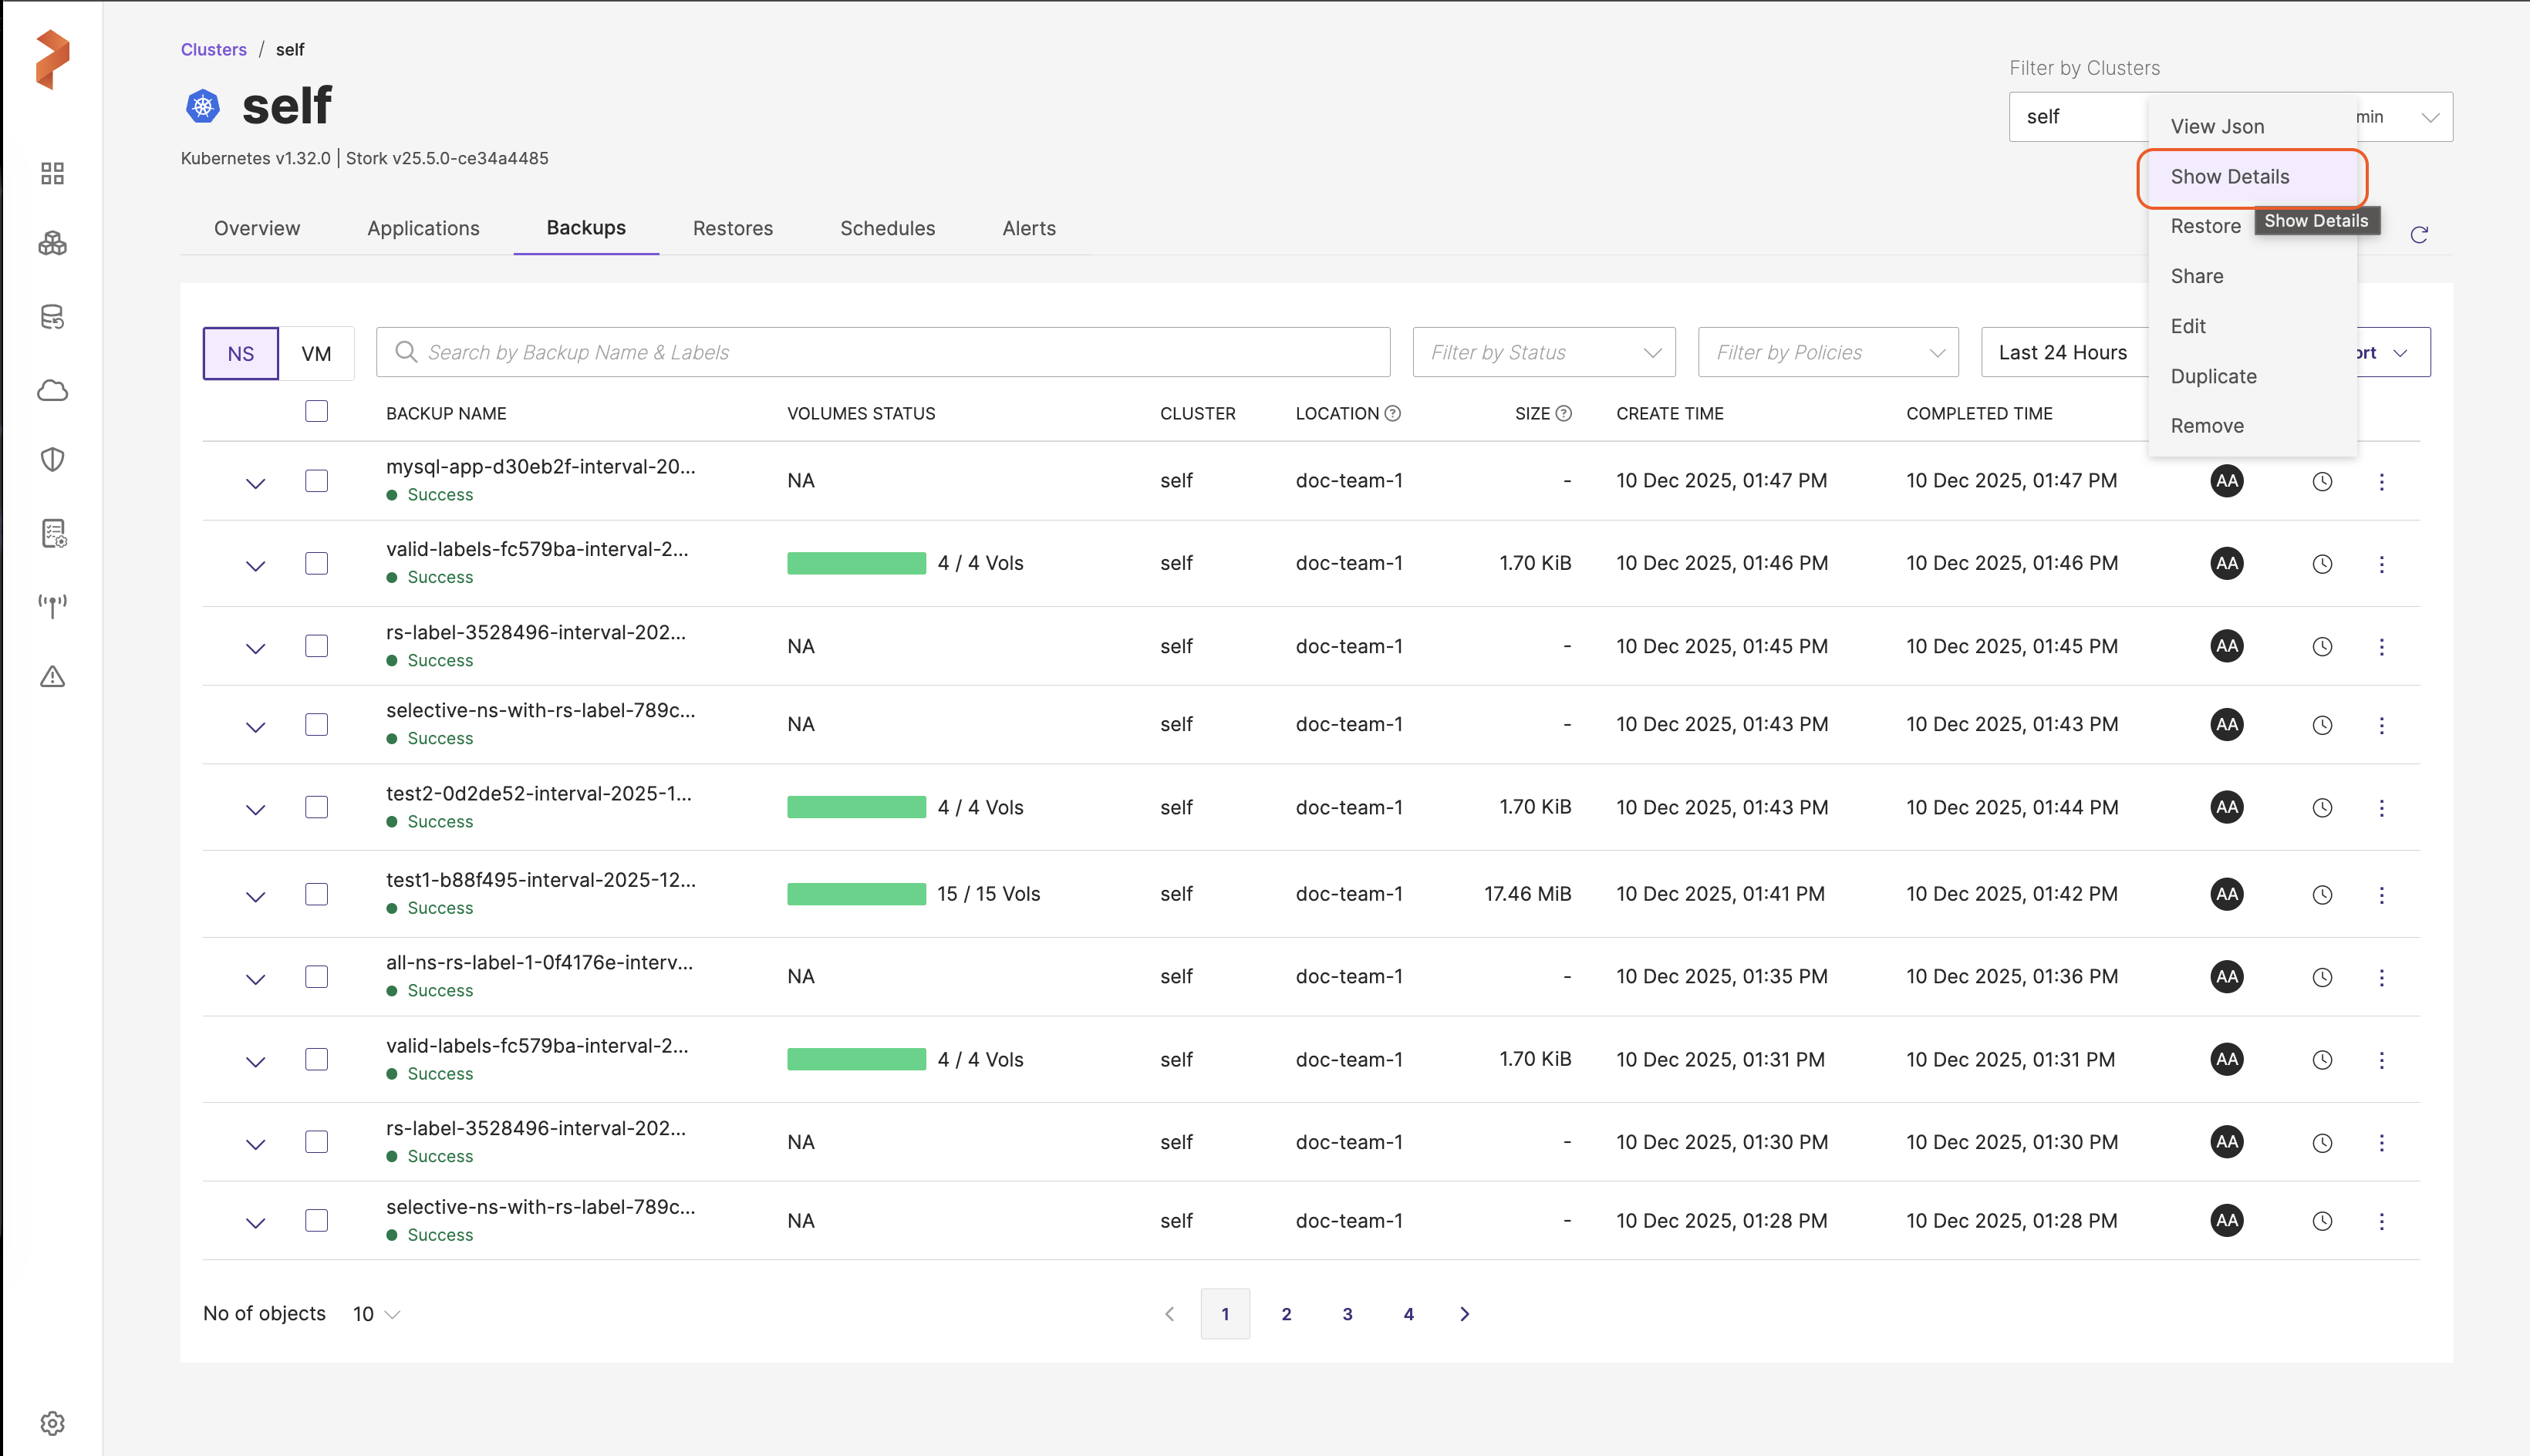
You can view the backup details in the following format: