Add Generic On-premises NFS Backup Location
Portworx Backup now allows you to add your Network File System (NFS) shares on your on-premises storage environment as a backup target. This feature enables you to leverage your existing NFS storage infrastructure to back up and restore your application data. Portworx Backup supports NFS backup location based on NFSv4.
NFS server prerequisites
-
Ensure that read and write permissions are enabled for the required NFS shares for Portworx Backup to reach those shares.
-
Make sure that standard port 2049 is open for Portworx Backup to communicate with the NFS server.
-
Make sure that NFS packages are installed in all the worker nodes of all of your Kubernetes clusters
Sample NFS server configuration
On NFS share for granting access to non-root user:
-
Create a non-root user in the NFS server if the user does not exist.
-
Update
/etc/exportsconfiguration file on the NFS server:<export path> <allowed_host(s)>(<comma separated mount options>)note<allowed host(s)>are the IP addresses or FQDN of worker nodes of the Portworx Backup cluster (where Portworx Backup is installed) and the application cluster.Example:
/mnt/nfsshare xx.xx.xx.xx(all_squash,anonuid=1001,anongid=1001,rw,sync)Where
1001is the user ID of the non-root user created in step 1. -
Provide the ownership to the non-root user:
chown -R <UID>:<GID> <NFS share/mount_path>Example:
chown -R 1001:1001 /mnt/nfsshare -
Export directories to NFS clients and restart the NFS server:
sudo systemctl restart <daemon_name>
sudo exportfs -a
After you add an NFS share based backup location in Portworx Backup, you can update and validate the NFS backup location. Topics in this section guide you to perform these tasks.
Add NFS backup location
To add an NFS share as backup location:
-
Login and access Portworx Backup home page.
-
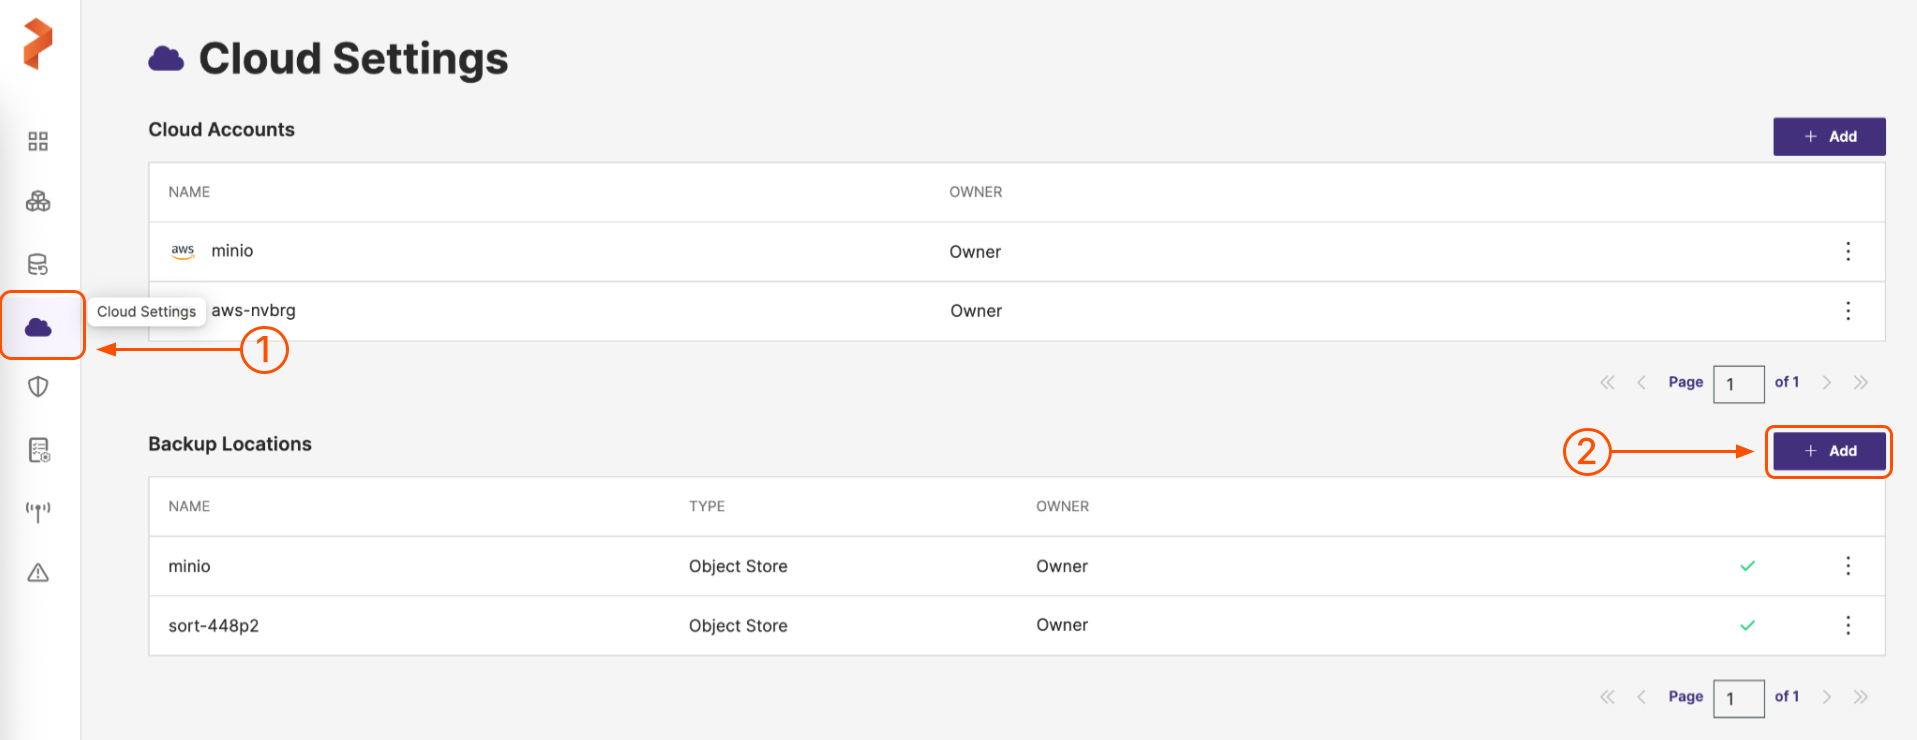
Select Cloud Settings from the left navigation pane. Under Backup Locations, choose the + Add button:

-
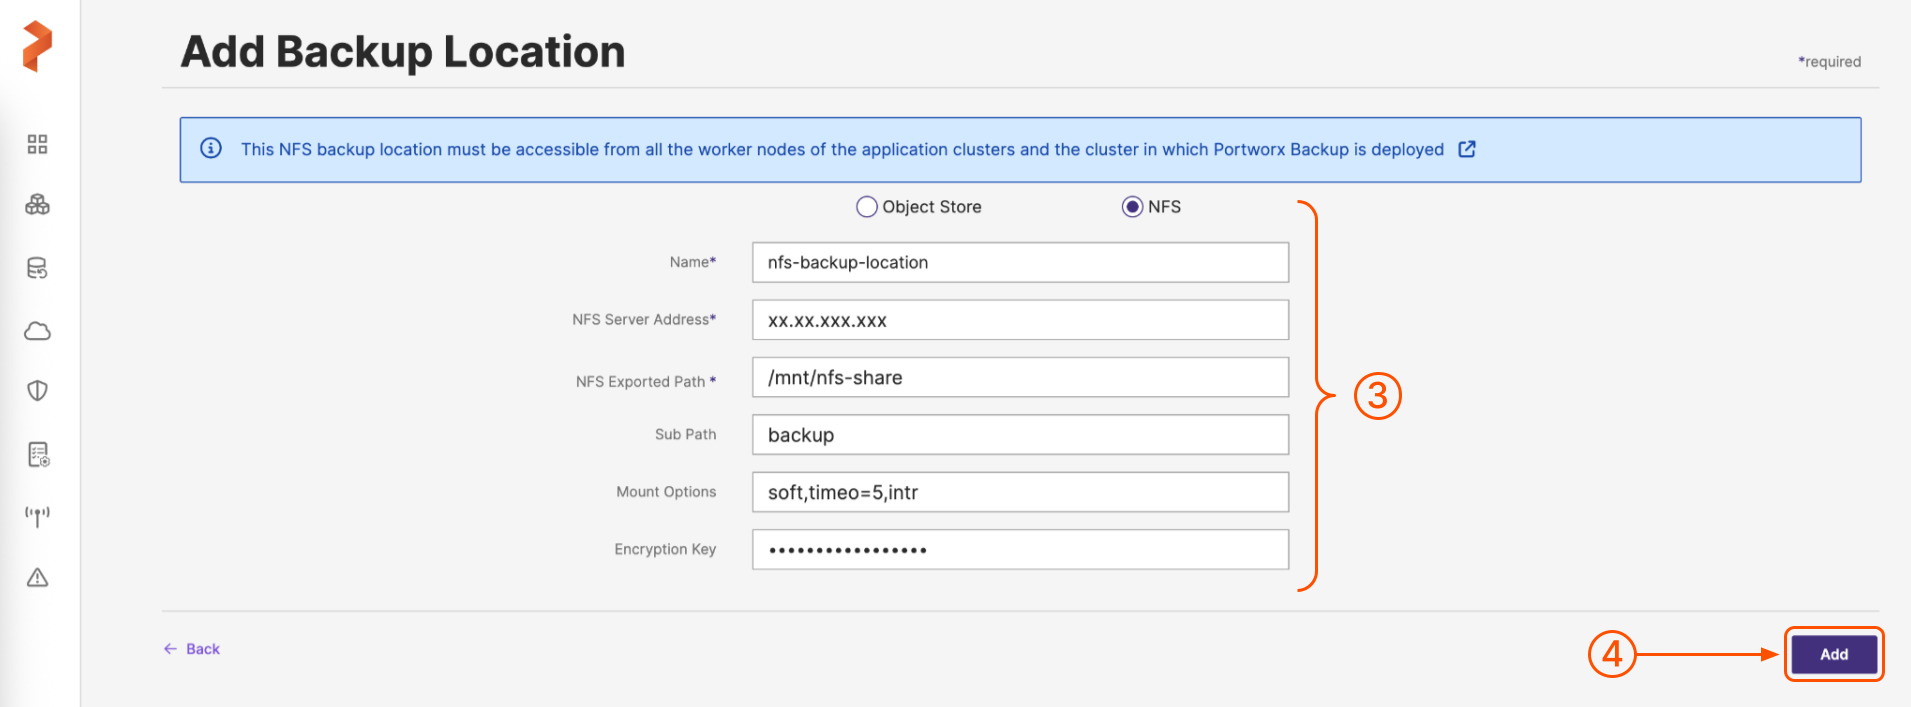
On the Add Backup Location page choose NFS option and specify the following values.
-
Name: Name of the backup location that resides on NFS share
-
NFS Server Address: IP address or FQDN address of the NFS server
notePortworx Backup recommends FQDN address over IP address.
-
NFS Exported Path: system’s absolute path exported by NFS server, path where the backups are going to be stored
-
(Optional) Sub Path: an optional field if the user wants to specify a subfolder location within the export path
-
(Optional) Mount Options: preferred option(s) for NFS mount, multiple mount options must be separated by a comma
Example:
soft,timeo=5,intrnoteIf you need to add NFSv4.1 server as backup location in Portworx Backup, make sure you specify
nfsvers=4.1in Mount Options field during addition of NFS backup location. -
(Optional) Encryption Key: key to encrypt the backups.
Portworx Backup validates and adds the new backup location based on NFS share. For more information on validating NFS backup location, refer Validate NFS backup location.
After successful validation, web console displays the newly created NFS backup location under homepage > Clusters (left navigation pane) > Settings > Cloud Settings > Backup Locations.

-
-
When you're done, select the Add button.
Update NFS backup location
After adding an NFS backup location, some parameters can be changed later. To update or manage the NFS backup location:
-
Login and access Portworx Backup home page.
-
Select Cloud Settings from the left navigation pane. Under the Backup Locations section, click vertical ellipsis.
The vertical ellipsis provides the below options:
-
View Json: allows you to view the metadata of the NFS backup location
-
Remove: deletes the NFS backup location
-
Edit: allows to edit the NFS server IP address and mount options
notePortworx Backup recommends to edit the NFS server address or FQDN only when the physical servers are the same with different IP addresses.
-
Validate: validates the NFS share based backup location to ensure that Portworx Backup can communicate with the NFS share. For more information on validating NFS backup location, refer Validate NFS backup location.
-
User Access: allows NFS backup location accessible to everyone or to specific users.
-
Validate NFS backup location
To validate NFS backup location:
-
Login and access Portworx Backup home page.
-
Select Cloud Settings from the left navigation pane. Under Backup Locations section, choose the NFS backup location that needs to be validated.
-
Click Vertical ellipsis and select Validate.
Portworx Backup validates the backup location and then adds in the backend.
noteDuring validation, users cannot update the NFS backup location details. Backup location will be unavailable during validation phase. Thus, users should wait for the validation to complete and then resume with creation and restoration of backup(s).
If validation fails, the web console displays the following tool tip error message:
Backup location validation failed