Upgrade Portworx Backup on Non Air-Gapped Environments
Portworx Backup supports upgrades to version n from versions n-1 or n-2. For example, if you are on Portworx Backup version 2.10.x or 2.11.x, you can directly upgrade to 3.0.0. If you are on 2.9.x or earlier and want to upgrade to 3.0.0, you need to upgrade in a phased manner. First upgrade to an intermediate version (2.10.x or 2.11.x), and then upgrade to 3.0.0. For more information, see Upgrade matrix
To install or upgrade Portworx Backup using Argo CD, see Deploy Portworx Backup using Argo CD.
Upgrade Portworx Backup in non-airgapped environment
To upgrade to the required version of Portworx Backup:
- Spec Details
- Finish
-
Access Portworx Central portal.
-
Enter login credentials and review the End-User License Agreement (EULA).
If you are new to Portworx Central, click Create account to generate your login credentials. You can also sign in with your organization’s OIDC identity provider, Google, or GitHub account.
-
Click Sign In to access the Portworx Central portal.
-
On the home page, under Explore our Products, navigate to the Portworx Backup card. Then click Generate Backup Spec to open the Portworx Backup Install/upgrade page (Spec Details tab).
-
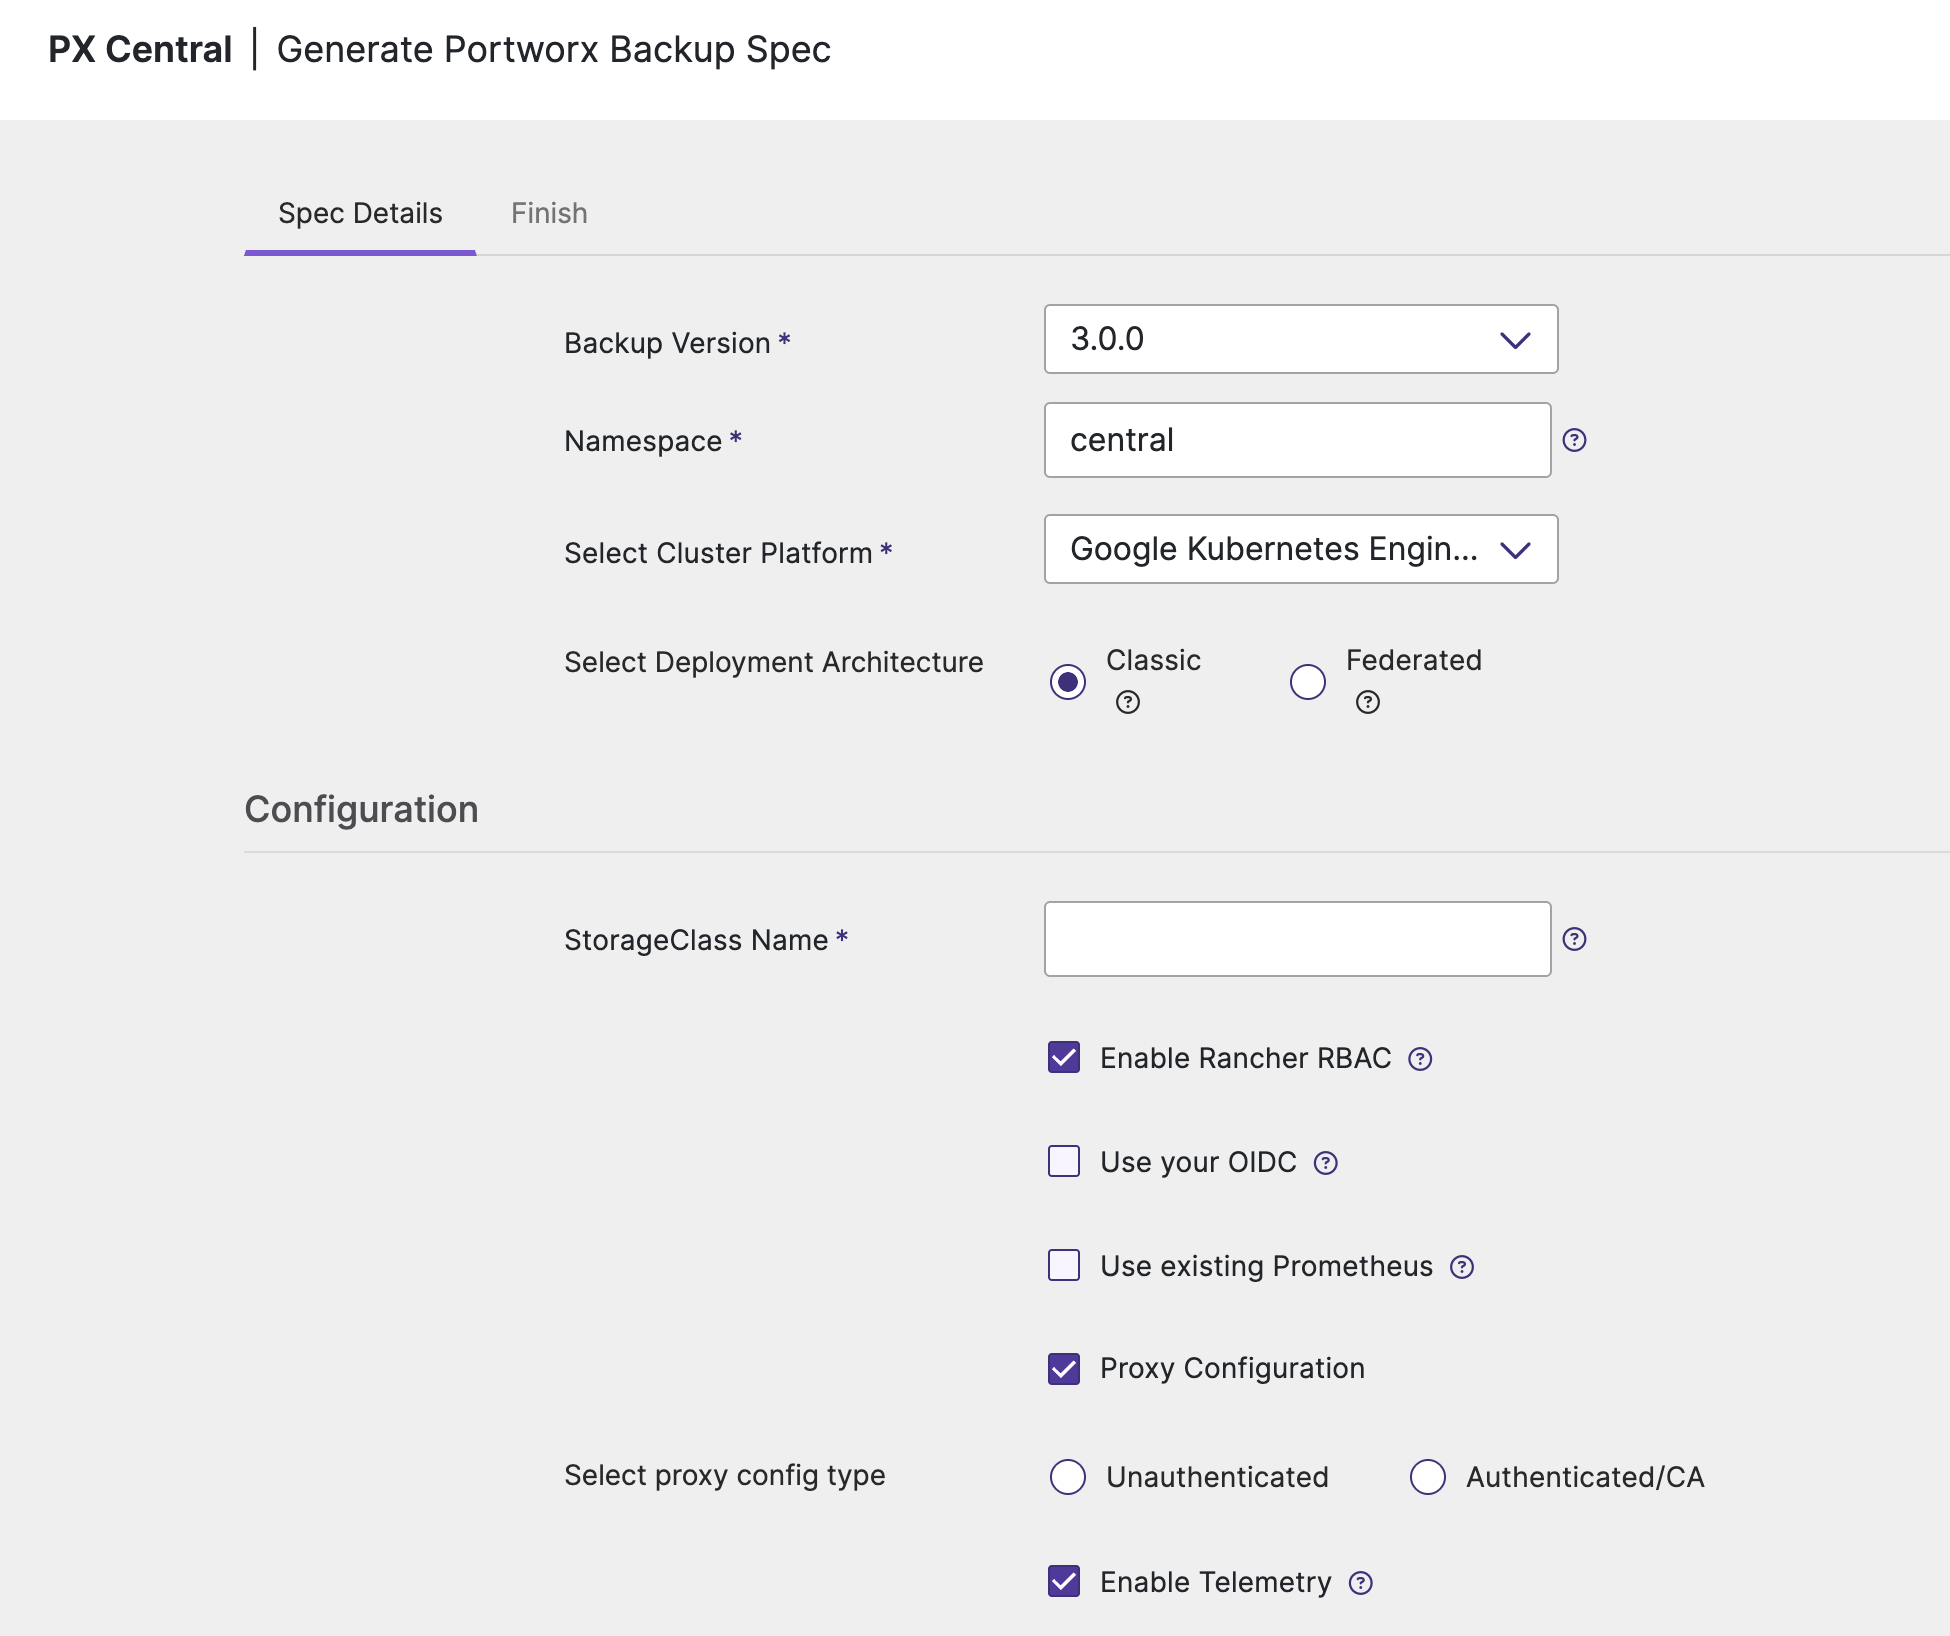
In the Spec Details tab provide the following values:
-
Release information:
- Backup Version: select the required version of Portworx Backup from the drop-down, here it is 3.0.0.
- Namespace: provide the name of the namespace where you want an instance of Portworx Backup to be installed.
- Select Cluster Platform: select your Kubernetes cluster platform from the drop-down list.
-
Configuration
-
StorageClass Name: name of the StorageClass; see the tooltip for more details
noteDefining the namespace and StorageClass is a one-time configuration step that should be completed during the initial installation. PVCs are created using Namespace and StorageClass values you define in the SpecGen, and these values cannot be modified during an upgrade.
-
Enable Rancher RBAC: select this checkbox if you are using Rancher for managing your Kubernetes clusters and want to enable Rancher's Role-Based Access Control (RBAC) for Portworx Backup. This feature can be enabled only if you have LDAP or PingIdentity as your identity provider. For more information, see Rancher RBAC Integration with Namespace Filtering and Rancher RBAC.
-
Use your OIDC: select this option only if your external authorization provider is Auth0 and fill in the following fields:
- Endpoint
- Client ID
- Client Secret
You can fetch these values from the Auth0 web console.
-
Use existing Prometheus: select this checkbox if you want to use your existing Prometheus stack to monitor Portworx Backup and enter the values for the following fields:
- Prometheus Endpoint: enter details of the endpoint where your Prometheus is installed
- Alertmanager Endpoint: enter details of the endpoint where your Alertmanager is installed
- Prometheus secret name: enter secret name of your Prometheus stack
- Alertmanager secret name: enter secret name of your Alertmanager
- Custom email template from PX-Backup: select to upload Portworx Backup's custom email template to your pre-configured Alertmanager for email notifications
By default, persistent volume size for Prometheus server is 5 GB. If you need more storage, append the following to the generated Helm command during the upgrade from previous versions of Portworx Backup to 3.0.0:
--set persistentStorage.prometheus.storage=8Gi,persistentStorage.prometheus.retentionSize=7360MBThis example resets the Prometheus server's persistent volume size to 8 GB and its retention size to 7360 MB. Set the storage based on your needs, and set
retentionSizeto about 92% of your chosenprometheus.storagevalue, expressed in MB (for example,7360MBfor8Gi). -
Proxy Configuration: select this checkbox if you have a proxy server configured in your environment and enter the values for the following fields:
- Unauthenticated: choose this if you have an unauthenticated proxy server.
- HTTP Proxy: proxy server URL for HTTP proxy
- HTTPS Proxy: proxy server URL for HTTPS proxy
- NO PROXY: comma-separated list of hostnames, IPs, or domains that should bypass the proxy settings
- Authenticated/CA: choose this option if your cluster is behind a proxy server with authentication or CA
- Proxy configuration secret: name of the Kubernetes proxy configuration secret created in Portworx Backup namespace holding the proxy configuration
- Unauthenticated: choose this if you have an unauthenticated proxy server.
-
-
Custom Registry
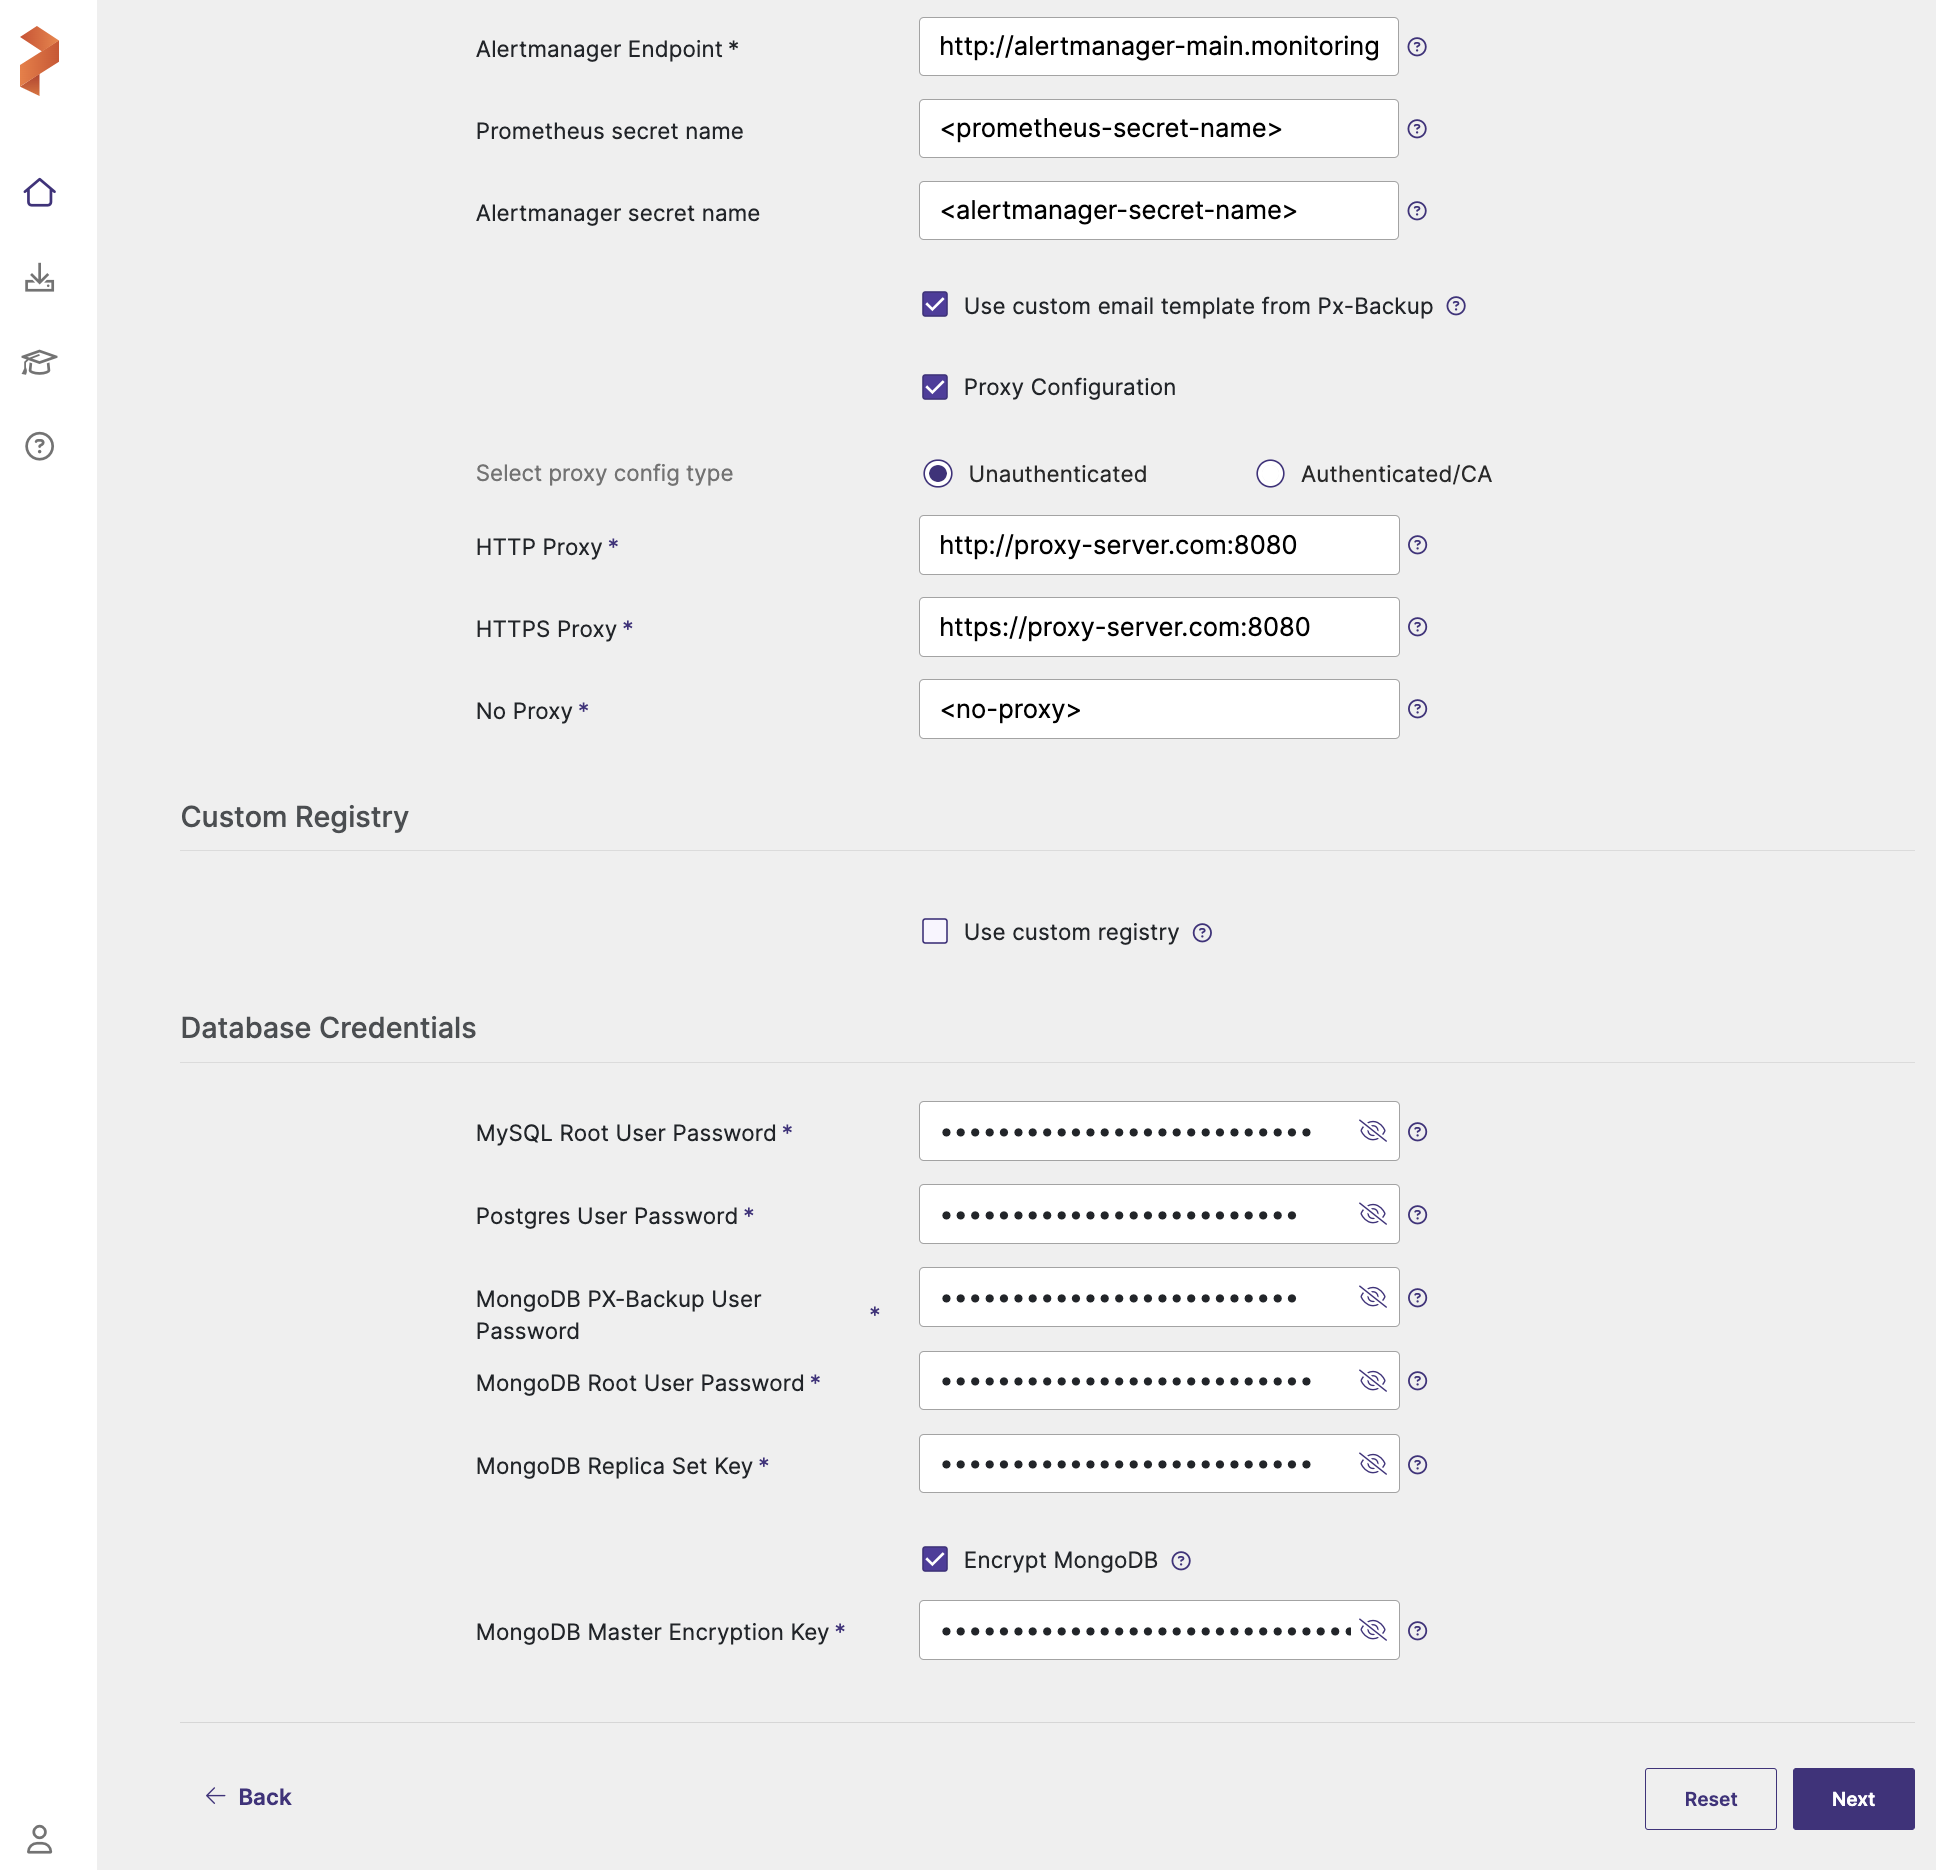
- Use custom registry: applicable only for air-gapped environments, do not select this check-box for non-airgapped system.
-
Database Credentials: This section configures database passwords for the various database components used by Portworx Backup. For guidelines on how to set the database credentials, see Password Policy.
-
MySQL Root User Password: root password for MySQL database
-
Postgres User Password: password for PostgreSQL user
-
MongoDB PX-Backup User Password: password for MongoDB PX-Backup user
-
MongoDB Root User Password: root password for MongoDB database
-
MongoDB Replica Set Key: key for MongoDB replica set authentication
-
Encrypt MongoDB: select this checkbox to enable encryption at rest for MongoDB database
-
MongoDB Master Encryption Key: Master encryption key for MongoDB encryption at rest
cautionSafeguarding your encryption key is vital to prevent permanent data loss. If the key is lost, you cannot access your encrypted data — it is the only means of decryption. Encryption keys cannot be rotated after they are set.
-
-
-
Click Next to navigate to Finish tab.
Navigate to the Finish tab at the top to execute few commands to complete the installation.
Finish tab
Finish tab provides you with the generated Kubernetes manifests and Helm commands needed to complete the installation of Portworx Backup in your environment.
- In the Finish tab:
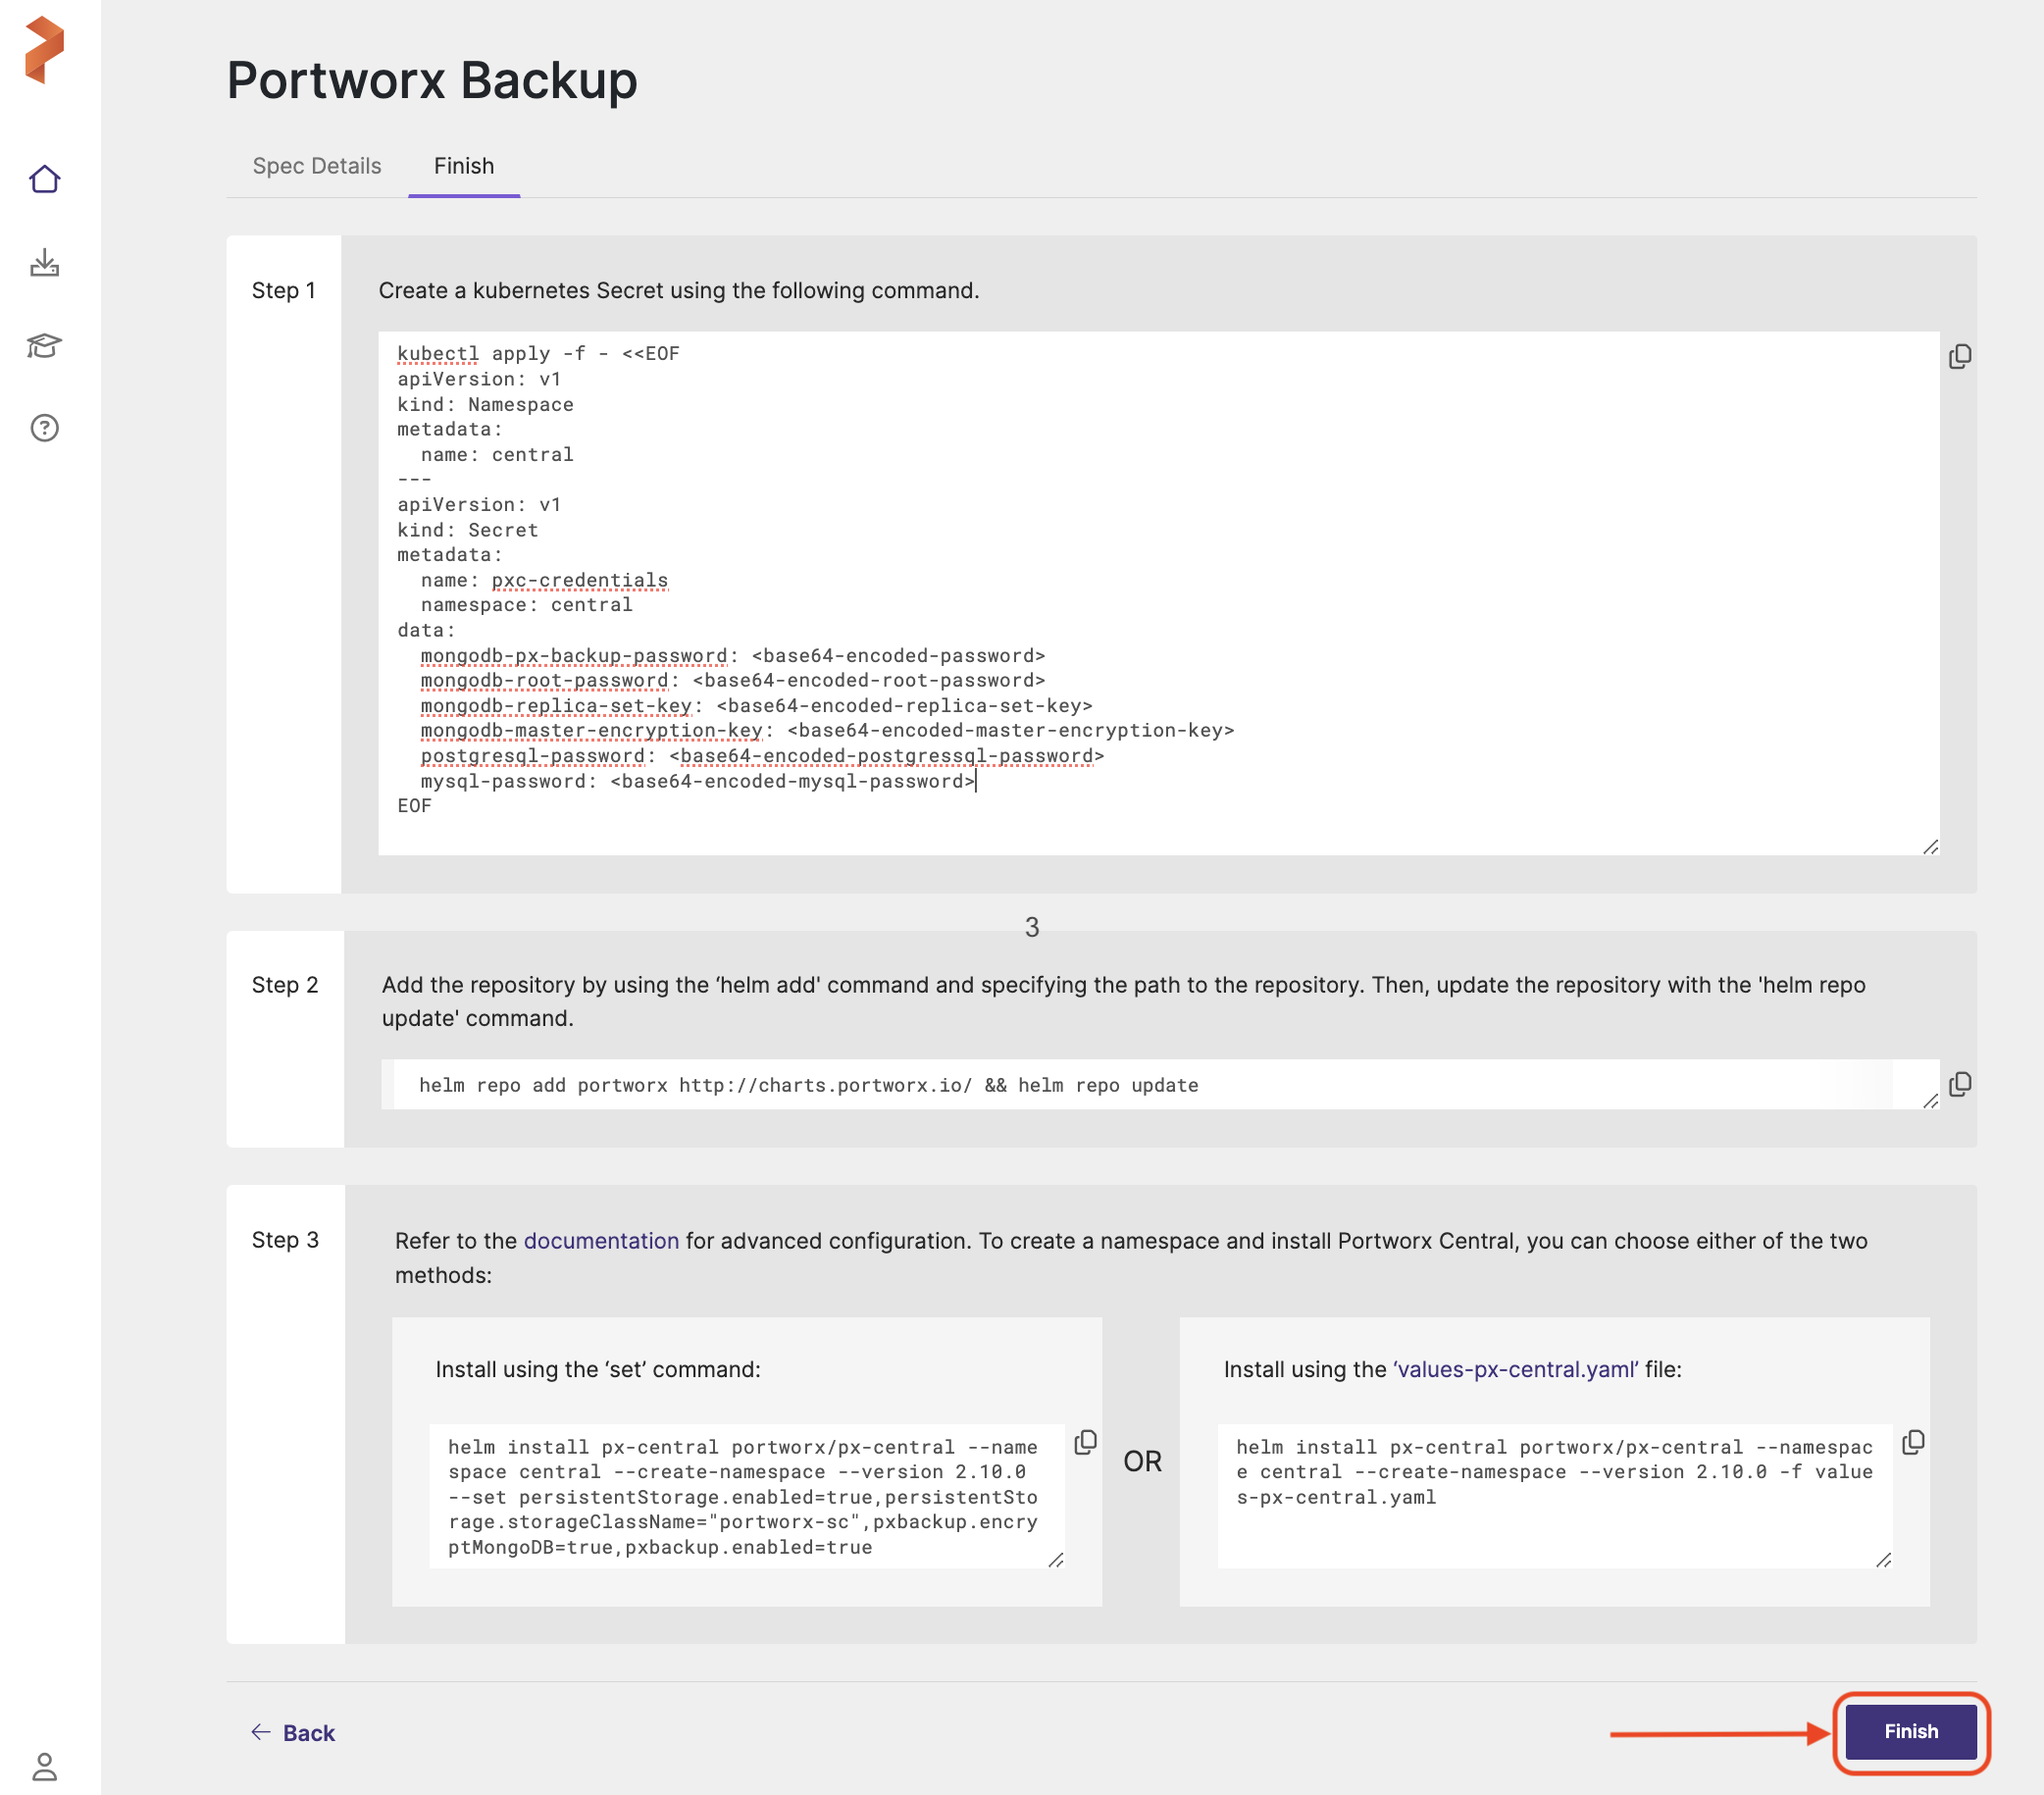
Step 1
-
Copy the YAML below (command under Step 1) to your terminal and run it to create a Kubernetes secret containing database credentials and configuration parameters for Portworx Backup components.
pxc-credentials secretkubectl apply -f - <<EOFapiVersion: v1kind: Namespacemetadata:name: <pxb-namespace>---apiVersion: v1kind: Secretmetadata:name: pxc-credentialsnamespace: <pxb-namespace>data:mongodb-px-backup-password: <base64-encoded-mongodb-password>mongodb-root-password: <base64-encoded-mongodb-root-password>mongodb-replica-set-key: <base64-encoded-mongodb-replica-set-key>mongodb-master-encryption-key: <base64-encoded-mongodb-master-encryption-key>postgresql-password: <base64-encoded-postgresql-password>mysql-password: <base64-encoded-mysql-password>EOFThe command creates the specified namespace (for example, central) and generates a
pxc-credentialssecret containing database passwords. All sensitive data is automatically base64-encoded for security, and the database credentials include password, replica set, and encryption key for MongoDB, only passwords for PostgreSQL and MySQL components of Portworx Backup.If
pxc-credentialssecret is not set, installing or upgrading Portworx Backup will fail with the following error:time="<UTC Timestamp>" level=fatal msg="Pre-install Hook failed: RunPreInstall: failed to validate custom passwords: ValidateCustomPasswordSecret: error validating pxc-credentials secret: secret pxc-credentials not found in namespace central"
Step 2
-
Execute the following command to add the helm repository to your cluster and update it:
helm repo add portworx http://charts.portworx.io/ && helm repo update
Step 3
You can upgrade Portworx Backup either with default options or with advanced options based on your environment. To upgrade Portworx Backup with default options, go with Install using set command. For upgrade with advanced options, go with Install using the values-px-central.yaml file.
To upgrade Portworx Backup with default or basic options:
-
Optional If you are deploying Portworx Backup in a cluster with Istio or linkerd as service mesh, append
istio.enabled=trueorlinkerd.enabled=trueat the end of the command provided under Install using thesetcommand.noteYou do not have to append
istio.enabled=trueif you have installed Istio in ambient mode. Do not use the--no-hooksflag with the Helm upgrade command; it puts the cluster into a bad state.Sample command:
helm upgrade px-central portworx/px-central --namespace <pxb-namespace> --version <pxb-release-version> --set persistentStorage.enabled=true,persistentStorage.storageClassName=<storage-class-name>,pxbackup.enabled=true,istio.enabled=trueNote that all the parameters you have provided in the Spec Details tab get appended after
--setin the command. -
After providing and appending all the required parameters for the upgrade, verify the command for accuracy.
-
Now copy and run the command in the terminal to upgrade Portworx Backup.
OR
Option 2: Install using the values-px-central.yaml fileTo upgrade Portworx Backup with advanced options:
-
Click
values-px-central.yamlfile option provided under Install using the values-px-central.yaml file on the right of Step 2. This creates and downloads a values file namedvalues-px-central.yamlwith all your configuration overrides. -
Rename this as
values-px-central-<pxb-release-version>.yaml. Where<pxb-release-version>is the Portworx Backup version you want to install. -
Set the value for the service mesh deployed in your Portworx Backup cluster. By default,
istio.enabledandlinkerd.enabledare set tofalse. Enable only one service mesh — a pod cannot belong to both Istio and Linkerd.noteThe
hostNameparameter is mandatory if multiple applications use the same prefix (/) and are using the Istio sidecar mode. To avoid routing conflicts during the PX-Backup deployment, update the host name by using theistio.hostNameHelm parameter. For more information, see the Configure a dedicated hostname for Portworx Backup UI with Istio section.Do not use
--no-hooksflag with the helm upgrade command otherwise it can turn the cluster into a bad state.If you use Istio (sidecar mode):
istio:enabled: truehostName: ""If you use Linkerd:
linkerd:enabled: true -
Save the yaml file for the changes made and validate the values.
-
From your CLI terminal, retrieve all custom values you used during the previous Portworx Backup installation or upgrade. These custom values are required for upgrade to retain the current configuration. Execute the following command to generate the current values YAML file:
helm get values --namespace <pxb-namespace> px-central -o yaml > values-current.yamlWhere
<pxb-namespace>is the namespace in which you are planning to upgrade Portworx Backup to the required latest version.The above command retrieves the values used to configure the
px-centralHelm release with helm get values, scoped to the specified namespace (--namespace <pxb-namespace>, such aspx-backup), and outputs them in YAML format (-o yaml). The results are then redirected into a file calledvalues-current.yaml, allowing you to review, back up, or modify the configuration for future use, such as during an upgrade. -
Compare the files you obtained from Step 2 and Step 5, and update the new
values-px-central-<pxb-release-version>.yamlif required to carry all the customizations you have made in the previous release.When you initially installed Portworx Backup using Helm, you likely customized several settings (for example, image registry paths, versions, storage class names, proxy configs, and so on). During an upgrade, you must retain these customizations to avoid overwriting your working setup. Helm upgrades are declarative, and if you do not pass your previous configuration again, Helm assumes defaults.
For example: In the existing
values-current.yaml, if thepersistentStorage.storageClassNameparameter is set with the valueportworx-sc, then you must set the sameportworx-scvalue in the newvalues-px-central-<pxb-release-version>.yaml. -
(Optional) Execute this step only if you have configured Prometheus and Grafana following the steps in Configure Prometheus and Grafana. Delete the Prometheus operator Deployment to avoid upgrade conflicts:
kubectl delete deploy prometheus-operator -n <pxb-namespace>Where
<pxb-namespace>is the namespace in which you are planning to upgrade Portworx Backup.noteThis deletes only the
prometheus-operatorDeployment, not the Prometheus or Alertmanager instances or their data (persistent volumes are retained). The step is required because the existing operator can conflict with the operator version the Helm upgrade installs. The Helm upgrade re-creates the Deployment, so the operator returns automatically once the upgrade completes. Metrics collection is paused only briefly while the operator pod is unavailable; already-stored metrics are not lost. -
Delete the post install hook job:
kubectl delete job pxcentral-post-install-hook --namespace <pxb-namespace>Where
<pxb-namespace>is the namespace in which you are planning to upgrade Portworx Backup.noteIf you have enabled health check, deletion of the post-install hook job is handled automatically. If not, you must delete it manually with the command above.
-
Now copy and execute the command under Install using the values-px-central.yaml file in your terminal to complete the upgrade. Use the
values-px-central-<pxb-release-version>.yamlfile you renamed and updated in the earlier steps.During an upgrade, several components are involved, which can considerably extend the upgrade duration. Therefore, the default timeout of 5 minutes is typically inadequate, and you must increase the timeout to 120 minutes by adding
--timeout=120m, as shown in the following command:helm upgrade px-central portworx/px-central --namespace <pxb-namespace> --version <pxb-release-version> -f values-px-central-<pxb-release-version>.yaml --timeout=120mWhere
<pxb-release-version>is the Portworx Backup version you want to upgrade to. -
Click Finish after you complete the upgrade installation.
This activates the trial version of Portworx Backup. To upgrade to the enterprise version, apply a Portworx Backup license.
You can find more information about the Portworx Backup Helm chart in the helm section.
Verify the upgrade
After the Helm upgrade completes, confirm that the upgrade succeeded and all components are healthy:
-
Confirm that the post-upgrade hook completed:
kubectl get job pxcentral-post-install-hook -n <pxb-namespace>The job should report
Completed. -
Confirm that all Portworx Backup pods, including the MongoDB pods, are in the
RunningorCompletedstate and that the MongoDB pods areReady:kubectl get pods -n <pxb-namespace>Wait until every MongoDB pod (for example,
pxc-backup-mongodb-0) shows1/1in theREADYcolumn before proceeding. -
Confirm that the deployed image tags match the target Portworx Backup version, and log in to the Portworx Backup web console to verify it is reachable and reports the upgraded version.