Install on air-gapped environments
This topic explains how you can prepare your clusters in an air-gapped environment and install Portworx Backup on-premises.
Prepare air-gapped environments
If your cluster is internet-connected, skip this section. If your cluster is air-gapped, you must pull the below Docker images to either your docker registry or your server. If you are using your own Prometheus and Alertmanager with Portworx Backup, you do not have to pull the last four images from the following list:
- 2.8.4
- 2.8.3
- 2.8.2
- 2.8.1
- 2.8.0
| Image | Image path | Version |
|---|---|---|
| pxcentralOnpremApi | docker.io/portworx/pxcentral-onprem-api | 2.8.4 |
| pxcentralOnpremUiFrontend | docker.io/portworx/pxcentral-onprem-ui-frontend | 2.8.4 |
| pxcentralOnpremUiBackend | docker.io/portworx/pxcentral-onprem-ui-backend | 2.8.4 |
| pxcentralOnpremUiLhbackend | docker.io/portworx/pxcentral-onprem-ui-lhbackend | 2.8.4 |
| pxcentralOnpremPreSetup | docker.io/portworx/pxcentral-onprem-hook | 2.8.4 |
| pxcentralOnpremPostSetup | docker.io/portworx/pxcentral-onprem-post-setup | 2.8.4 |
| pxBackup | docker.io/portworx/px-backup | 2.8.4 |
| postgresql | docker.io/portworx/postgresql | 16.6.0-debian-12-r2 |
| keycloak | docker.io/portworx/keycloak | 25.0.2 |
| keycloakLoginTheme | docker.io/portworx/keycloak-login-theme | 2.8.0 |
| busybox | docker.io/portworx/busybox | 1.35.0 |
| mysql | docker.io/portworx/mysql | 8.0.40 |
| mongodb7 | docker.io/portworx/mongodb | 7.0.15-debian-12-r2 |
| mongodb6 | docker.io/portworx/mongodb | 6.0.13-debian-11-r21 |
| mongodb5 | docker.io/portworx/mongodb | 5.0.24-debian-11-r20 |
| kopiaExecutor | docker.io/portworx/kopiaexecutor | 1.2.18 |
| nfsExecutor | docker.io/portworx/nfsexecutor | 1.2.18 |
| filesystemCtl | docker.io/portworx/filesystemctl | 1.2.18 |
| pxBackupPrometheusImage | docker.io/portworx/prometheus | v3.1.0 |
| pxBackupAlertmanagerImage | docker.io/portworx/alertmanager | v0.28.0 |
| pxBackupPrometheusOperatorImage | docker.io/portworx/prometheus-operator | v0.79.2 |
| pxBackupPrometheusConfigReloaderImage | docker.io/portworx/prometheus-config-reloader | v0.79.2 |
| Image | Version |
|---|---|
| docker.io/portworx/pxcentral-onprem-api | 2.8.3 |
| docker.io/portworx/pxcentral-onprem-ui-frontend | 2.8.3 |
| docker.io/portworx/pxcentral-onprem-ui-backend | 2.8.3 |
| docker.io/portworx/pxcentral-onprem-ui-lhbackend | 2.8.3 |
| docker.io/portworx/pxcentral-onprem-hook | 2.8.3 |
| docker.io/portworx/pxcentral-onprem-post-setup | 2.8.3 |
| docker.io/portworx/px-backup | 2.8.3 |
| docker.io/portworx/postgresql | 11.19.0-debian-11-r1 |
| docker.io/portworx/keycloak | 25.0.2 |
| docker.io/portworx/keycloak-login-theme | 2.8.0 |
| docker.io/portworx/busybox | 1.35.0 |
| docker.io/portworx/mysql | 8.0.40 |
| docker.io/portworx/mongodb | 7.0.15-debian-12-r2 |
| docker.io/portworx/mongodb | 6.0.13-debian-11-r21 |
| docker.io/portworx/kopiaexecutor | 1.2.17 |
| docker.io/portworx/nfsexecutor | 1.2.17 |
| docker.io/portworx/filesystemctl | 1.2.17 |
| docker.io/portworx/prometheus | v3.0.1 |
| docker.io/portworx/alertmanager | v0.27.0 |
| docker.io/portworx/prometheus-operator | v0.78.2 |
| docker.io/portworx/prometheus-config-reloader | v0.78.2 |
| Image | Version |
|---|---|
| docker.io/portworx/pxcentral-onprem-api | 2.8.2 |
| docker.io/portworx/pxcentral-onprem-ui-frontend | 2.8.2 |
| docker.io/portworx/pxcentral-onprem-ui-backend | 2.8.2 |
| docker.io/portworx/pxcentral-onprem-ui-lhbackend | 2.8.2 |
| docker.io/portworx/pxcentral-onprem-post-setup | 2.8.2 |
| docker.io/portworx/pxcentral-onprem-pre-upgrade | 2.8.2 |
| docker.io/portworx/px-backup | 2.8.2 |
| docker.io/portworx/postgresql | 11.19.0-debian-11-r1 |
| docker.io/portworx/keycloak | 25.0.2 |
| docker.io/portworx/keycloak-login-theme | 2.8.0 |
| docker.io/portworx/busybox | 1.35.0 |
| docker.io/portworx/mysql | 8.0.37 |
| docker.io/portworx/mongodb | 7.0.14-debian-12-r0 |
| docker.io/portworx/mongodb | 6.0.13-debian-11-r21 |
| docker.io/portworx/kopiaexecutor | 1.2.16 |
| docker.io/portworx/nfsexecutor | 1.2.16 |
| docker.io/portworx/filesystemctl | 1.2.16 |
| docker.io/portworx/prometheus | v2.53.0 |
| docker.io/portworx/alertmanager | v0.26.0 |
| docker.io/portworx/prometheus-operator | v0.75.0 |
| docker.io/portworx/prometheus-config-reloader | v0.75.0 |
| Image | Version |
|---|---|
| docker.io/portworx/pxcentral-onprem-api | 2.8.1 |
| docker.io/portworx/pxcentral-onprem-ui-frontend | 2.8.1 |
| docker.io/portworx/pxcentral-onprem-ui-backend | 2.8.1 |
| docker.io/portworx/pxcentral-onprem-ui-lhbackend | 2.8.1 |
| docker.io/portworx/pxcentral-onprem-post-setup | 2.8.1 |
| docker.io/portworx/pxcentral-onprem-pre-upgrade | 2.8.1 |
| docker.io/portworx/px-backup | 2.8.1 |
| docker.io/portworx/postgresql | 11.19.0-debian-11-r1 |
| docker.io/portworx/keycloak | 25.0.2 |
| docker.io/portworx/keycloak-login-theme | 2.8.0 |
| docker.io/portworx/busybox | 1.35.0 |
| docker.io/portworx/mysql | 8.0.37 |
| docker.io/portworx/mongodb | 7.0.14-debian-12-r0 |
| docker.io/portworx/mongodb | 6.0.13-debian-11-r21 |
| docker.io/portworx/kopiaexecutor | 1.2.16 |
| docker.io/portworx/nfsexecutor | 1.2.16 |
| docker.io/portworx/filesystemctl | 1.2.16 |
| docker.io/portworx/prometheus | v2.53.0 |
| docker.io/portworx/alertmanager | v0.26.0 |
| docker.io/portworx/prometheus-operator | v0.75.0 |
| docker.io/portworx/prometheus-config-reloader | v0.75.0 |
| Image | Version |
|---|---|
| docker.io/portworx/pxcentral-onprem-api | 2.8.0 |
| docker.io/portworx/pxcentral-onprem-ui-frontend | 2.8.0 |
| docker.io/portworx/pxcentral-onprem-ui-backend | 2.8.0 |
| docker.io/portworx/pxcentral-onprem-ui-lhbackend | 2.8.0 |
| docker.io/portworx/pxcentral-onprem-post-setup | 2.8.0 |
| docker.io/portworx/pxcentral-onprem-pre-upgrade | 2.8.0 |
| docker.io/portworx/px-backup | 2.8.0 |
| docker.io/portworx/postgresql | 11.19.0-debian-11-r1 |
| docker.io/portworx/keycloak | 25.0.2 |
| docker.io/portworx/keycloak-login-theme | 2.8.0 |
| docker.io/portworx/busybox | 1.35.0 |
| docker.io/portworx/mysql | 8.0.37 |
| docker.io/portworx/mongodb | 7.0.14-debian-12-r0 |
| docker.io/portworx/mongodb | 6.0.13-debian-11-r21 |
| docker.io/portworx/kopiaexecutor | 1.2.15 |
| docker.io/portworx/nfsexecutor | 1.2.15 |
| docker.io/portworx/filesystemctl | 1.2.15 |
| docker.io/portworx/prometheus | v2.53.0 |
| docker.io/portworx/alertmanager | v0.26.0 |
| docker.io/portworx/prometheus-operator | v0.75.0 |
| docker.io/portworx/prometheus-config-reloader | v0.75.0 |
- Refer to the Install Stork in air-gapped environments section to know more about the Stork and other
openstorageimages in your air-gapped environment, before installing Portworx Backup. - If your application cluster is running in the IBM Cloud environment, ensure that the image repository path is set to
icr.io/ext/portworx/stork:<supported-pxb-stork-version>before applying thestork-spec.yamlduring Stork installation (without PXE).
To pull the above Docker images and push them to an internal registry:
-
Download the
pxcentral-ag-install-backup.shair-gapped bootstrap Portworx Backup install script.curl -o pxcentral-ag-install-backup.sh -L "https://install.portworx.com/pxcentral-air-gapped?px-backup=true"You can also download the install script for a specific release by specifying a
versionquery. For example:curl -o pxcentral-ag-install-backup.sh -L "https://install.portworx.com/pxcentral-air-gapped?version=2.8.4&px-backup=true"
-
Provide execute permission for the install script:
chmod +x pxcentral-ag-install-backup.sh -
Pull the container images using the
pxcentral-ag-install-backup.shscript:./pxcentral-ag-install-backup.sh pull -
Push the images to a local registry server, accessible by the air-gapped nodes. Replace
<repo>with your registry location../pxcentral-ag-install-backup.sh push <repo> -
Access Portworx Central specgen.
-
From the home page, navigate to Backup Services under Explore our Products.
-
Click on I agree to EULA and go through the Portworx Products Terms of Use carefully.
-
Navigate back to the Portworx Central portal and click Start Free Trial.
-
In the Spec Details provide the following values:
- Backup Version: select the required version of Portworx Backup from the drop-down
- Namespace: provide the name of the namespace where you want an instance of Portworx Backup to be installed
- Select your environment: choose On-Premises or Cloud based on your storage environment
- StorageClass Name: name of the StorageClass, refer tooltip for more details
- Use your OIDC: select this option only if your external authorization provider is Auth0 and key in the following fields
- Endpoint
- Client ID
- Client Secret
-
Use existing Prometheus: select this checkbox if you have to use your existing Prometheus stack to monitor Portworx Backup and enter the values for the following fields:
- Prometheus Endpoint: enter details of the endpoint where your Prometheus is installed
- Alertmanager Endpoint: enter details of the endpoint where your Alertmanager is installed
- Prometheus secret name: enter secret name of your Prometheus stack
- Alertmanager secret name: enter secret name of your Alertmanager
- Custom email template from PX-Backup: select to upload Portworx Backup's custom email template to your pre-configured Alertmanager for email notifications
These values can be fetched from the Auth0 web console.
-
Use custom registry: for air-gapped environments:
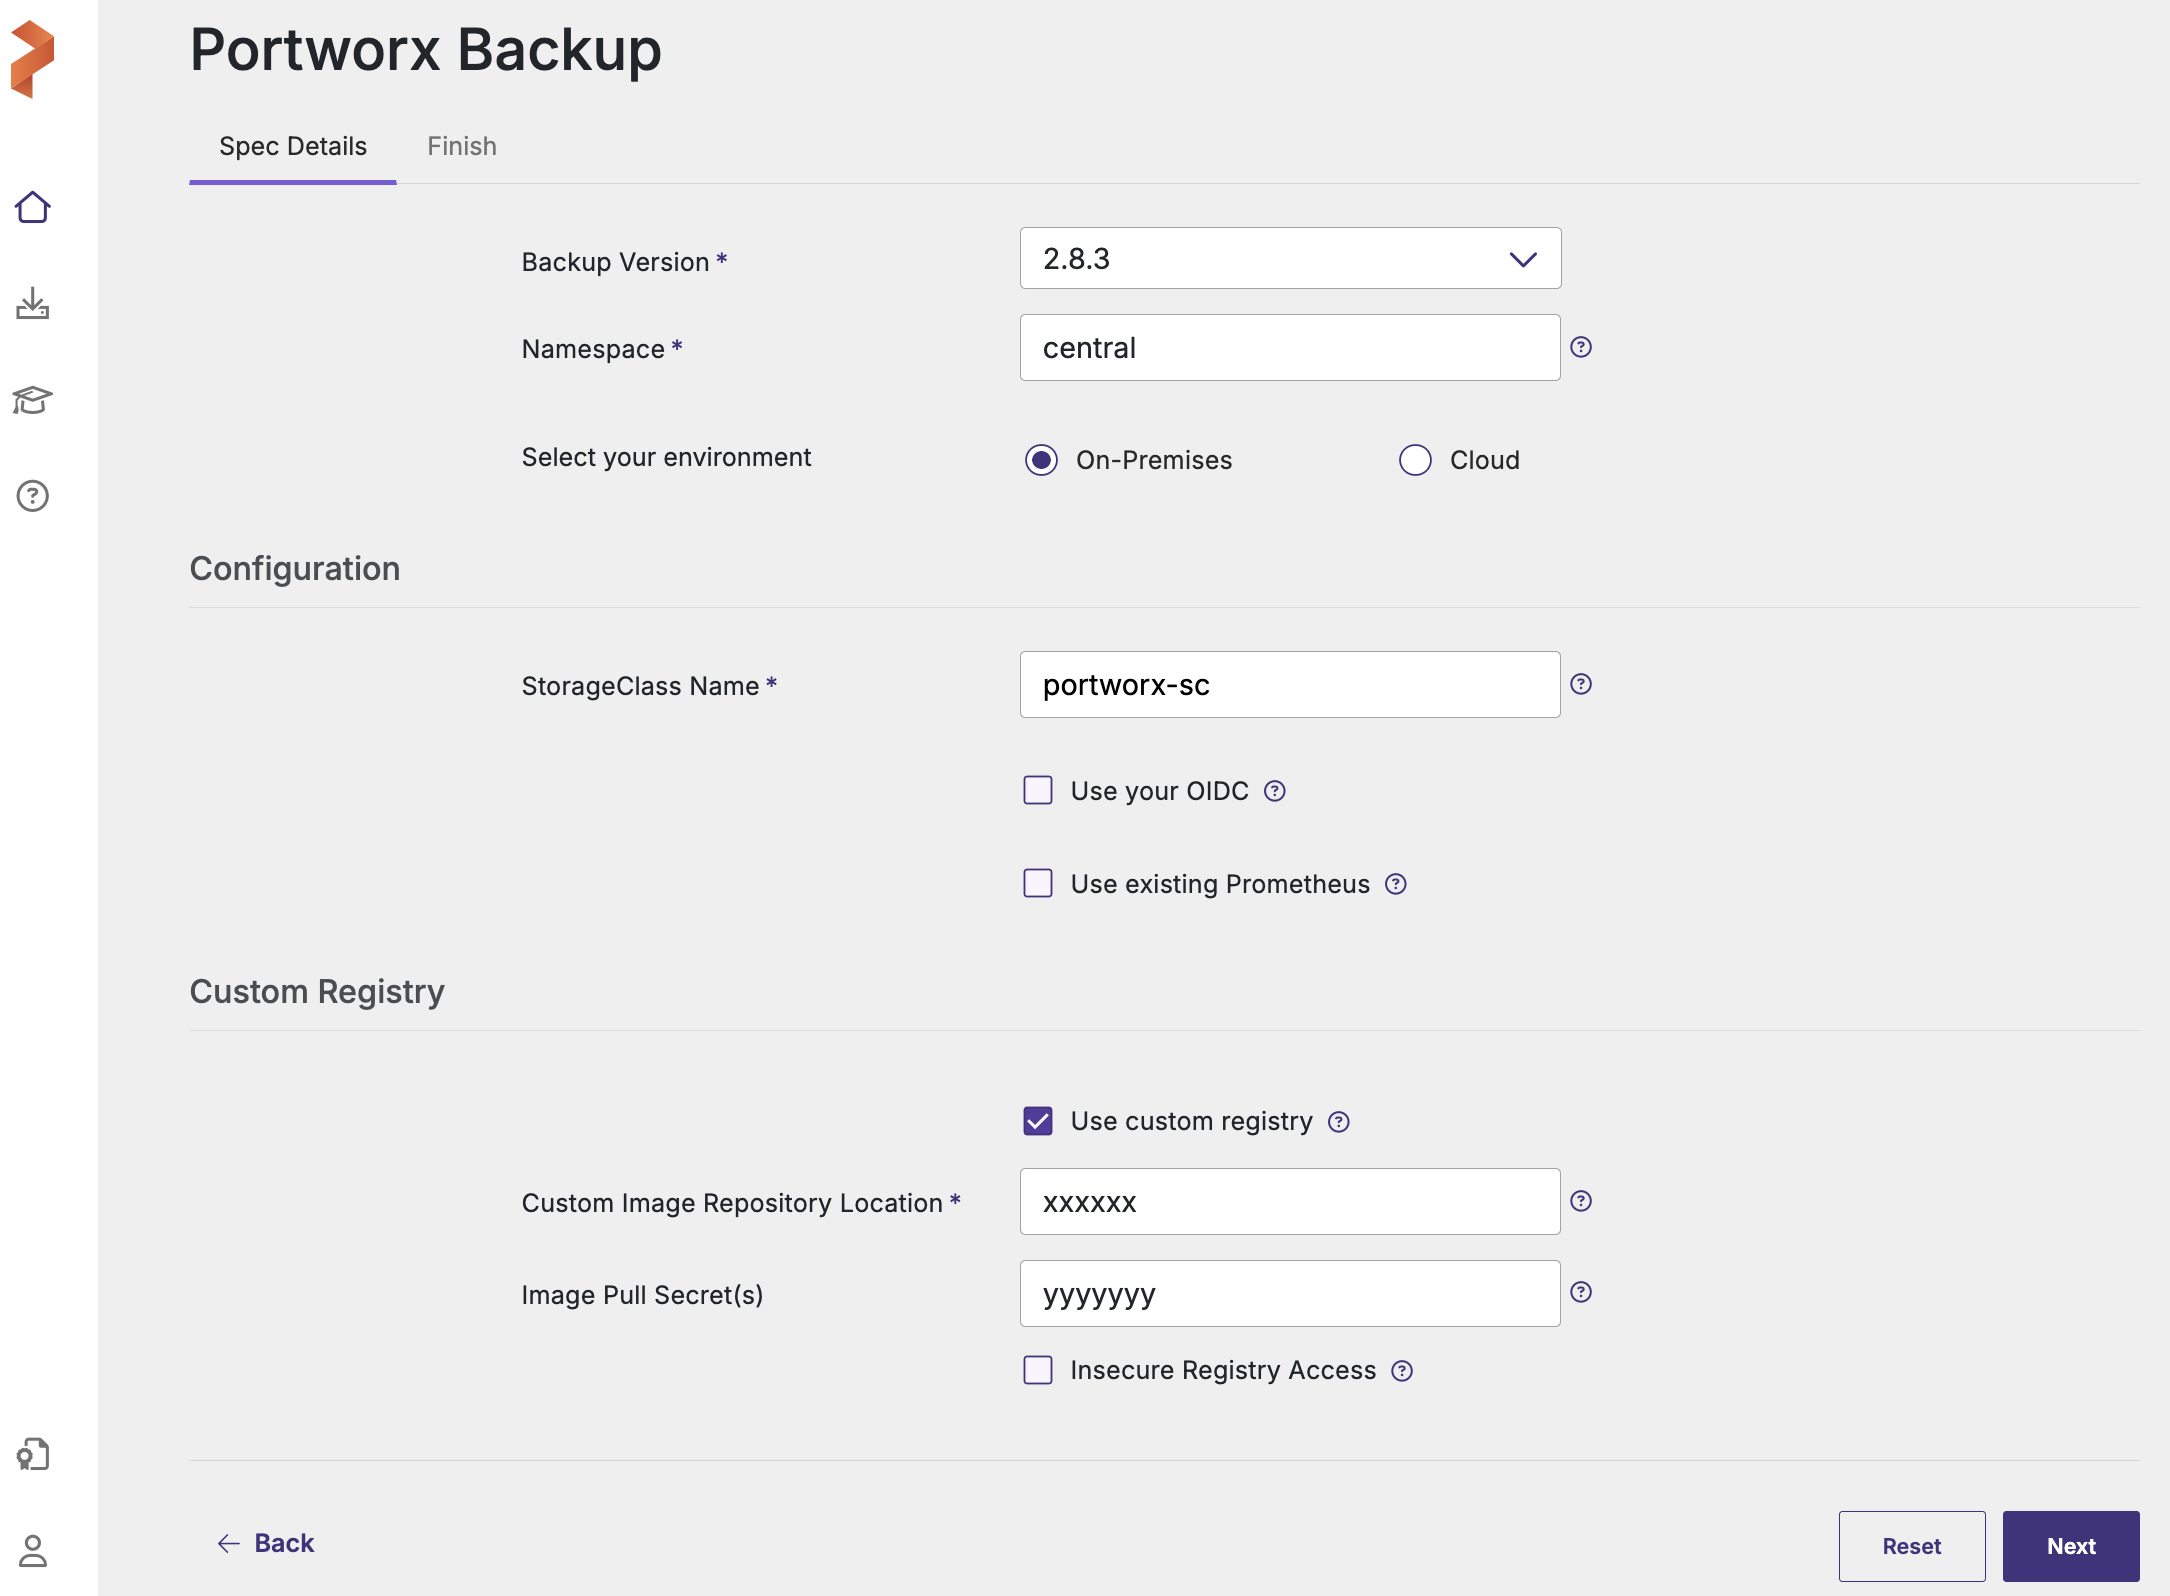
- Custom Image Repository Location: path of custom image repository
- Image Pull Secret(s): create a secret in the following cases:
- If image pulling from an internal repository requires credentials
- If you were using
docregistry-secret
-
Click Next to navigate to Finish tab.
-
Under Step 2 of the web console, click
values-px-central.yamlfile to download the default options.
- For installation through Argo CD, set the below helm parameter:
isArgoCD=true - If the cluster where you are planning to deploy PXB is OpenShift with ArgoCD then, set the following helm parameters to true:
isArgoCD=true
isOpenshift=true
-
From the machine where you run the
helm3command:-
Download the latest
px-centralpackage with the following command:curl -O https://raw.githubusercontent.com/portworx/helm/master/stable/px-central-2.8.4.tgz -
Modify the Helm command generated from second option of Step 2 (of Portworx Backup web console) to provide the helm package, instead of providing the repository. For example:
helm install px-central portworx/px-central --namespace central --create-namespace --version 2.8.4 -f values-px-central.yaml
Following is the modified command for air-gapped environment using the downloaded helm package:
helm install px-central px-central-2.8.4.tgz --namespace central --create-namespace --version 2.8.4 -f values-px-central.yaml
noteFor installation through Argo CD, set the below helm parameter in the Argo CD web console:
isArgoCD=true -