Image registry configuration
Image registry configuration in PDS lets you define where container images come from - whether from a public, private, or custom registry - so you can maintain security, compliance, and version control over all your deployed data services.
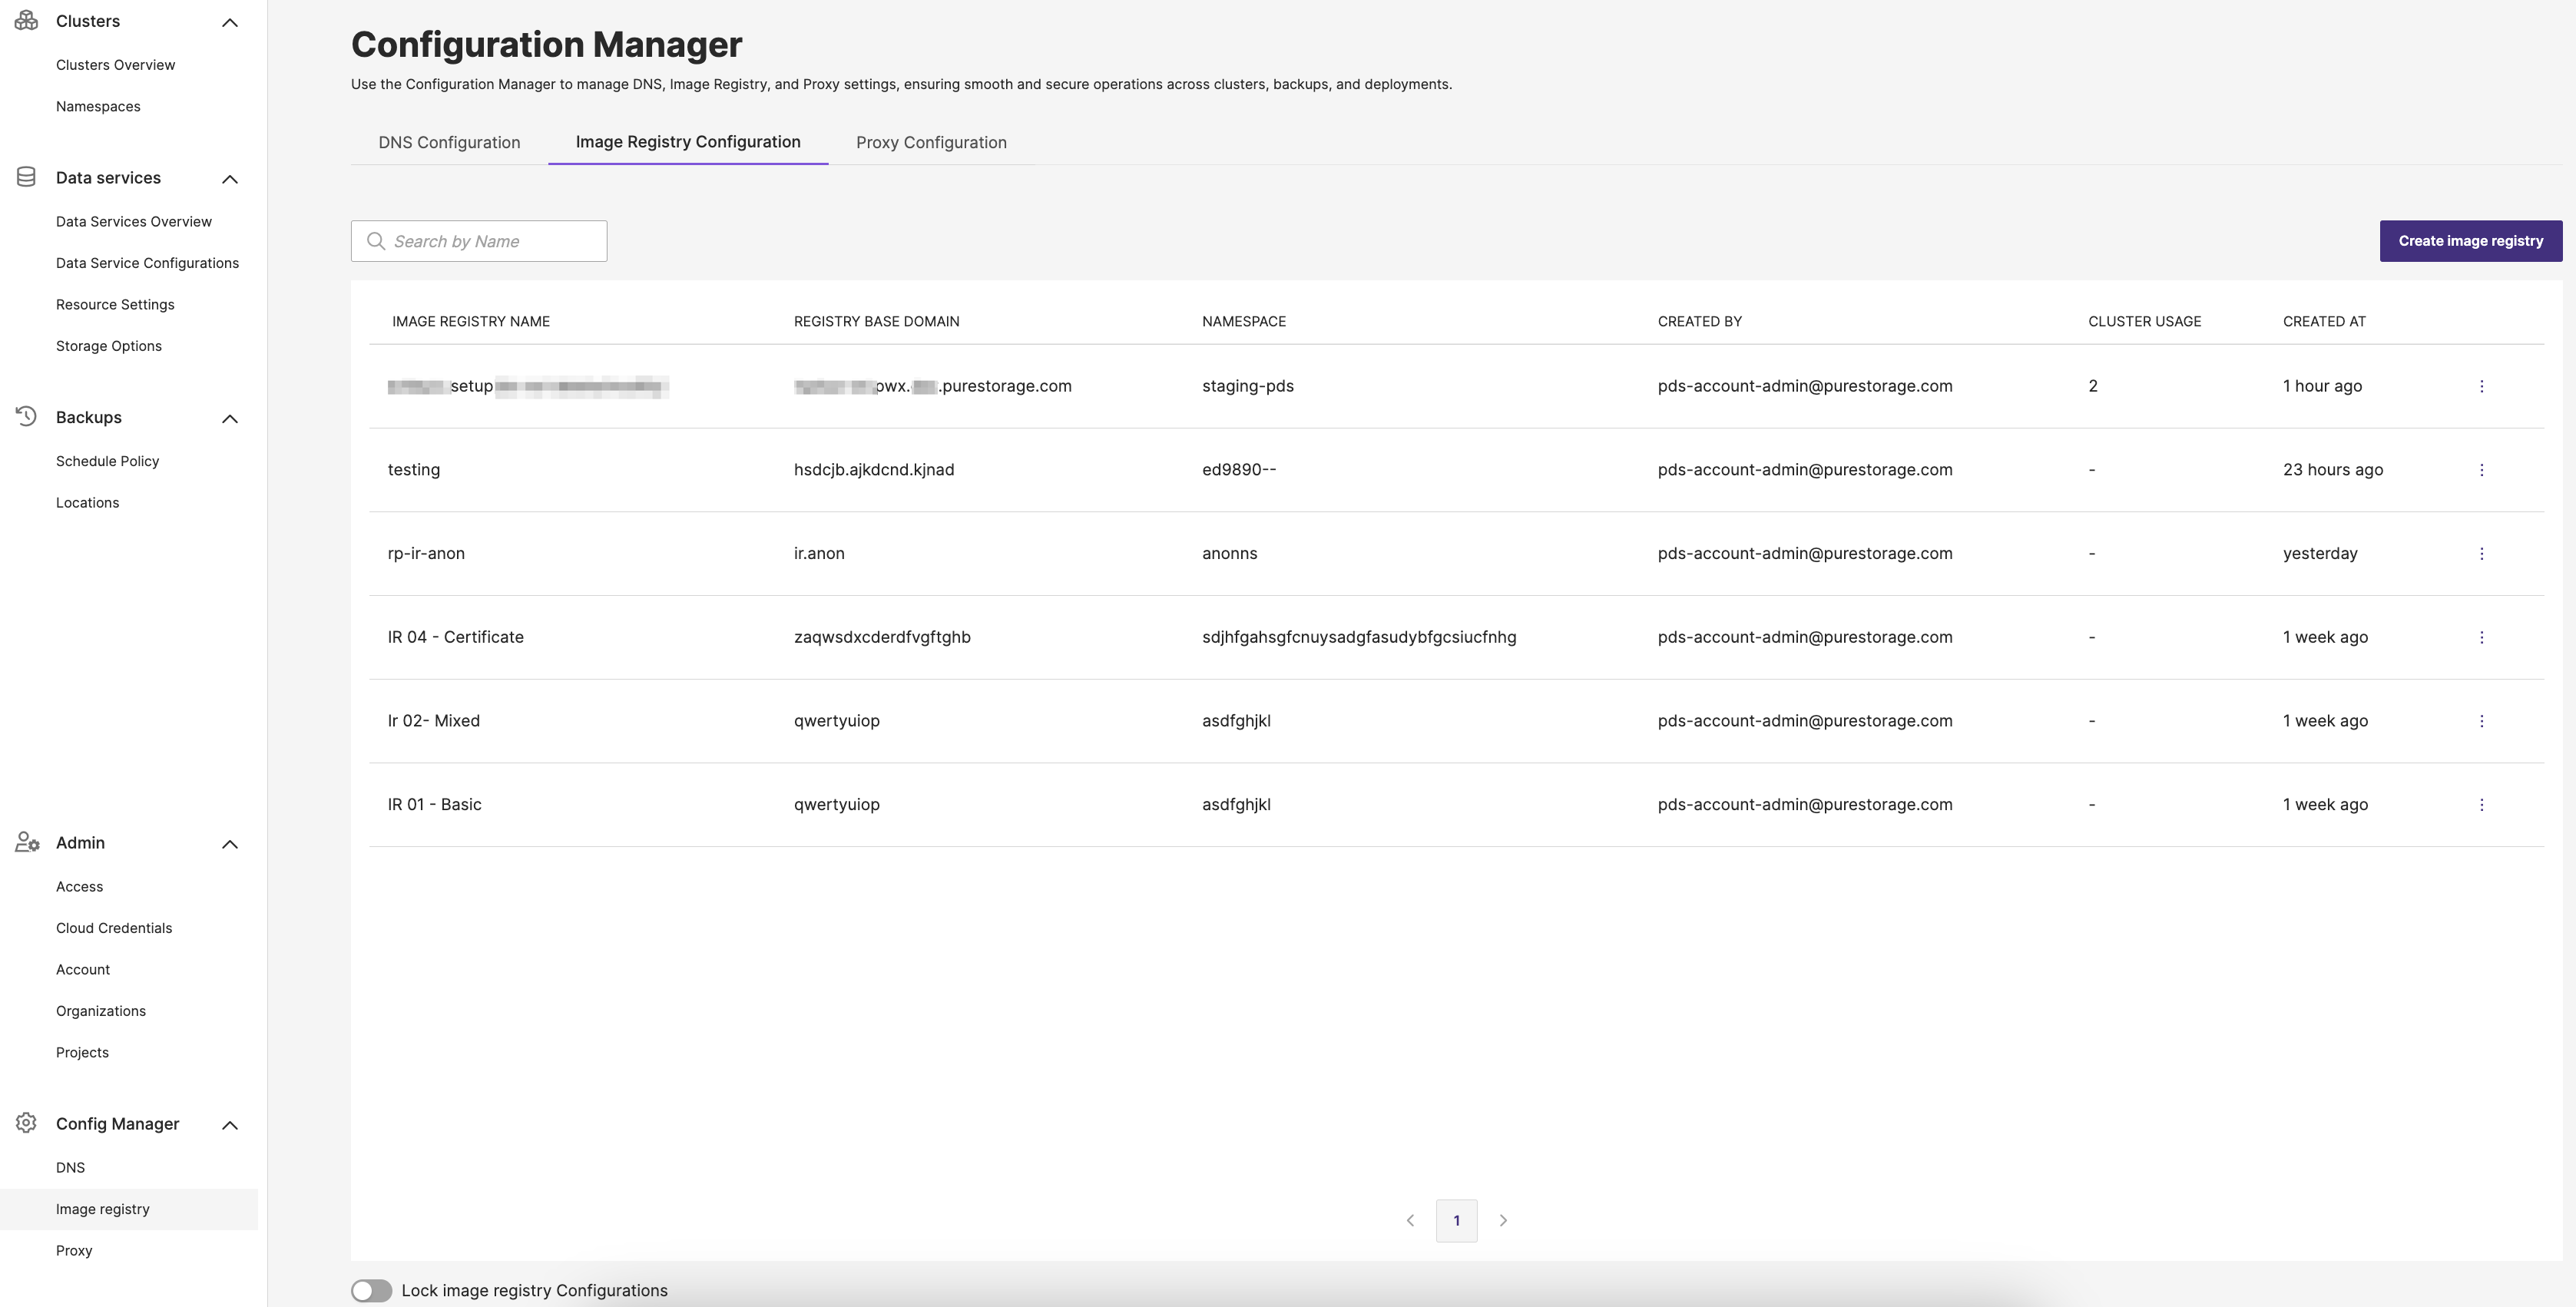
In the PDS platform, navigate to Config Manager and select Image registry to view and manage existing image registry configurations or create new ones:
On the Image registry tab, you will see a list of all existing configurations. The table includes:
- Image Registry Name: The descriptive name assigned to the registry configuration.
- Registry Base Domain: The domain or endpoint where images are hosted.
- Namespace: The specific repository path or namespace within that registry.
- Created By: Displays who created or owns the configuration.
- Cluster Usage: Indicates how many clusters are currently using this registry.
- Created At: The date and time when this registry configuration was added.

Lock image registry Configurations
Turning on this lock stops anyone from creating, modifying or deleting the configured image registries. This maintains consistency in how container images are sourced across different services or deployments.
Create an image registry configuration
To create the image registry configuration in PDS:
-
In the PDS UI left pane, select Image registry under the Config Manager dropdown.
-
In the Configuration Manager page -> Image Registry Configuration tab, select the Create image registry button.
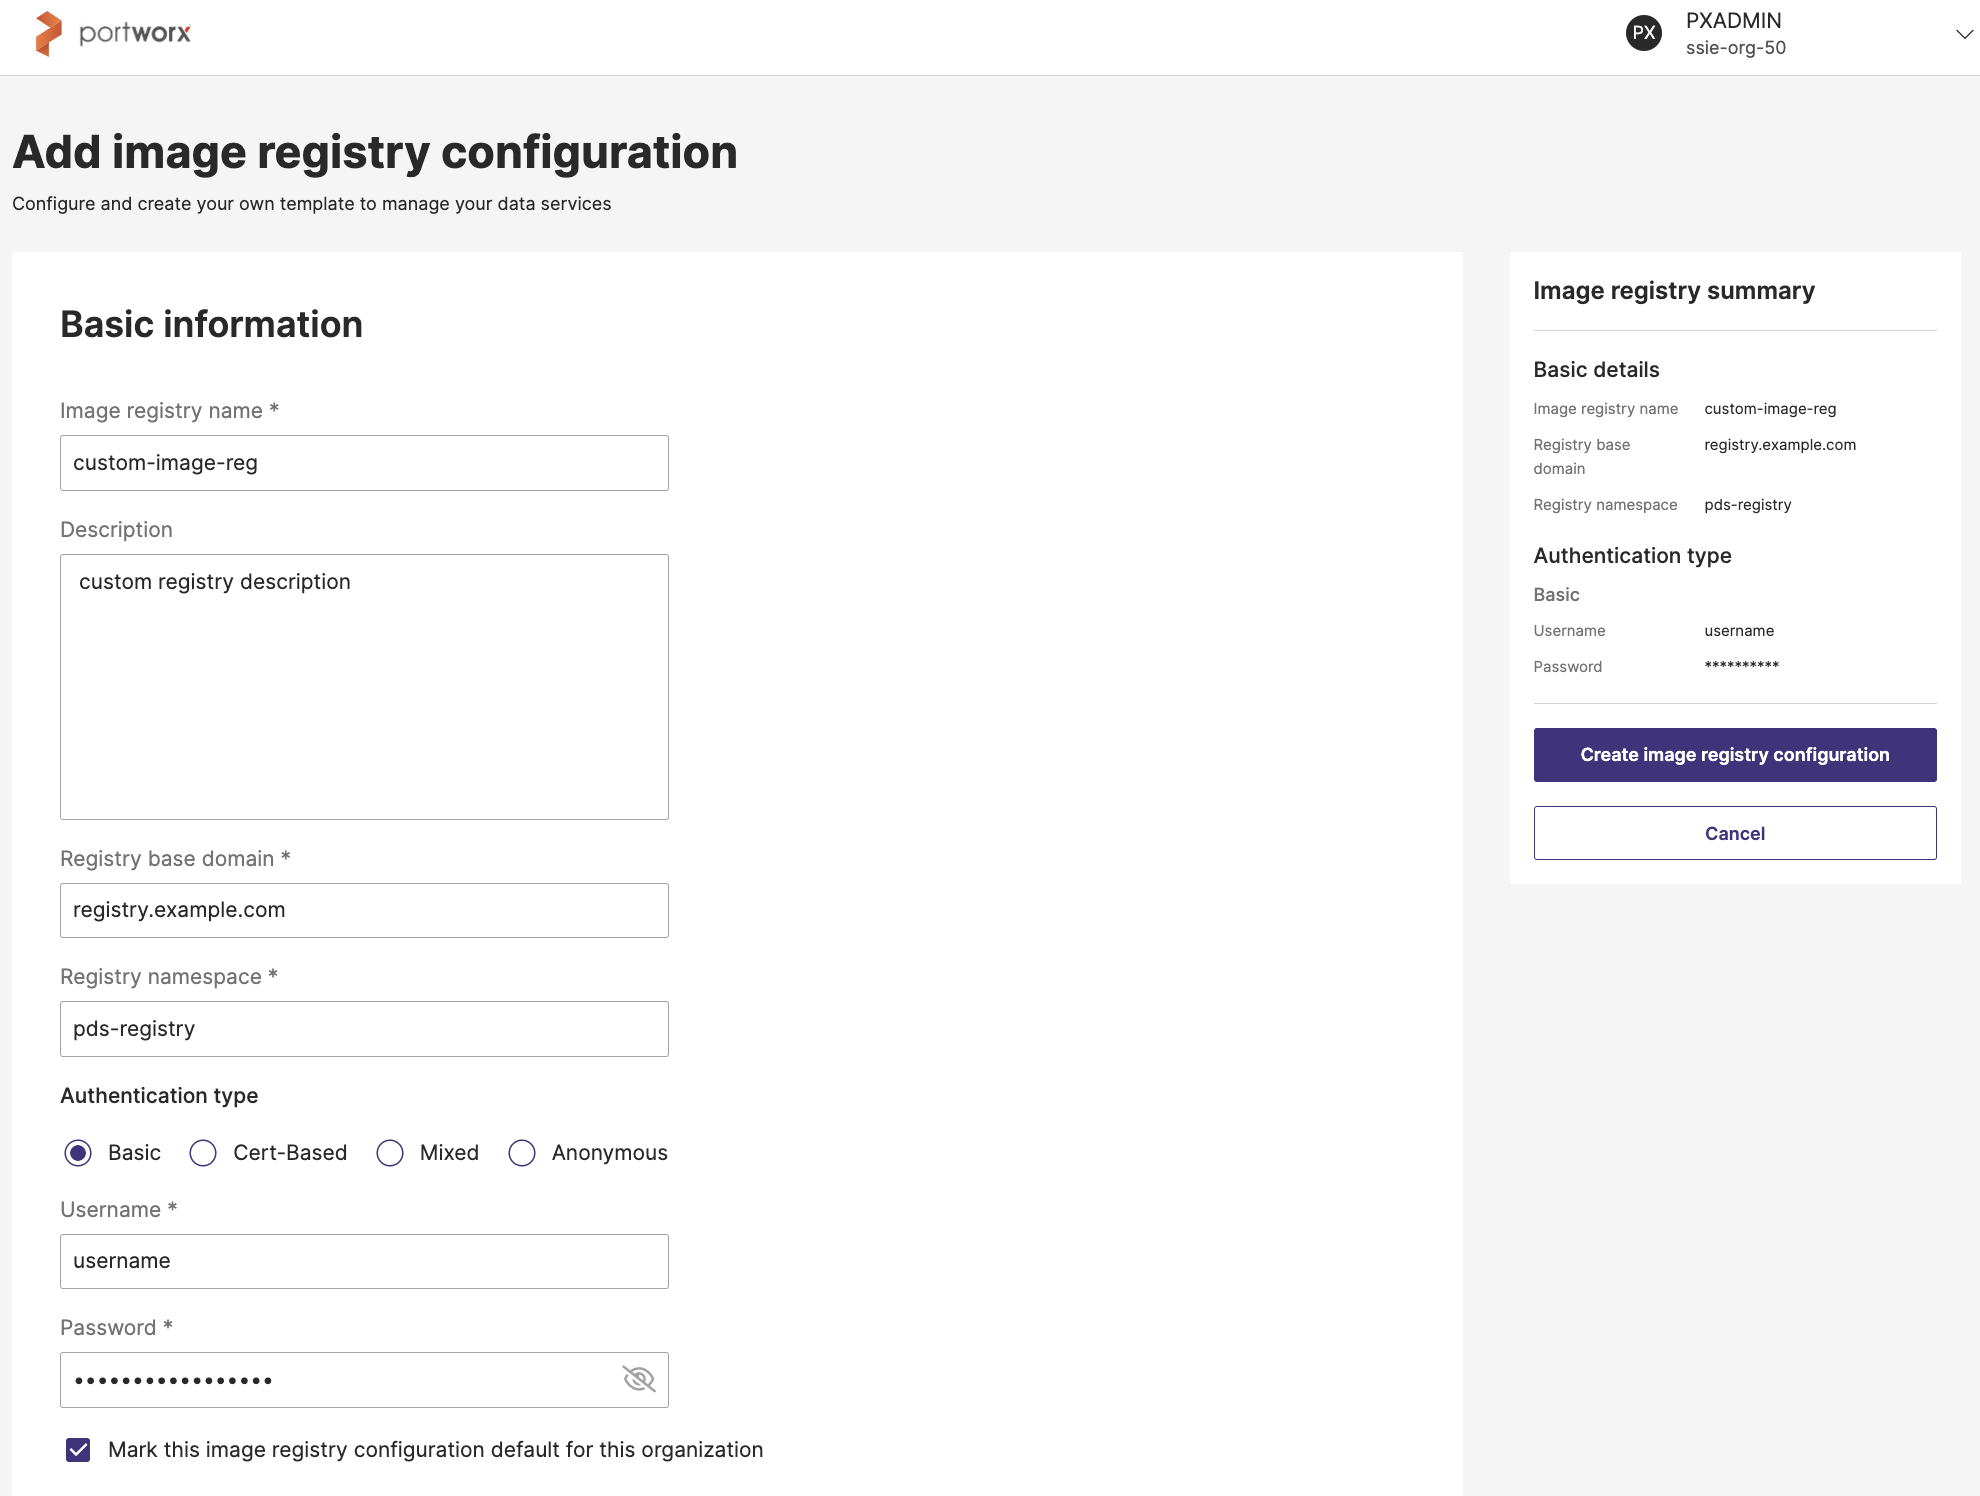
The Add image registry configuration page appears.
-
In the Add image registry configuration page -> Basic information section:

- Image registry name: Provide a descriptive name. For example, “IR 01 – Basic”.
- (Optional) Description: Add details about this registry. For example, “Private registry in datacenter X”.
- Registry base domain: The base domain or registry endpoint. For example,
registry.myorg.com. - Registry namespace: The repository or namespace where PDS will look for images. For example,
myorg/images. - Authentication type: From the Select Authentication type dropdown, select one of the following authentication method:
- Basic Authentication: Uses a simple username and password combination to secure access. This option is selected by default.
- Mixed Authentication: Allows multiple credential methods (such as Basic plus a certificate) to be used together.
- Anonymous Authentication: Requires no credentials at all, allowing open access.
- Certificate-Based Authentication: Relies on SSL or TLS certificates to verify identity, rather than traditional user credentials.
- Username and Password: Mandatory to enter, if you have selected Basic or Mixed Authentication type.
- CA certificate: Mandatory to specify, if you have selected the Mixed or Certificate-Based Authentication type.
- (Optional) Select the checkbox, if you want PDS to use this registry by default whenever you register a cluster.
-
Review your settings in the Image registry summary on the right.
-
Click Create image registry configuration to finalize.
- Newly created registries appear in the Image Registry Configuration table. Validate by deploying a test data service to ensure PDS can pull images correctly.
- The image registry configuration is applied during cluster registration. If you mark an image registry configuration as default, it is automatically pre-filled on the cluster registration page. The image registry configuration for a new data service depends on the cluster in which it is deployed.
Manage image registry configurations
This section describes how to edit or remove existing image registry configurations, and how to set one as the default.
Edit an image registry configuration
To edit an existing configuration details:
-
In the Image Registry Configuration tab, locate the configuration you want to edit.
-
Select the vertical ellipsis button, then select Edit from the dropdown.
This will open the Basic information form for the chosen configuration.
-
Modify any relevant fields, such as Image registry name, Description and any fields that are enabled for editing.
As you edit, the Image registry summary on the right side will automatically reflect your changes.
-
Review your edits in the Image registration summary panel.
-
Click Update image registry configuration to apply your changes and finalize the edit.
-
If you change your mind, choose Cancel to discard.
Your image registry configuration will now be updated with the new settings.
- All clusters using this image registry configuration will be updated.
- Ensure the registry is reachable from all clusters.
- Credential updates may take up to 10 minutes to reflect on connected clusters.
- Disconnected clusters will not receive the updated configuration. If credentials have been rotated and are no longer valid, disconnected clusters must be re-registered.
Delete an image registry configuration
To delete an image registry configuration:
-
In the Image Registry Configuration tab, locate the configuration you want to delete.
-
Select the vertical ellipsis button, then select Delete from the dropdown.
A confirmation window appears warning that this action is irreversible.
-
In the Delete image registry configuration window, click Delete to permanently remove it.
After completing these steps, the image registry configuration will no longer appear in your configuration list.
You can delete the default image registry configuration unless it is in use by a cluster or inherited from the account.
Mark an image registry configuration default
To mark an existing image registry configuration as the default:
- In the Image Registry Configuration tab, locate the configuration you want to mark as default.
- Select the vertical ellipsis button, then select Mark as default from the dropdown.
“Configuration set as default successfully” will appear to confirm that the image registry configuration was successfully updated as the default.