Proxy configuration
Proxy configuration is used when PDS must operate behind a corporate firewall or proxy server. By specifying proxy details, you ensure seamless access to external resources (like container registries), enabling smooth image pulls and updates without network disruptions.
In the PDS platform, navigate to Config Manager and select Proxy to view and manage existing proxy configurations or create new ones:
On the Proxy Configuration tab, you will see a list of all existing configurations. The table includes:
- Proxy Name: The user-defined label for the proxy configuration.
- (Optional)HTTP URL: The proxy’s HTTP endpoint.
- (Optional)HTTPS URL: The proxy’s HTTPS endpoint. IPv6 format is not supported.
- Created By: The account or user who created the configuration.
- Cluster Usage: Shows how many clusters currently use this proxy configuration.
- Created At: The date and time the proxy configuration was first added.
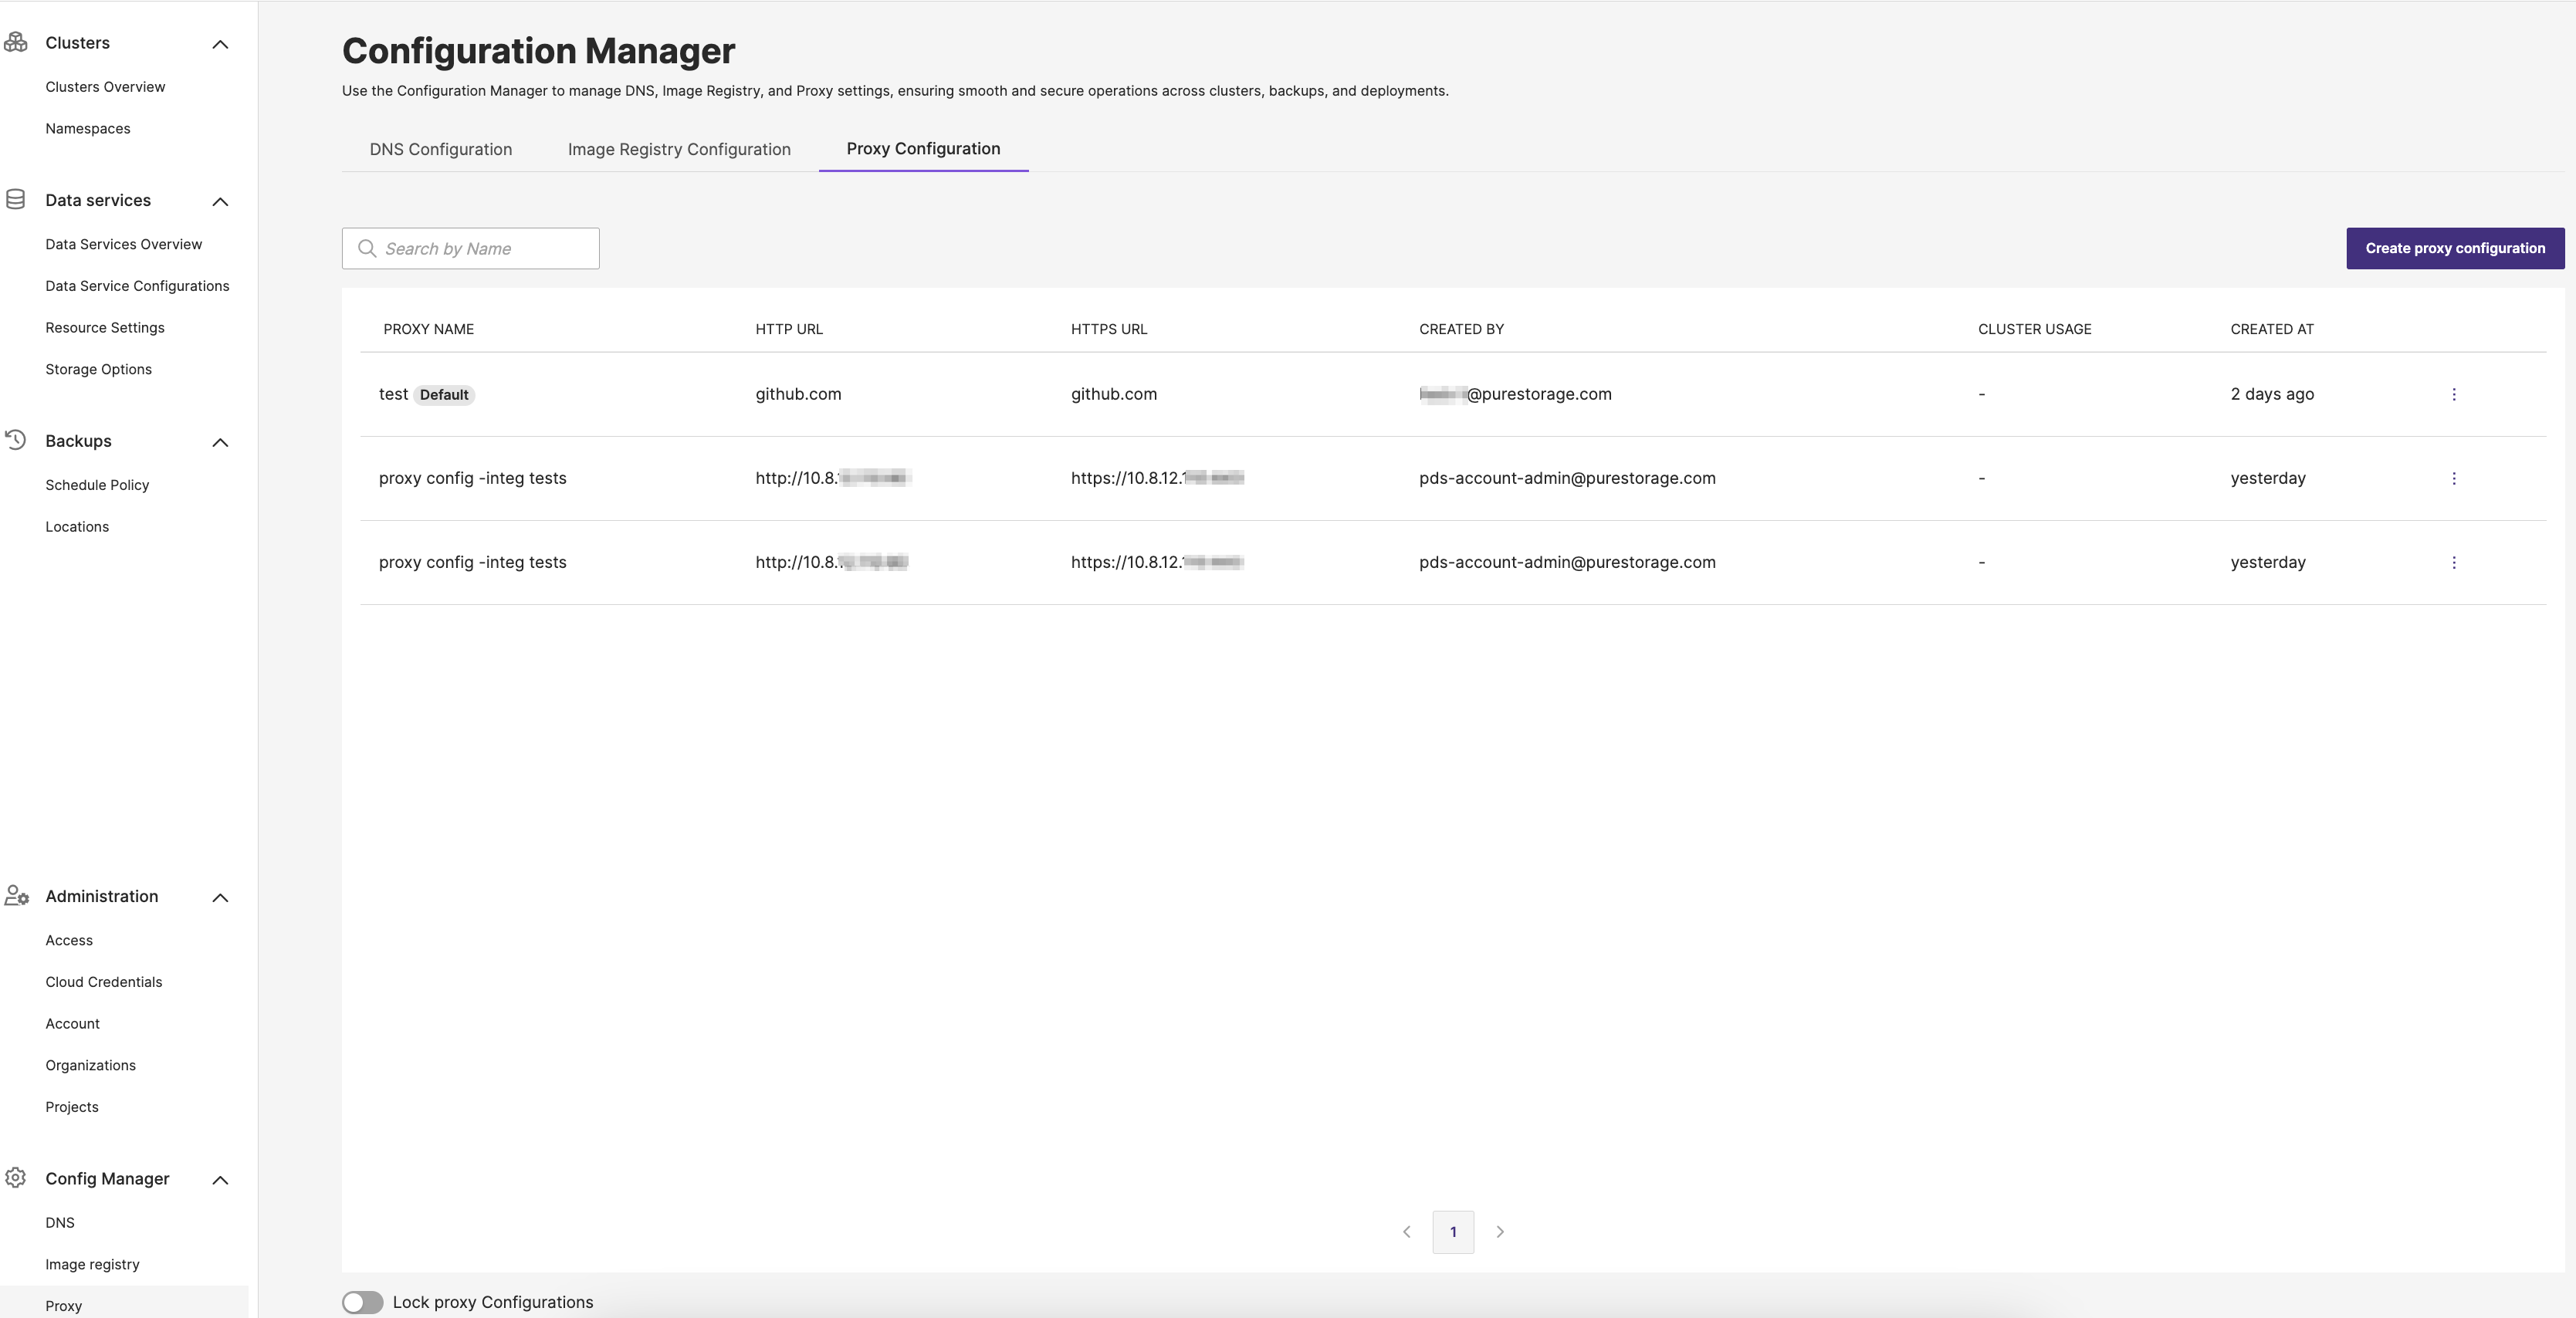
Lock proxy Configurations
Enabling the lock for proxy configurations blocks creating new, editing, and deleting existing configurations. This ensures that network traffic routing through these proxies remains consistent and protected from accidental alterations.
Create a proxy configuration
-
In the PDS UI left pane, select Proxy under the Config Manager dropdown.
-
In the Configuration Manager page -> Proxy Configuration tab, select the Create proxy configuration button.
The Add proxy configuration page appears.
-
In the Add proxy configuration page -> Basic information section:
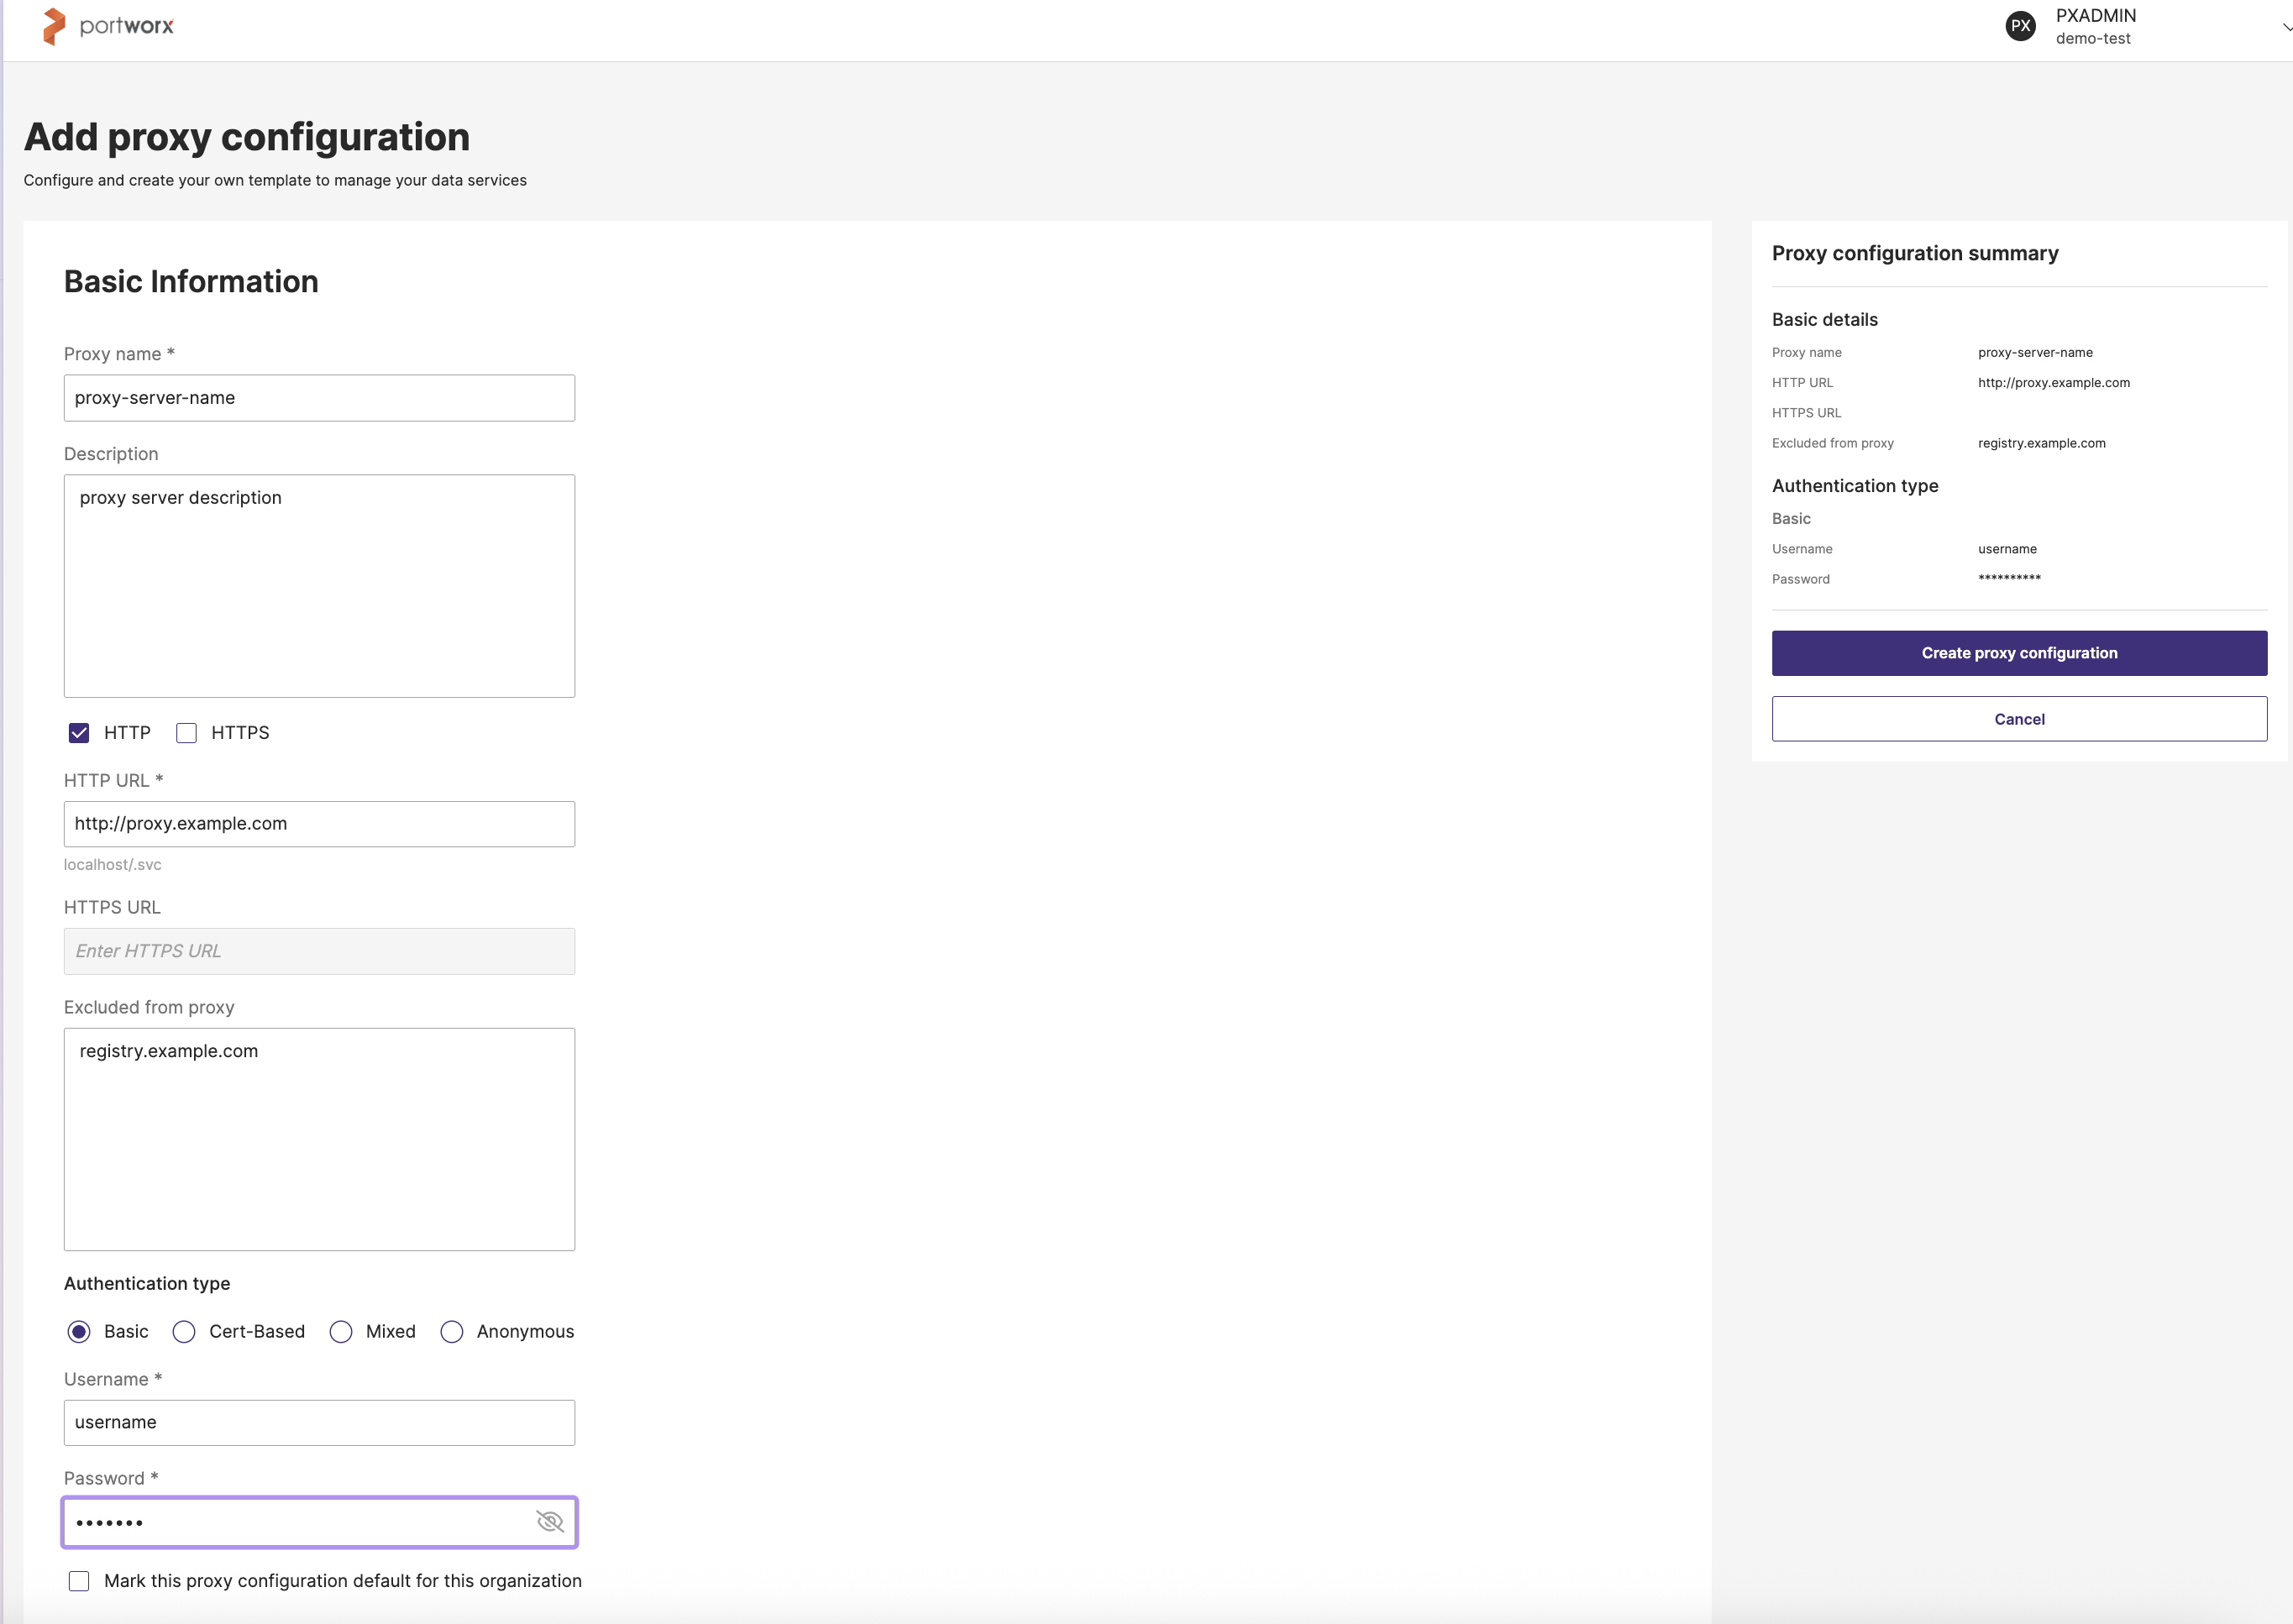
- Proxy name: Enter a descriptive name for this proxy. For example, “Corporate Proxy” or “abc”.
- (Optional) Description: Add details or notes about this proxy.
- (Optional) HTTP URL: Provide the address for the proxy’s HTTP endpoint. For example,
http://proxy.myorg.com:8080. - (Optional) HTTPS URL: Provide the address for the proxy’s HTTPS endpoint. For example,
https://proxy.myorg.com:8443. IPv6 format is not supported. - (Optional) Excluded from proxy: List any domains or IP addresses that you want bypassed from this proxy. For example, localhost,
127.0.0.1, github.com. - Authentication type: From the Select Authentication type dropdown, select one of the following authentication method:
- Basic Authentication: Uses a simple username and password combination to secure access. This option is selected by default.
- Mixed Authentication: Allows multiple credential methods (such as Basic plus a certificate) to be used together.
- Anonymous Authentication: Requires no credentials at all, allowing open access.
- Certificate-Based Authentication: Relies on SSL or TLS certificates to verify identity, rather than traditional user credentials.
- Username and Password: Mandatory to enter, if you have selected Basic or Mixed Authentication type.
- CA certificate: Mandatory to specify, if you have selected the Mixed or Certificate-Based Authentication type.
- (Optional) Select the checkbox, if you want PDS to use this registry by default whenever you register a cluster.
-
Review your settings in the Proxy configuration summary on the right.
-
Click Create proxy configuration to finalize.
- Once saved, your newly created proxy configuration should be visible in the Proxy Configuration table.
- The proxy configuration is applied during cluster registration. If you mark a proxy configuration as default, it is automatically pre-filled on the cluster registration page. The proxy configuration for a new data service depends on the cluster in which it is deployed.
Manage proxy configurations
This section describes how to edit or remove existing proxy configurations, and how to set one as the default.
Edit a proxy configuration
To edit an existing configuration details:
-
In the Proxy Registry Configuration tab, locate the configuration you want to edit.
-
Select the vertical ellipsis button, then select Edit from the dropdown.
This will open the Basic information form for the chosen configuration.
-
Modify any relevant fields, such as Proxy name, Description and any fields that are enabled for editing.
As you edit, the Proxy configuration summary on the right side will automatically reflect your changes.
-
Review your edits in the Proxy summary panel.
-
Click Update proxy configuration to apply your changes and finalize the edit.
-
If you change your mind, choose Cancel to discard.
Your proxy configuration will now be updated with the new settings.
- All clusters using this proxy configuration will be updated.
- Ensure the proxy server is reachable from all clusters.
- Credential updates may take up to 10 minutes to reflect on connected clusters.
- Disconnected clusters will not receive the updated configuration. If the existing credentials or certificates have been rotated and are no longer valid, disconnected clusters must be re-registered.
Delete a proxy configuration
To delete a proxy configuration:
-
In the Proxy Configuration tab, locate the configuration you want to delete.
-
Select the vertical ellipsis button, then select Delete from the dropdown.
A confirmation window appears warning that this action is irreversible.
-
In the Delete Proxy configuration window, click Delete to permanently remove it.
After completing these steps, the proxy configuration will no longer appear in your configuration list.
You can delete the default proxy configuration unless it is in use by a cluster or inherited from the account.
Mark a proxy configuration default
To mark an existing proxy configuration as the default:
- In the Proxy Configuration tab, locate the configuration you want to mark as default.
- Select the vertical ellipsis button, then select Mark as default from the dropdown.
“Configuration set as default successfully” will appear to confirm that the proxy configuration was successfully updated as the default.