Use FlashArray as backend storage
This section provides instructions for configuring your environment to use FlashArray as backend storage for Kubernetes applications for single-tenant and multi-tenant setups.
Before you begin, ensure that all system requirements are met.
PX-CSI supports both block volumes and FlashArray File Services (NFS). If you plan to use both, follow both sections. If you’re using only one of these storage types, skip the other section.
- Configure block volumes - For applications requiring block storage with protocols like iSCSI, NVMe-oF, or Fibre Channel. Requires multipath and udev configuration.
- Configure FlashArray File Services - For applications requiring NFS file storage. Does not require multipath or udev configuration.
Configure block volumes
Skip this section if you are only using FlashArray File Services (NFS). The multipath and udev configurations below are required only for block protocols (iSCSI, NVMe-oF, Fibre Channel).
Configure multipath.conf file
PX-CSI supports native NVMe multipath and Device Mapper (DM) multipath. If you are using native NVMe multipath, you can skip this section. For DM multipath, you must configure the multipath.conf file as described below.
- FlashArray and PX-CSI do not support user-friendly names. Set
user_friendly_namestonobefore installing PX-CSI on your cluster. This ensures consistent device naming conventions between PX-CSI and FlashArray. - Add
polling_interval 10as recommended for RHEL. This defines how often the system checks for path status updates. - To avoid interference from the
multipathdservice during PX-CSI volume operations, set thepxddevice denylist rule.
Your /etc/multipath.conf file should follow this structure:
blacklist {
        devnode "^pxd[0-9]*"
        devnode "^pxd*"
        device {
          vendor "VMware"
          product "Virtual disk"
        }
}
defaults {
    polling_interval 10
    find_multipaths yes
}


devices {
    device {
        vendor                      "NVME"
        product                     "Everpure FlashArray"
        path_selector               "queue-length 0"
        path_grouping_policy        group_by_prio
        prio                        ana
        failback                    immediate
        fast_io_fail_tmo            10
        user_friendly_names         no
        no_path_retry               0
        features                    0
        dev_loss_tmo                60
    }
    device {
        vendor                   "PURE"
        product                  "FlashArray"
        path_selector            "service-time 0"
        hardware_handler         "1 alua"
        path_grouping_policy     group_by_prio
        prio                     alua
        failback                 immediate
        path_checker             tur
        fast_io_fail_tmo         10
        user_friendly_names      no
        no_path_retry            0
        features                 0
        dev_loss_tmo             600
    }
}
Configure udev rules
Configure queue settings with udev rules on all nodes. For recommended settings for FlashArray systems, see Applying Queue Settings with udev.
If you are using native NVMe multipath, you must update the udev rules to set the I/O policy to queue-depth. For more information, see Native Multipath Configuration.
Apply multipath and udev configurations
Apply the multipath and udev configurations from the previous sections for the changes to take effect.
- OpenShift Container Platform
- Other Kubernetes platforms
Use a MachineConfig in OpenShift to apply multipath and udev configuration files consistently across all nodes.
-
Encode the configuration files in base64 format and add them to the MachineConfig, as shown in the following example:
apiVersion: machineconfiguration.openshift.io/v1kind: MachineConfigmetadata:creationTimestamp:labels:machineconfiguration.openshift.io/role: workername: <your-machine-config-name>spec:config:ignition:version: 3.2.0storage:files:- contents:source: data:text/plain;charset=utf-8;base64,<base64-encoded-multipath-conf>filesystem: rootmode: 0644overwrite: truepath: /etc/multipath.conf- contents:source: data:text/plain;charset=utf-8;base64,<base64-encoded-udev_conf>filesystem: rootmode: 0644overwrite: truepath: /etc/udev/rules.d/99-pure-storage.rulessystemd:units:- enabled: truename: iscsid.service- enabled: truename: multipathd.service -
Apply the MachineConfig to your cluster:
oc apply -f <your-machine-config-name>.yaml
- Update the
multipath.conffile as described in the Configuremultipath.conffile section and restart themultipathdservice on all nodes:systemctl restart multipathd.service - Create the udev rules as described in the Configure udev rules section and apply them on all nodes:
udevadm control --reload-rules && udevadm trigger
Volume attachment limits
PX-CSI supports up to 1024 volume attachments per node (LUNs for SCSI transports; namespaces for NVMe-oF). The effective limit also depends on the Linux storage stack, the HBA, and driver parameters. Before you deploy PX-CSI, ensure that the operating system (OS) and host bus adapters (HBAs) are configured to support the number of attachments required for your use case.
For Fibre Channel (FC), use the following commands to inspect LUN limits:
-
Identify the adapter type:
lspci -nn | grep -i fibre(Look for QLogic or Emulex in the output)
-
Inspect the LUN limits:
-
For QLogic adapters:
cat /sys/module/qla2xxx/parameters/ql2xmaxlun -
For Emulex adapters:
cat /sys/module/lpfc/parameters/lpfc_max_luns
tipIf the LUN limit is lower than the number of volume attachments you plan to use, you can update the LUN limits.
- OpenShift Container Platform
- Other Kubernetes platforms
Use the following MachineConfig to update the kernel arguments on all nodes:
-
For QLogic adapters:
apiVersion: machineconfiguration.openshift.io/v1kind: MachineConfigmetadata:name: fc-lun-updatelabels:machineconfiguration.openshift.io/role: workerspec:kernelArguments:- scsi_mod.max_luns=65535- qla2xxx.ql2xmaxlun=65535 -
For Emulex adapters:
apiVersion: machineconfiguration.openshift.io/v1kind: MachineConfigmetadata:name: fc-lun-updatelabels:machineconfiguration.openshift.io/role: workerspec:kernelArguments:- scsi_mod.max_luns=65535- lpfc.lpfc_max_luns=65535config:ignition:version: 3.2.0storage:files:- path: /etc/modprobe.d/lpfc.confmode: 0644contents:source: data:text/plain;base64,b3B0aW9ucyBscGZjIGxwZmNfbWF4X2x1bnM9NjU1MzU=
Manually run the following commands on all nodes:
-
For QLogic adapters:
echo "options qla2xxx ql2xmaxlun=65535" > /etc/modprobe.d/qla2xxx.confdracut -freboot -
For Emulex adapters:
echo "options lpfc lpfc_max_luns=65535" > /etc/modprobe.d/lpfc.confdracut -freboot
-
Configure FlashArray connectivity
- iSCSI
- NVMe-oF/TCP
- NVMe-oF RDMA
If you are using the iSCSI protocol, follow the instructions below to verify the iSCSI setup:
-
Run the following command from the node to discover your iSCSI targets:
iscsiadm -m discovery -t st -p <flash-array-interface-endpoint>10.13.xx.xx0:3260,207 iqn.2010-06.com.purestorage:flasharray.xxxxxxx10.13.xx.xx1:3260,207 iqn.2010-06.com.purestorage:flasharray.xxxxxxx -
Run the following command on each node to verify that each node has a unique initiator:
cat /etc/iscsi/initiatorname.iscsiInitiatorName=iqn.1994-05.com.redhat:xxxxx -
If the initiator names are not unique, assign a new unique initiator name:
echo "InitiatorName=`/sbin/iscsi-iname`" > /etc/iscsi/initiatorname.iscsiimportantReplace the initiator names on any nodes that have duplicates with the newly generated unique names.
-
After making changes, restart the iSCSI service:
systemctl restart iscsid
If your environment has multiple subnets with network policies that restrict cross-subnet communication, you can configure subnet-aware iSCSI login. This setting ensures that iSCSI initiator interfaces communicate only with FlashArray target interfaces within the same subnet. For more information, see Configure subnet-aware iSCSI login.
If you are using the NVMe-oF/TCP protocol, complete the following steps to ensure that the prerequisites are met and to optimize performance for FlashArray.
Prerequisites
-
Supported Operating System: RHEL 9.4 and Ubuntu 22.04
-
Supported Multipath version:
multipath-tools(0.8.7 or later) -
Supported NVMe CLI version
Operating System NVMe CLI version RHEL version earlier than 9.4
Ubuntu version earlier than 22.04Version 1.16 RHEL version 9.4 to 9.5
Ubuntu version 22.04 or laterVersion 2.6 RHEL version 9.6 or later Version 2.11 -
Verify NVMe multipath mode: PX-CSI automatically detects and supports both native NVMe multipath and DM multipath. To check which mode is active, run:
modprobe nvme_corecat /sys/module/nvme_core/parameters/multipathY: native NVMe multipath (ANA) is enabled. PX-CSI uses native multipath.N: DM multipath is used. PX-CSI uses device mapper multipath.- Parameter does not exist: an older kernel without native multipath support. DM multipath is used.
Both modes are supported. No configuration changes are required. For more information about multipath support with FlashArray, see Native Multipath Configuration.
note- If you need to change the multipath mode after you install PX-CSI, cordon the nodes, drain the pods, follow the operating system documentation to update the multipath mode, and then uncordon the nodes after the change is complete.
-
Make sure that NVMe-oF/TCP interface is enabled in FlashArray.
Optimize NVMe performance settings
The following settings are recommended to optimize performance and ensure that NVMe storage devices function efficiently within a multipath environment:
-
Disable I/O scheduler: NVMe devices manage their own queuing and prioritize requests, making kernel-level I/O scheduling unnecessary.
cat /sys/block/nvme0n1/queue/scheduler # Should return '[none] mq-deadline' -
Enable blk-mq: Enabling block multi-queue (blk-mq) for multipath devices allows the system to use multiple I/O queues, improving parallel request handling.
cat /sys/module/dm_mod/parameters/use_blk_mq # Should return 'Y'
After modifying the configuration, restart the multipathd service:
systemctl restart multipathd.service
Verify NVMe Qualified Name (NQN)
After installing the NVMe CLI, verify the NVMe Qualified Name (NQN) on all nodes:
-
Run the following command on each node to verify whether each node has a unique NVMe Qualified Name (NQN):
cat /etc/nvme/hostnqnnqn.2014-08.org.nvmexpress:uuid:xxxxxxx-xxxx-xxxx-xxxx-c6412d6e0e77 -
If the NQNs are not unique, assign a new name using the following command to prevent potential conflicts in networked environments:
nvme gen-hostnqn > /etc/nvme/hostnqn
By ensuring that these settings are properly configured, you can optimize NVMe performance and maintain stable connectivity with FlashArray in an NVMe-oF/TCP environment.
NVMe-oF RDMA can be used with FlashArray Direct Access (FADA) volumes. When you select NVMe-oF RDMA during StorageCluster spec generation or specify the protocol in the spec manually, PX-CSI recognizes that you want to use the NVMe-oF RDMA protocol and uses it to communicate with the FlashArray.
- QoS (IOPS and bandwidth) limits are not supported with NVMe volumes.
- In-place upgrades from iSCSI or Fibre Channel to NVMe are not supported. Changing the SAN type might result in unpredictable attachment behavior.
Prerequisites
-
Check that your setup meets the requirements in the NVMe-oF RDMA Support Matrix.
-
Ensure that your Linux kernel supports NVMe. Load the
nvme-fabricsandnvme-rdmamodules on boot or include them when you compile the kernel. -
Supported NVMe CLI version
Operating System NVMe CLI version RHEL version earlier than 9.4
Ubuntu version earlier than 22.04Version 1.16 RHEL version 9.4 to 9.5
Ubuntu version 22.04 or laterVersion 2.6 RHEL version 9.6 or later Version 2.11 -
Verify NVMe multipath mode: PX-CSI automatically detects and supports both native NVMe multipath and DM multipath. To check which mode is active, run:
modprobe nvme_corecat /sys/module/nvme_core/parameters/multipathY: native NVMe multipath (ANA) is enabled. PX-CSI uses native multipath.N: DM multipath is used. PX-CSI uses device mapper multipath.- Parameter does not exist: an older kernel without native multipath support. DM multipath is used.
Both modes are supported. No configuration changes are required in PX-CSI. For more information about multipath support with FlashArray, see Native Multipath Configuration.
note- If you need to change the multipath mode after you install PX-CSI, cordon the nodes, drain the pods, follow the operating system documentation to update the multipath mode, and then uncordon the nodes after the change is complete.
-
Make sure that NVMe-oF RDMA interface is enabled in FlashArray.
Optimize NVMe performance settings
The following settings are recommended to optimize performance and ensure that NVMe storage devices function efficiently within a multipath environment:
-
Disable I/O scheduler: NVMe devices manage their own queuing and prioritize requests, making kernel-level I/O scheduling unnecessary.
cat /sys/block/nvme0n1/queue/scheduler # Should return '[none] mq-deadline' -
Enable blk-mq: Enabling block multi-queue (blk-mq) for multipath devices allows the system to use multiple I/O queues, improving parallel request handling.
cat /sys/module/dm_mod/parameters/use_blk_mq # Should return 'Y'
After modifying the configuration, restart the multipathd service:
systemctl restart multipathd.service
Verify NVMe Qualified Name (NQN)
After installing the NVMe CLI, verify the NVMe Qualified Name (NQN) on all nodes:
-
Run the following command on each node to verify whether each node has a unique NVMe Qualified Name (NQN):
cat /etc/nvme/hostnqnnqn.2014-08.org.nvmexpress:uuid:xxxxxxx-xxxx-xxxx-xxxx-c6412d6e0e77 -
If the NQNs are not unique, assign a new name using the following command to prevent potential conflicts in networked environments:
nvme gen-hostnqn > /etc/nvme/hostnqn
By ensuring that these settings are properly configured, you can optimize NVMe performance and maintain stable connectivity with FlashArray in an NVMe-oF RDMA environment.
Configure hardware
Configure your Cisco, Juniper, or Arista switch for use with FlashArray NVMe-oF RDMA.
Configure the adapter as a PCI device
Configure the NVMe-oF RDMA adapter in ESXi as a PCI device. For example, on vSphere, follow the steps in Enable Passthrough for a Network Device on a host from the VMware documentation.
Once the NVMe-oF RDMA adapter is set up as a PCI device, the VM can mount it as a PCI device and access external storage directly.
Use NVMe-oF RDMA in a VM
If you are using a VM, you also need to perform additional steps to enable and configure PCI passthrough.
The following examples illustrate how to perform these steps for vSphere. Your environment might require different steps.
Enable RoCE as PCI passthrough
After you install a physical adapter, the NVMe-oF RDMA adapter should be listed in PCI Devices.
-
Navigate to a host in the vSphere Client navigator.
-
Select the Configure tab, then under Hardware, select PCI devices.
-
Select all of the NVMe adapters that you added, then select Toggle passthrough.
When passthrough configurations complete successfully, the device is listed in the Passthrough-enabled devices tab.
Configure PCI passthrough in a VM
-
In the vSphere client, select the VM you want to add the PCI passthrough card to from the list of VMs. Right-click the VM, then select Edit settings.
-
Click Add new device, then select PCI device.
-
Select DirectPathIO, then select any of the RoCE adapter interfaces.
Add as many PCI devices for RoCE adapters as you need for the VM. Multiple ports on the FlashArray provide redundant connections, but for extra redundancy you should add two or more PCI devices in case one device fails.
Configure FlashArray File Services
Skip this section if you are only using FlashArray block volumes (iSCSI, NVMe-oF, Fibre Channel). This section is only for NFS-based file storage.
Ensure that FlashArray is configured to meet the following prerequisites:
-
Enable FlashArray File Services on your FlashArray. For more information, see Setting Up File Services.
-
Configure a virtual interface (VIF) for use with file services.
-
Create a filesystem to serve as the top-level directory for FA file volumes.
-
Create an NFS policy. This policy is required to create exports for FA file volumes.
By default, when you enable FlashArray File Services, the nfs-simple policy is available and has user mapping enabled. If you plan to use this policy, edit it to disable user mapping.
When user mapping is enabled and the policy uses AUTH_SYS security, anonymous users are mapped to UID and GID 65534 unless overridden. This can cause permission issues for workloads using fixed user identities. AUTH_SYS is the default NFS authentication mode and uses numeric UID and GID values passed from the client.
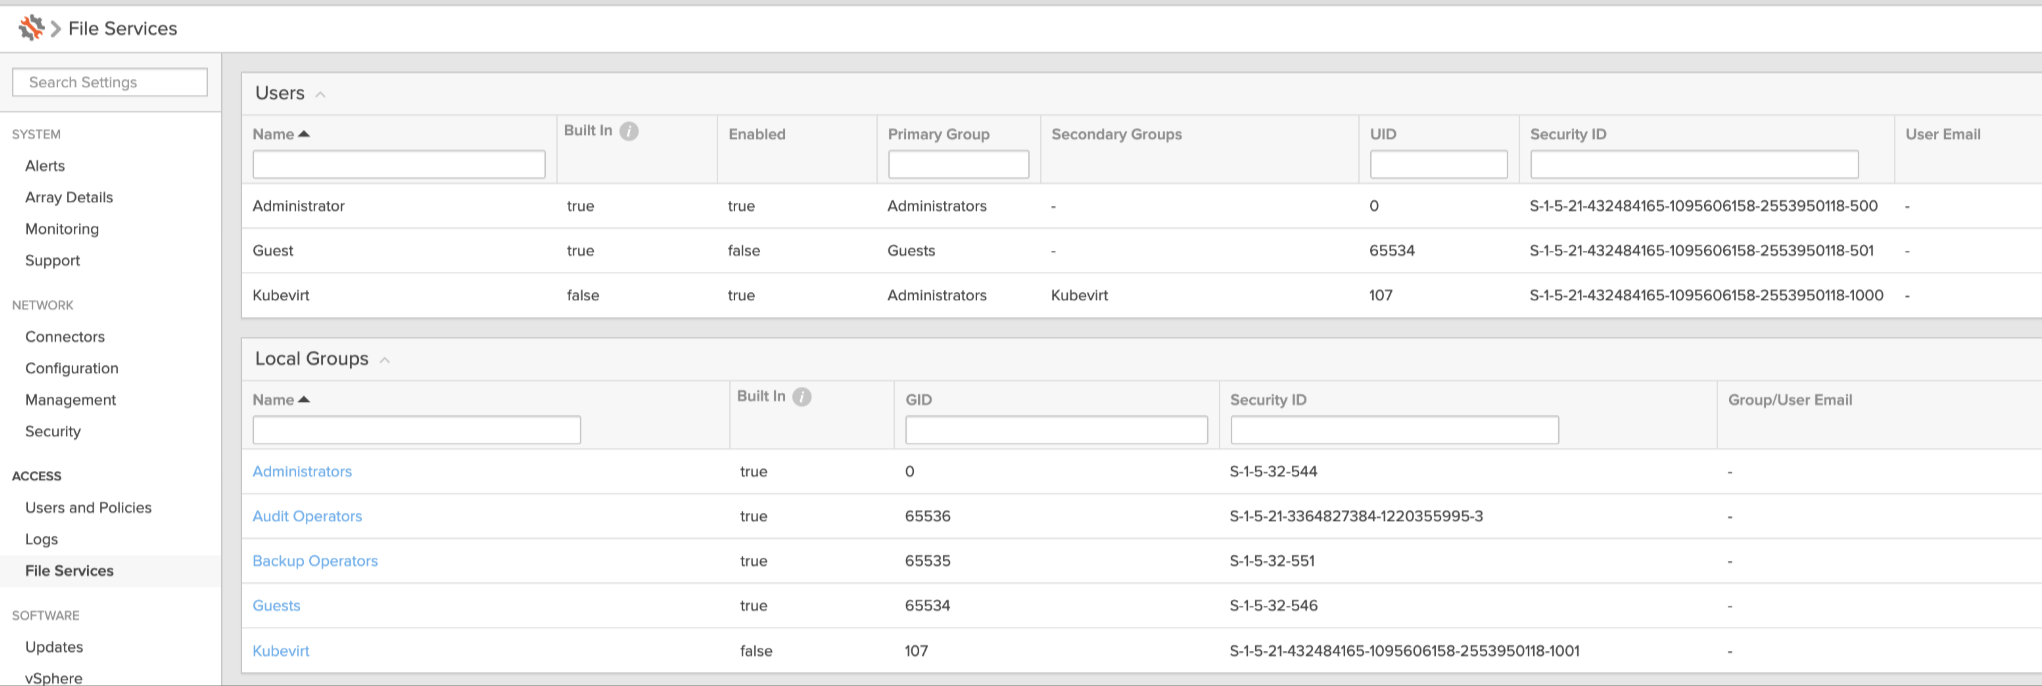
If you plan to use the same policy with root_squash for KubeVirt:
- Add a user (for example,
kubevirt) to FlashArray File Services. - KubeVirt VMs use QEMU, which runs with UID 107 and GID 107.
- Set both the UID and GID to
107.

Alternatively, you can create a new policy with user mapping disabled and no_root_squash access.
For more information about FA file configuration, see FA file NFS configuration and use cases.
FlashArray does not support secure multi-tenancy for FA file services.
Set up user access in FlashArray
To establish secure communication between PX-CSI and FlashArray, create a user account and generate an API token. This token acts as an authentication key, allowing PX-CSI to interact with FlashArray and perform storage operations on behalf of the authorized user.
FlashArray host sharing with realms is not supported when using Secure Multi-Tenancy (SMT). You cannot mix hosts within a realm with hosts outside a realm on the same node. For example, using Boot from SAN with a host outside the realm is not supported.
Note that realms are supported only for block volumes. If you are using the same FlashArray for file services, you must create a FlashArray user that is not part of a realm so that PX-CSI can use the same token for both block volume and file service operations.
- FlashArray without secure multi-tenancy
- FlashArray with secure multi-tenancy
-
Create a user:
- In your FlashArray dashboard, select Settings in the left pane.
- On the Settings page, select Access.
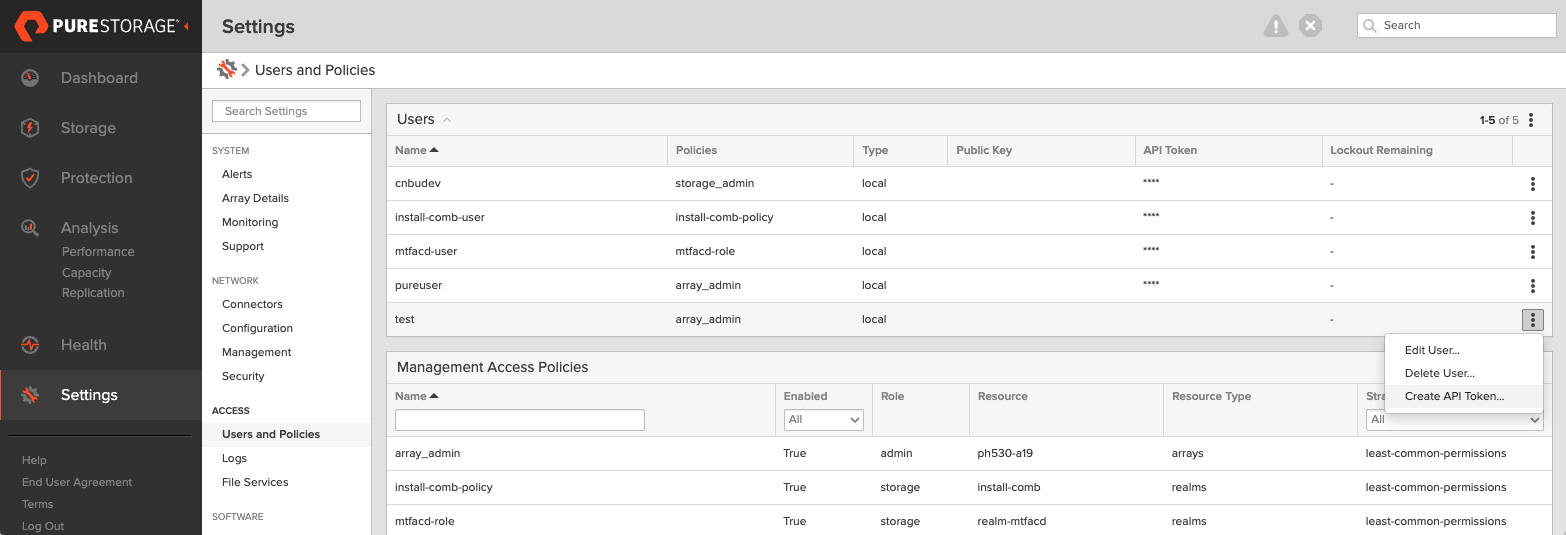
- In the Users section, click the vertical ellipsis in the top-right corner and select Create User:

- In the Create User window, enter your details and set the role to Storage Admin.
- Select Create to add the new user.
-
Generate an API token:
- To create a token for the user you created, select the user from the Users list, click the vertical ellipsis in the top-right corner of the username, and select Create API Token:
- In the API Token window, leave the Expires in field blank if you want to create a token that never expires, and click Create.
- Save this information to avoid the need to recreate the token.
- To create a token for the user you created, select the user from the Users list, click the vertical ellipsis in the top-right corner of the username, and select Create API Token:
The following steps must be performed on the FlashArray CLI.
-
Create a realm for each customer: All volumes from the PX-CSI installation will be placed within this realm, ensuring customer-specific data isolation.
purerealm create <customer1-realm>Name Quota Limit<customer1-realm> - -
Create a pod inside the realm: A pod in FlashArray defines a boundary where specific volumes are placed.
purepod create <customer1-realm>::<fa-pod-name>noteStretched FlashArray pods (pods spanning multiple FlashArrays) are not supported.
By assigning realms and pods in FlashArray, you ensure that different users interact only with the specific storage resources allocated to them.
-
Create a policy for a realm: Ensure that you have administrative privileges on FlashArray before proceeding. This policy grants users access to their respective realms with defined capabilities.
purepolicy management-access create --realm <customer1-realm> --role storage --aggregation-strategy all-permissions <realm-policy>For basic privileges, use the following command:
purepolicy management-access create --realm <customer1-realm> --role storage --aggregation-strategy least-common-permissions <realm-policy> -
Verify the created policy: This step ensures that the policy has been set up correctly with the right permissions.
purepolicy management-access listName Type Enabled Capability Aggregation Strategy Resource Name Resource Type<realm-policy> admin-access True all all-permissions <customer1-realm> realmsThis policy ensures that users linked to the specified realm can perform storage operations within their allocated realm.
-
Create a user linked to a policy: This command creates a user with the access rights defined by the policy. You must create a password that the user can use to log in to FlashArray, as shown in the output:
pureadmin create --access-policy <realm-policy> <flasharray-user>Enter password:Retype password:Name Type Access Policy<flasharray-user> local <realm-policy>This step ensures that users are securely connected to their designated realms with appropriate access.
-
Sign in as the newly created user in the FlashArray CLI.
-
Run
pureadmin create --api-tokenand copy the created token.
Create pure.json file
To integrate PX-CSI with FlashArray, create a JSON configuration file (named pure.json) containing essential information about the FlashArray environment. This file should include the management endpoints and the API token you generated.
PX-CSI supports FlashArray ActiveCluster with block volumes for high availability, providing synchronous replication between two FlashArrays, a recovery point objective (RPO) of zero, and automatic failover. To use ActiveCluster, add both FlashArrays to the pure.json configuration file. For more information about ActiveCluster, see Use FlashArray ActiveCluster for high availability.
-
Management endpoints: These are URLs or IP addresses that PX-CSI uses to communicate with FlashArray through API calls. To locate these, go to Settings > Network in your FlashArray dashboard. Note the IP addresses or hostnames of your management interfaces, prefixed with vir, indicating virtual interfaces.
important- For an IPv6 address, ensure that the IP address is enclosed in square brackets. For example:
"MgmtEndPoint": "[XXXX:XXXX:XXXX:XXXX:XXXX:XXXX:XXXX:XXXX]". - If you're using FlashArray file services, the
fileVIFcan be used as a management endpoint. It accepts HTTPS traffic and is created using subinterfaces on both controllers, making it a floating management virtual IP (VIP). This configuration enables high availability. You can configurefileVIFas themgmtEndpointin PX-CSI if you want to consolidate management and data communication onto the same interface.
- For an IPv6 address, ensure that the IP address is enclosed in square brackets. For example:
-
API token: Generated in the previous section.
-
Realm (secure multi-tenancy only): Realms define tenant boundaries within a secure multi-tenancy setup. When multiple FlashArrays are attached to a cluster, the admin can specify a realm to ensure that storage volumes are isolated for each tenant. FlashArray volumes created through PX-CSI will be placed within the specified realm.
note- Each cluster can only support one realm per array, meaning a single PX-CSI deployment cannot use multiple realms on the same FlashArray.
- Secure multi-tenancy is supported only for block volumes.
-
NFSEndPoint (FlashArray file services only): Specify the
NFSEndPointof the FlashArray file services.importantIf you are using an IPv6 address for NFSEndPoint, ensure that the IP address is enclosed in square brackets, for example:
"NFSEndpoint": "[XXXX:XXXX:XXXX:XXXX:XXXX:XXXX:XXXX:XXXX]". -
VLAN (VLAN binding only): Specify the VLAN ID to which the host is bound. VLAN binding ensures that storage traffic between the Kubernetes node and FlashArray is limited to the specified VLAN. When this field is set, PX-CSI registers the Kubernetes node as a host associated with the specified VLAN ID. For more information about creating VLAN tagging for your FlashArray, see the VLAN Tagging section in the Purity//FA Administration Guide
noteVLAN binding is supported on Purity version 6.4.1 or later.
Use the information above to create a JSON file. Below is a template for the configuration content, which you should populate with your specific information:
If you are configuring both FlashArray and FlashBlade, you can add FlashBlade configuration information in the same file. Refer to the JSON file for more information.
- FlashArray without secure multi-tenancy
- FlashArray with secure multi-tenancy
{
  "FlashArrays": [
    {
      "MgmtEndPoint": "<fa-management-endpoint>",
      "APIToken": "<fa-api-token>",
      "NFSEndPoint": "<nfs-endpoints-of-fa>", ## This field is required only for FA file services.
      "VLAN": "<vlan-id>" ## This field is required only VLAN binding.
    }
  ]
}
{
  "FlashArrays": [
    {
      "MgmtEndPoint": "<first-fa-management-endpoint1>",
      "APIToken": "<first-fa-api-token>",
      "Realm": "<first-fa-realm>",
      "VLAN": "<vlan-id>" ## This field is required only VLAN binding.
    }
  ]
}
(Optional) CSI topology feature
PX-CSI supports topology-aware storage provisioning for Kubernetes applications. By specifying topology information, such as node, zone, or region, you can control where volumes are provisioned. This ensures that storage aligns with your application's requirements for availability, performance, and fault tolerance. PX-CSI optimizes storage placement, improving efficiency and resilience in multi-zone or multi-region Kubernetes environments. For more information, see CSI topology.
To prepare your environment to use topology-aware provisioning, follow these steps:
- Edit the
pure.jsonfile created in the previous section to define the topology for each FlashArray. For more information, seepure.jsonwith CSI topology. - Label your Kubernetes nodes with values that correspond to the labels defined in the
pure.jsonfile. For example:kubectl label node <nodeName> topology.portworx.io/zone=zone-0kubectl label node <nodeName> topology.portworx.io/region=region-0
Add FlashArray configuration to a Kubernetes Secret
To enable PX-CSI to access the FlashArray configuration, add the pure.json file to a Kubernetes secret by running the following command to create a secret named px-pure-secret:
- OpenShift Container Platform
- Other Kubernetes platforms
oc create secret generic px-pure-secret --namespace <stc-namespace> --from-file=pure.json=<file path>
secret/px-pure-secret created
kubectl create secret generic px-pure-secret --namespace <stc-namespace> --from-file=pure.json=<file path>
secret/px-pure-secret created
- The specific name
px-pure-secretis required so that PX-CSI can correctly identify and access the Kubernetes secret upon startup. This secret securely stores the FlashArray configuration details and allows PX-CSI to access this information within the Kubernetes environment. - Ensure that the
px-pure-secretis in the same namespace where you plan to install PX-CSI.