Access Web Console with AWS ALB
This procedure configures the ALB as internal (alb.ingress.kubernetes.io/scheme: internal), which keeps the Portworx Backup web console on a private network. This is the recommended default.
Do not change the scheme to internet-facing unless public internet access to the console is an explicit, intended requirement — an internet-facing ALB exposes the console to the public internet. To keep the console private, you can also expose the UI service as ClusterIP or an internal load balancer. For details, see Configure Access to Portworx Backup Web Console.
Perform the following steps to use an AWS Application Load Balancer (ALB) to access Portworx Backup UI:
-
Remove the AWS Elastic Load Balancing (ELB) service and change to NodePort, and add Port 443. Ensure the target port is set to 8080. For example:
- name: httpport: 80protocol: TCPtargetPort: 8080- name: httpsport: 443protocol: TCPtargetPort: 8080 -
Install the AWS Load Balancer Controller on your cluster. This is the current, supported controller that provisions ALBs for Ingress resources. The older
aws-alb-ingress-controllerproject has been renamed to the AWS Load Balancer Controller and is deprecated; do not use thev1.0.0manifests. Follow the official installation steps in the AWS Load Balancer Controller documentation. -
Verify that the AWS Load Balancer Controller is running. It installs into the
kube-systemnamespace by default:kubectl get deployment -n kube-system aws-load-balancer-controllerIf the deployment is not ready, inspect the controller pods and logs:
kubectl get pods -n kube-system -l app.kubernetes.io/name=aws-load-balancer-controllerkubectl logs -n kube-system deployment/aws-load-balancer-controller -
Launch ALB with default port 80. For example:
apiVersion: networking.k8s.io/v1kind: Ingressmetadata:name: "px-backup-ingress"namespace: "px-central"annotations:alb.ingress.kubernetes.io/scheme: internalalb.ingress.kubernetes.io/subnets: subnet-0b220d16cacdde728, subnet-086e80f21d1666074alb.ingress.kubernetes.io/certificate-arn: <acm-certificate-arn>alb.ingress.kubernetes.io/listen-ports: '[{"HTTP": 80}, {"HTTPS": 443}]'alb.ingress.kubernetes.io/ssl-redirect: '443'labels:run: pxcentral-frontendspec:ingressClassName: albrules:- http:paths:- path: /*pathType: ImplementationSpecificbackend:service:name: "px-backup-ui"port:number: 80noteThe
extensions/v1beta1API version for Ingress was removed in Kubernetes 1.22. The example above usesnetworking.k8s.io/v1, which is required for Kubernetes 1.22 and later. Thekubernetes.io/ingress.classannotation is replaced by thespec.ingressClassNamefield innetworking.k8s.io/v1.noteThis example uses
alb.ingress.kubernetes.io/scheme: internal, which keeps the console on a private (internal) network — the recommended default. Useinternet-facingonly when public internet access to the console is an explicit, intended requirement. For aninternalALB, use private subnets; forinternet-facing, use public subnets.noteThe
alb.ingress.kubernetes.io/certificate-arn,listen-ports, andssl-redirectannotations attach the ACM certificate to the ALB and serve the console over HTTPS (redirecting HTTP to HTTPS). Replace<acm-certificate-arn>with the ACM certificate ARN you copy in step 8. Because the certificate is requested later in this procedure, create the Ingress with these annotations after you obtain the ARN, or add the annotations and re-apply the Ingress once the certificate is issued. Without thecertificate-arnannotation, the ALB serves the console over plain HTTP only.noteYou can skip the
alb.ingress.kubernetes.io/subnets:parameter, if you use the latest version of ALB and Kubernetes. If there is an issue while launching ALB, an error message appears in the ALB controller pod that it is not satisfying the subnets. You need to add this line and pick the subnets from the VPC (private subnets for aninternalALB, or public subnets used for the EKS cluster for aninternet-facingALB). -
Get the ALB endpoint once the above ingress resource is applied.
-
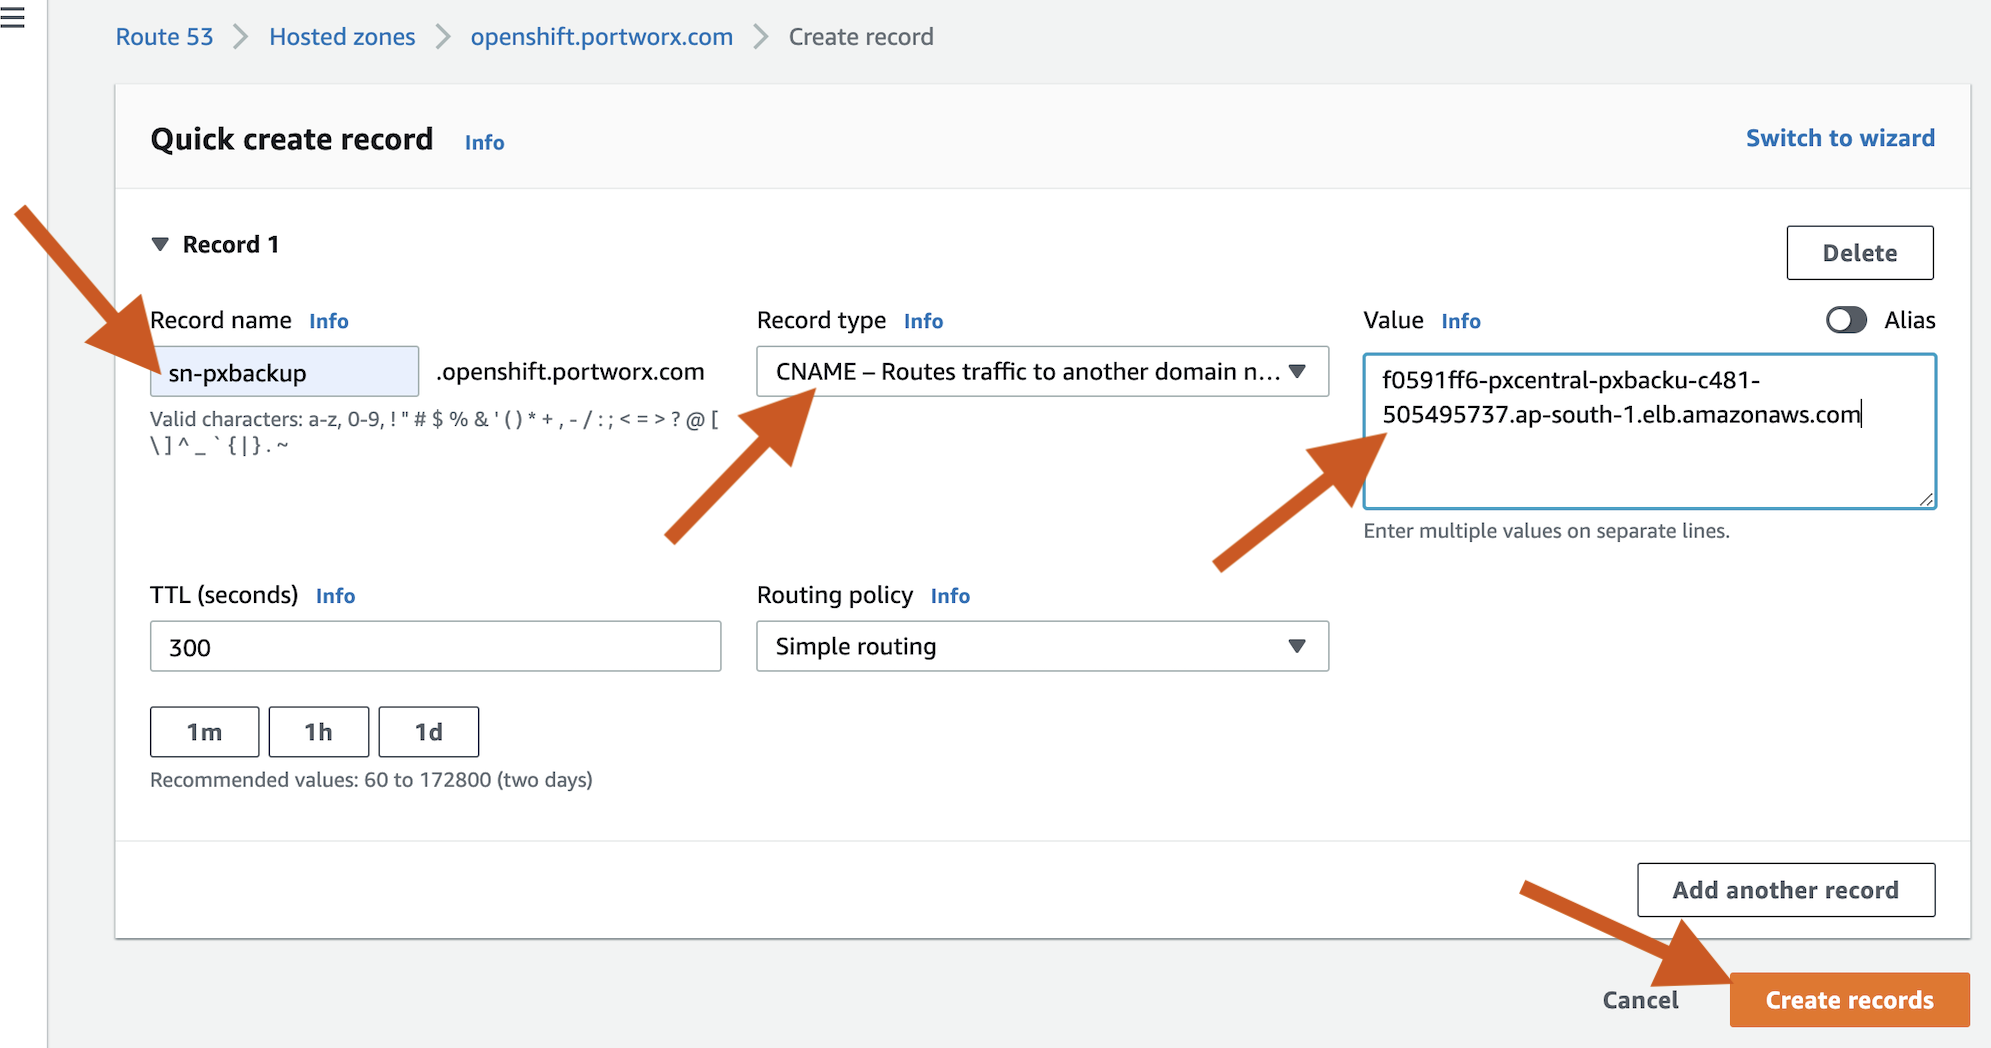
Create the CNAME record with the above endpoint.
-
Set up SSL with ACM:
-
Navigate to the AWS Certificate Manager.
-
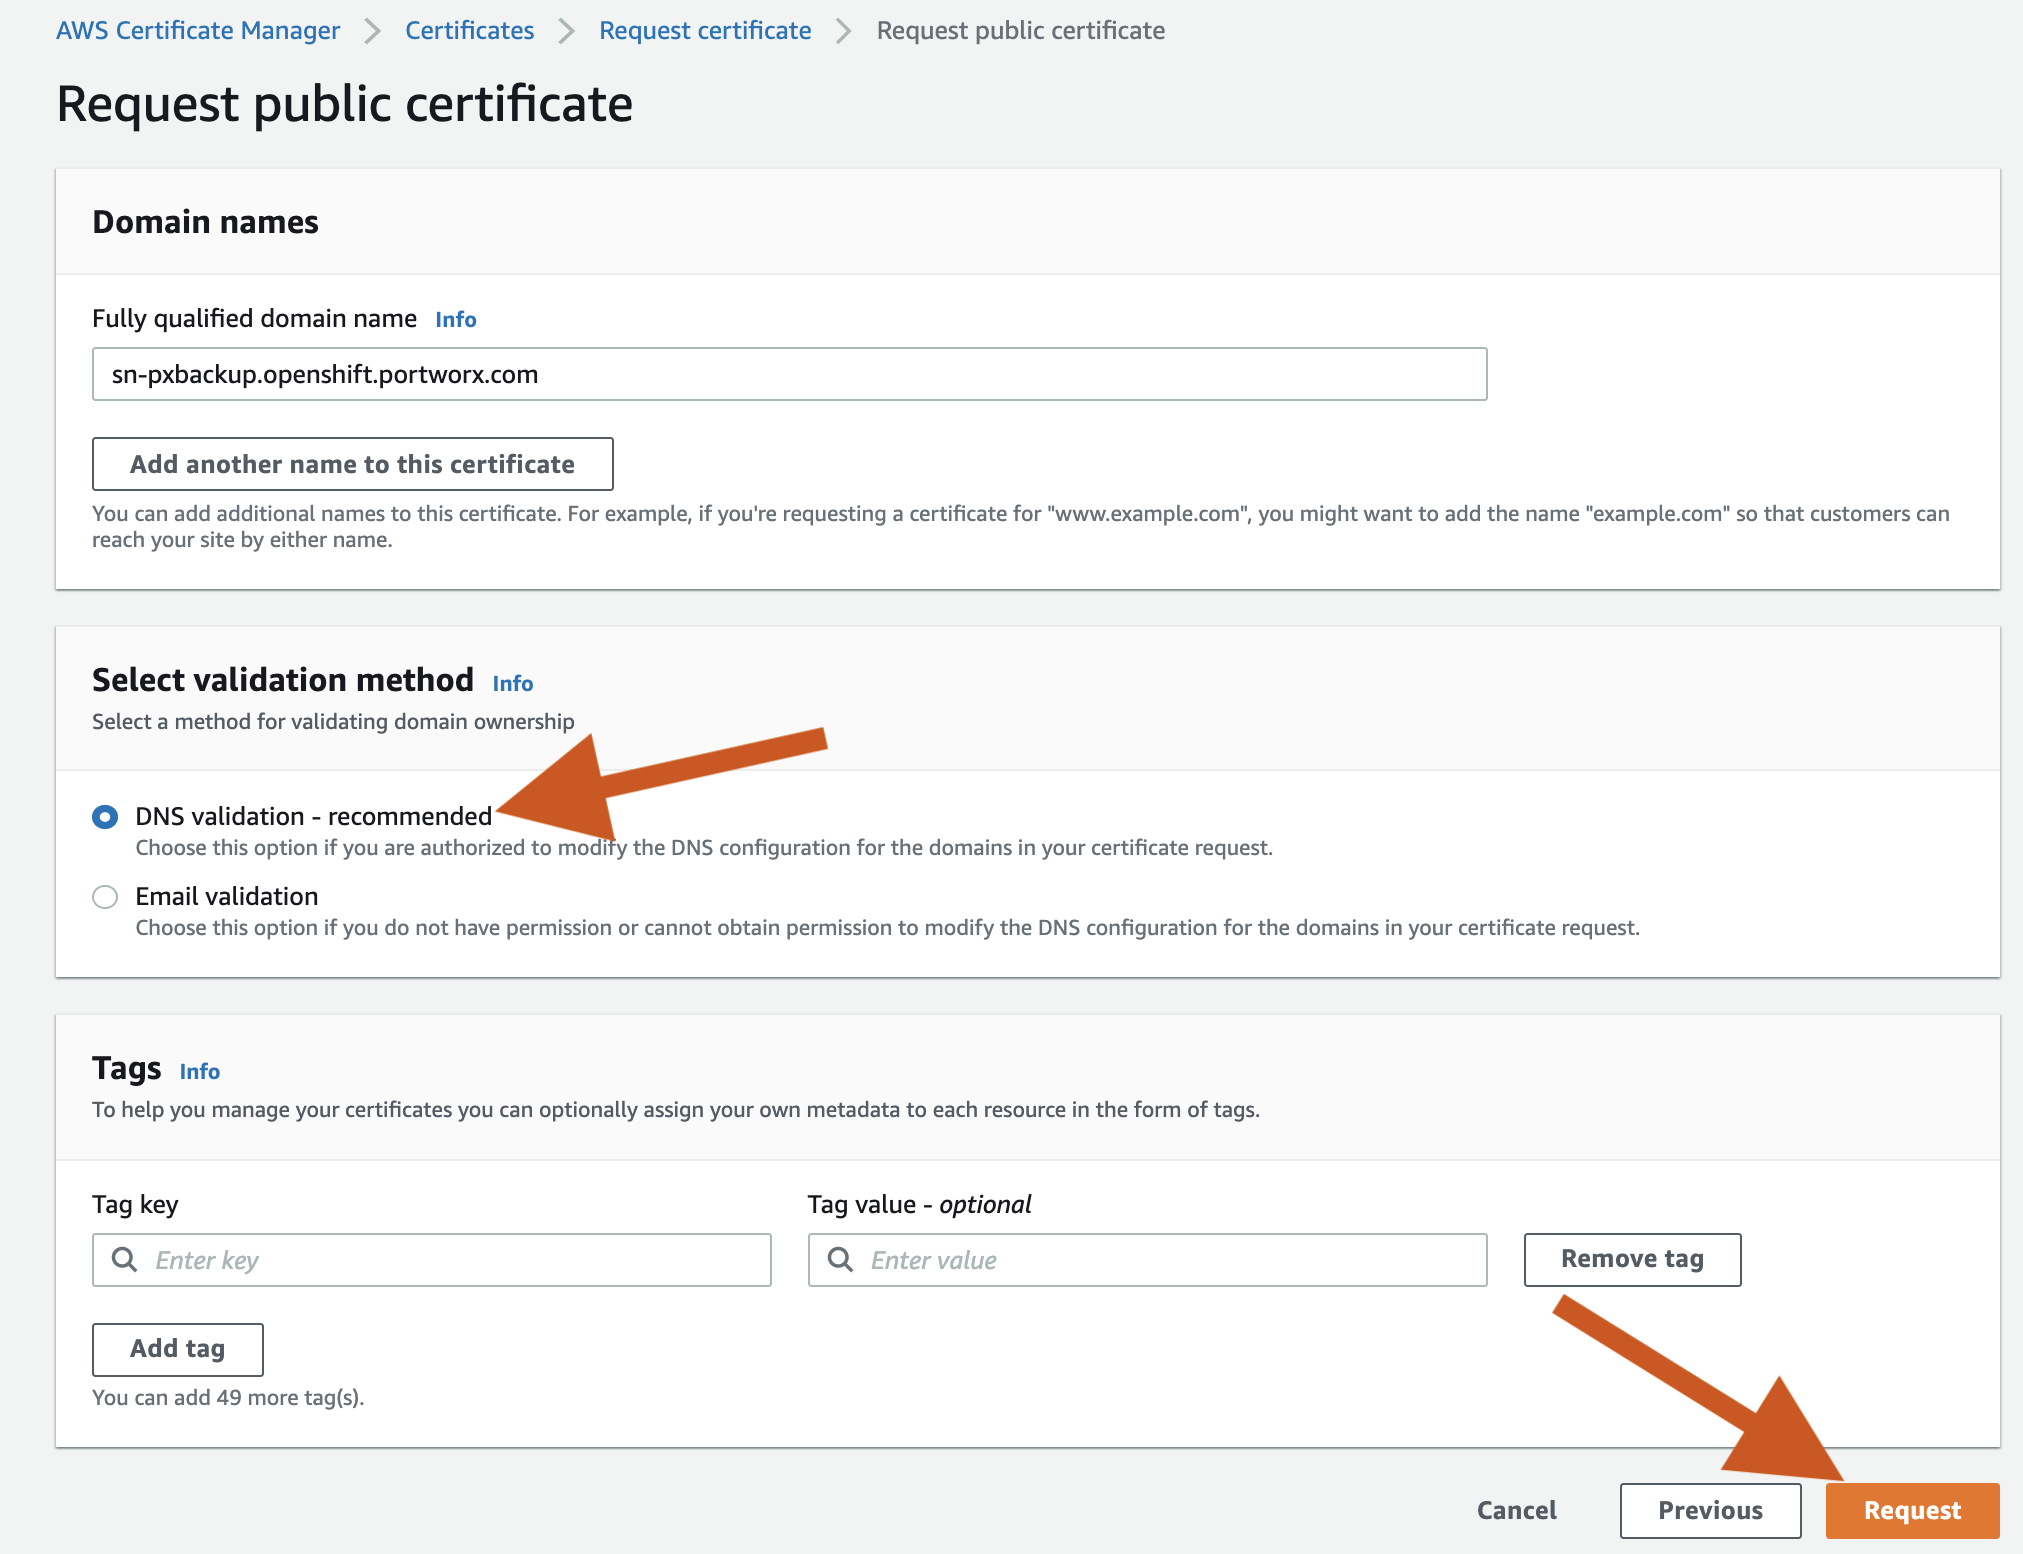
Select Request > Public Certificate > FQDN (sn-pxbackup.openshift.portworx.com) > DNS Validation > Request.
The status shows Pending Validation under Certificate status. Select the certificate number and then click Create records in Route 53.
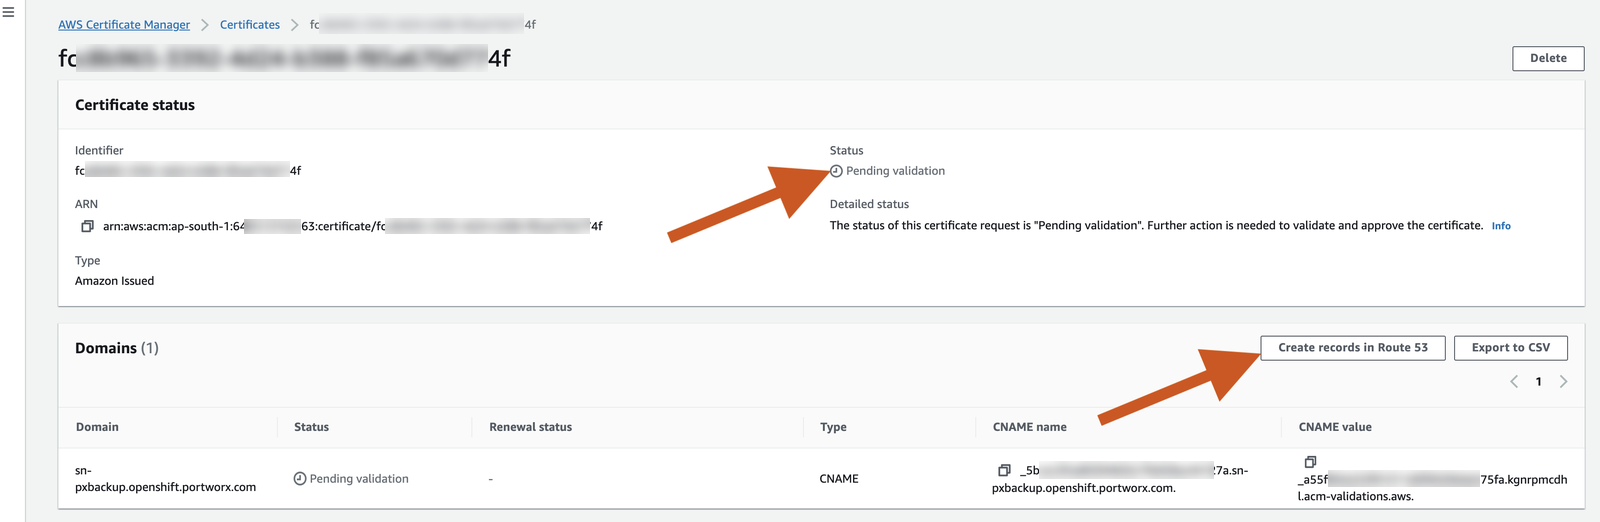
The status changes to Issued after some time.

-
-
Click the certificate ID and copy the ARN number, which is used in ingress resource.
-
In your identity provider, select the application you created, go to Authentication > Web URI, and add your Portworx Backup URL endpoint.
You can then log in at your domain (for example,
https://<your-application-name>.<your-domain>/) using your configured identity provider.