Version: 3.1

Disk Provisioning on VMware vSphere

This guide explains how the Portworx Dynamic Disk Provisioning feature works within Kubernetes on VMware and the requirements for it.

note

Installation steps below are only supported if you are running with Kubernetes.

Architecture

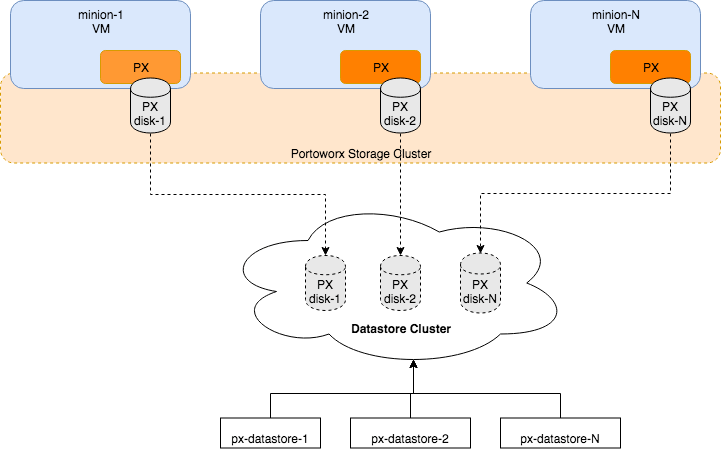
The following diagram gives an overview of the Portworx architecture on vSphere using shared datastores.

  • Portworx runs on each Kubernetes minion/worker.
  • Based on the given spec by the end user, Portworx on each node will create its disk on the configured shared datastores or datastore clusters.
  • Portworx will aggregate all of the disks and form a single storage cluster. End users can carve PVCs (Persistent Volume Claims), PVs (Persistent Volumes) and Snapshots from this storage cluster.
  • Portworx tracks and manages the disks that it creates. In a failure event, if a new VM spins up, Portworx on the new VM will be able to attach to the same disk that was previously created by the node on the failed VM.

Portworx architecture for PKS on vSphere using shared datastores or datastore clusters

Limiting storage nodes

Portworx allows you to create a heterogenous cluster where some of the nodes are storage nodes and rest of them are storageless.

You can specify the number of storage nodes in your cluster by setting the max_storage_nodes_per_zone input argument. This instructs Portworx to limit the number of storage nodes in one zone to the value specified in max_storage_nodes_per_zone argument. The total number of storage nodes in your cluster will be:

Total Storage Nodes = (Num of Zones) * max_storage_nodes_per_zone

While planning capacity for your auto scaling cluster make sure the minimum size of your cluster is equal to the total number of storage nodes in Portworx. This ensures that when you scale up your cluster, only storageless nodes will be added. While when you scale down the cluster, it will scale to the minimum size which ensures that all Portworx storage nodes are online and available.

note

You can always ignore the max_storage_nodes_per_zone argument. When you scale up the cluster, the new nodes will also be storage nodes but while scaling down you will lose storage nodes causing Portworx to lose quorum.

Examples:

  • "-s", "type=lazyzeroedthick,size=200", "-max_storage_nodes_per_zone", "1"

For a cluster of 6 nodes spanning 3 zones (zone-1a,zone-1b,zone-1c), in the above example Portworx will have 3 storage nodes (one in each zone) and 3 storageless nodes. Portworx will create a total 3 disks of size 200 each and attach one disk to each storage node.

  • "-s", "type=lazyzeroedthick,size=200", "-s", "type=lazyzeroedthick,size=100", "-max_storage_nodes_per_zone", "2"

For a cluster of 9 nodes spanning 2 zones (zone-1a,zone-1b), in the above example Portworx will have 4 storage nodes and 5 storageless nodes. Portworx will create a total of 8 disks (4 of size 200 and 4 of size 100). Portworx will attach a set of 2 disks (one of size 200 and one of size 100) to each of the 4 storage nodes.

Availability across failure domains

Since Portworx is a storage overlay that automatically replicates your data, Portworx by Pure Storage recommends using multiple availability zones when creating your VMware vSphere based cluster. Portworx automatically detects regions and zones that are populated using known Kubernetes node labels. You can also label nodes with custom labels to inform Portworx about region, zones and racks. Refer to the Cluster Topology awareness page for more details.

Install Portworx

Follow the instructions in this section to install Portworx.

Prerequisites

  • VMware vSphere version 7.0 or newer.
  • kubectl configured on the machine having access to your cluster.
  • Portworx does not support the movement of VMDK files from the datastores on which they were created. Do not move them manually or have any settings that would result in a movement of these files. In order to make sure that Storage DRS does not move VMDK files, set Storage DRS settings to the following configuration.
  • The vCenter server user must have the specified minimum privileges.
note

If you provide a vSphere datastore cluster as an input, Portworx uses a DRS recommended API to select an appropriate datastore from the list of datastores in the datastore cluster.

Configure Storage DRS settings

From the Edit Storage DRS Settings window of your selected datastore cluster, edit the following settings:

  • For Storage DRS automation, choose the No Automation (Manual Mode) option, and set the same for other settings, as shown in the following screencapture:

    VsphereDRS1

  • For Runtime Settings, clear the Enable I/O metric for SDRS recommendations option.

    VsphereDRS1

  • For Advanced options, clear the Keep VMDKs together by default options.

    VsphereDRS1

Step 1: vCenter user for Portworx

Provide Portworx with a vCenter server user that has the following minimum vSphere privileges using your vSphere console:

  • Datastore

    • Allocate space
    • Browse datastore
    • Low level file operations
    • Remove file
  • Host

    • Local operations
    • Reconfigure virtual machine
  • Virtual machine

    • Change Configuration

    • Add existing disk

    • Add new disk

    • Add or remove device

    • Advanced configuration

    • Change Settings

    • Extend virtual disk

    • Modify device settings

    • Remove disk

      If you create a custom role as above, make sure to select Propagate to children when assigning the user to the role.

      Why select Propagate to Children ?

      In vSphere, resources are organized hierarchically. By selecting "Propagate to Children," you ensure that the permissions granted to the custom role are automatically applied not just to the targeted object, but also to all objects within its sub-tree. This includes VMs, datastores, networks, and other resources nested under the selected resource.

note

All commands in the subsequent steps need to be run on a machine with kubectl access.

Step 2: Create a Kubernetes secret with your vCenter user and password

  1. Get VCenter user and password by running the following commands:

    • For VSPHERE_USER: echo '<vcenter-server-user>' | base64
    • For VSPHERE_PASSWORD: echo '<vcenter-server-password>' | base64

    Note the output of both commands for use in the next step.

  2. Update the following Kubernetes Secret template by using the values obtained in step 1 for VSPHERE_USER and VSPHERE_PASSWORD.

    apiVersion: v1
    kind: Secret
    metadata:
    name: px-vsphere-secret
    namespace: <px-namespace>
    type: Opaque
    data:
    VSPHERE_USER: XXXX
    VSPHERE_PASSWORD: XXXX
  3. Apply the above spec to update the spec with your VCenter username and password:

    kubectl apply -f <updated-secret-template.yaml>

Step 3: Generate the specs

vSphere environment details

Export the following environment variables based on your vSphere environment. These variables will be used in a later step when generating the YAML spec.

# Hostname or IP of your vCenter server
export VSPHERE_VCENTER=myvcenter.net

# Prefix of your shared ESXi datastore(s) names. Portworx will use datastores who names match this prefix to create disks.
export VSPHERE_DATASTORE_PREFIX=mydatastore-

# Change this to the port number vSphere services are running on if you have changed the default port 443
export VSPHERE_VCENTER_PORT=443

Disk templates

A disk template defines the VMDK properties that Portworx will use as a reference for creating the actual disks out of which Portworx will create the virtual volumes for your PVCs.

The template adheres to the following format:

type=<vmdk type>,size=<size of the vmdk>
  • type: Supported types are thin, eagerzeroedthick, and lazyzeroedthick
  • size: This is the size of the VMDK in GiB

The following example will create a 150GB EagerZeroedThick VMDK on each VM:

export VSPHERE_DISK_TEMPLATE=type=eagerzeroedthick,size=150

Generate the spec file

Now generate the spec with the following curl command.

note

Observe how curl below uses the environment variables setup up above as query parameters.

export VER=$(kubectl version --short | awk -Fv '/Server Version: /{print $3}')
curl -fsL -o px-spec.yaml "https://install.portworx.com/3.0?kbver=$VER&c=portworx-demo-cluster&b=true&st=k8s&csi=true&vsp=true&ds=$VSPHERE_DATASTORE_PREFIX&vc=$VSPHERE_VCENTER&s=%22$VSPHERE_DISK_TEMPLATE%22"

Apply specs

Apply the Operator and StorageCluster specs you generated in the section above using the kubectl apply command:

  1. Deploy the Operator:

    kubectl apply -f 'https://install.portworx.com/<version-number>?comp=pxoperator'
    serviceaccount/portworx-operator created
    podsecuritypolicy.policy/px-operator created
    clusterrole.rbac.authorization.k8s.io/portworx-operator created
    clusterrolebinding.rbac.authorization.k8s.io/portworx-operator created
    deployment.apps/portworx-operator created
  2. Deploy the StorageCluster:

    kubectl apply -f 'https://install.portworx.com/<version-number>?operator=true&mc=false&kbver=&b=true&kd=type%3Dgp2%2Csize%3D150&s=%22type%3Dgp2%2Csize%3D150%22&c=px-cluster-XXXX-XXXX&eks=true&stork=true&csi=true&mon=true&tel=false&st=k8s&e==AWS_ACCESS_KEY_ID%3XXXX%2CAWS_SECRET_ACCESS_KEY%3XXXX&promop=true'
    storagecluster.core.libopenstorage.org/px-cluster-0d8dad46-f9fd-4945-b4ac-8dfd338e915b created
Monitor the Portworx pods
  1. Enter the following kubectl get command, waiting until all Portworx pods show as ready in the output:

    kubectl get pods -o wide -n kube-system -l name=portworx
  2. Enter the following kubectl describe command with the ID of one of your Portworx pods to show the current installation status for individual nodes:

    kubectl -n kube-system describe pods <portworx-pod-id>
    Events:
    Type Reason Age From Message
    ---- ------ ---- ---- -------
    Normal Scheduled 7m57s default-scheduler Successfully assigned kube-system/portworx-qxtw4 to k8s-node-2
    Normal Pulling 7m55s kubelet, k8s-node-2 Pulling image "portworx/oci-monitor:2.5.0"
    Normal Pulled 7m54s kubelet, k8s-node-2 Successfully pulled image "portworx/oci-monitor:2.5.0"
    Normal Created 7m53s kubelet, k8s-node-2 Created container portworx
    Normal Started 7m51s kubelet, k8s-node-2 Started container portworx
    Normal PortworxMonitorImagePullInPrgress 7m48s portworx, k8s-node-2 Portworx image portworx/px-enterprise:2.5.0 pull and extraction in progress
    Warning NodeStateChange 5m26s portworx, k8s-node-2 Node is not in quorum. Waiting to connect to peer nodes on port 9002.
    Warning Unhealthy 5m15s (x15 over 7m35s) kubelet, k8s-node-2 Readiness probe failed: HTTP probe failed with statuscode: 503
    Normal NodeStartSuccess 5m7s portworx, k8s-node-2 PX is ready on this node
    note

    In your output, the image pulled will differ based on your chosen Portworx license type and version.

Monitor the cluster status

Use the pxctl status command to display the status of your Portworx cluster:

PX_POD=$(kubectl get pods -l name=portworx -n kube-system -o jsonpath='{.items[0].metadata.name}')
kubectl exec $PX_POD -n kube-system -- /opt/pwx/bin/pxctl status
Was this page helpful?