Manage Clusters (Federated Mode)
In Federated mode (also referred to as Managed Service Provider mode or Workload Identity mode), Portworx Backup supports two ways to onboard clusters:
- Gardener shoot clusters — discovered automatically through the Gardener API. The Gardener API server kubeconfig is required for discovery; individual shoot cluster kubeconfigs are not needed.
- Standalone shoot clusters — Any standalone shoot cluster that is not managed by a Gardener configuration can be onboarded manually using a kubeconfig. For more information, see Onboard a standalone shoot cluster.
In both cases, once onboarded, the Portworx Backup server sends instructions to the cluster, and Stork on the cluster handles all backup operations locally.
Clusters and Gardener cluster configurations are non-RBAC resources in Portworx Backup — they are governed by ownership, not by RBAC resource roles. In Federated mode, only a super administrator (px-backup-super.admin) can connect a cluster or add a Gardener cluster configuration; the super administrator who onboards it becomes its owner. Only the owner or another super administrator can then edit, share, or remove it. In Federated mode, the available built-in roles are px-backup-super.admin, px-backup-infra.admin, and px-backup-app.user (the px-backup-app.admin role is not available in Federated mode). For the full role privileges and the list of RBAC and non-RBAC resources, see the Role Privileges Matrix.
Prerequisites
The minimum software versions required to manage clusters in Federated mode depend on the backup location provider. All versions in the row for your provider must be met:
| Backup location provider | Portworx Backup (backup cluster) | Portworx Enterprise (application cluster) | Stork (application cluster) | Portworx Operator (application cluster) |
|---|---|---|---|---|
| Azure Blob Storage | 3.0.0 or later | 3.6.1 or later | 26.3.0 or later | 26.2.0 or later |
| AWS S3 | 3.1.0 or later | 3.6.2 or later | 26.4.0 or later | 26.3.0 or later |
| Google Cloud Storage (GCS) | 3.1.0 or later | 3.6.2 or later | 26.4.0 or later | 26.3.0 or later |
To manage clusters in Federated mode, ensure that the following prerequisites are met:
-
Portworx Backup is installed in Federated mode at the version listed above for your backup location provider. For installation instructions, see Install Portworx Backup in Federated Mode.
-
Portworx Enterprise, Stork, and the Portworx Operator are installed on each application cluster at the versions listed above. Stork must be deployed through the Portworx Operator as part of a Portworx Enterprise installation. Standalone Stork deployments are not supported in Federated mode.
noteThe
StorageCluster(STC) is the custom resource that the Portworx Operator uses to define a Portworx Enterprise installation. In Federated mode, Workload Identity for Stork is configured through the STC custom resource, not through the Stork deployment manifest. The Operator reads the STC spec and applies the required service account annotations and namespace labels automatically. Set the provider-specific Workload Identity configuration in the STC specification before onboarding the cluster:-
Azure: Set the Managed Identity client ID and the required labels in the STC specification. The Operator then annotates the Stork service account with
azure.workload.identity/client-idand labels the Portworx namespace withazure.workload.identity/use=true. For setup instructions, see Prepare your AKS Cluster in the Portworx Enterprise documentation. -
AWS: Set the IAM role ARN in the STC
spec.workloadIdentity.credentials(cloud provideraws, keyeks.amazonaws.com/role-arn). The Operator then annotates the Stork service account witheks.amazonaws.com/role-arn. For setup instructions, see the Workload Identity guide in the Portworx Enterprise documentation and IAM roles for service accounts in the AWS documentation. -
GCP: Configure GCP Workload Identity Federation and reference the resulting credential configuration
ConfigMapin the STC specification (spec.workloadIdentity.gcp.credentialsConfigMap), and setspec.stork.useWorkloadIdentity: true. The Operator then mounts the credential configuration into the Stork pods, projects a Kubernetes service account token, and setsGOOGLE_APPLICATION_CREDENTIALSso that Stork authenticates through Workload Identity Federation.noteGKE-native Workload Identity is not supported. Portworx pods run with
hostNetwork: true, which bypasses the GKE metadata server, so theiam.gke.io/gcp-service-accountservice account annotation and GKE metadata server are not used. Only GCP Workload Identity Federation for Gardener (external) clusters is supported.
:::
-
-
Workload Identity is configured on each shoot cluster for the cloud provider where the backup location resides:
-
Azure: An Azure Managed Identity is configured on each shoot cluster, bound to the Stork service account, and assigned the role required for your storage type — the Storage Blob Data Contributor role on the target Azure Blob Storage account for standard storage, or a custom role (for example,
portworx-backup-locked-role) with the additional storage account, container, and blob permissions required for immutable (object lock-enabled) storage. For the full standard and immutable permission requirements, see Configure Backup Locations in Federated Mode.noteThe Owner role on the Azure Storage account does not grant access to blob data. You must explicitly assign the appropriate role for your storage type (Storage Blob Data Contributor for standard storage, or the custom role for immutable storage). Without this, Stork cannot read or write backup data even if the identity has Owner-level access.
-
AWS: An IAM role is configured for IRSA (IAM Roles for Service Accounts) and annotated to the Stork service account on each shoot cluster, granting the required permissions on the target S3 bucket. For the full permission list (including account-level vs bucket-level scoping and object-lock permissions) and the IRSA trust relationship, see Configure Backup Locations in Federated Mode.
-
GCP: A GCP service account is configured for each shoot cluster and mapped to the Stork Kubernetes service account through GCP Workload Identity Federation (using a Workload Identity Pool and OIDC provider bound to the Gardener shoot cluster's OIDC issuer), and granted the required permissions on the target GCS bucket (
storage.buckets.get,storage.objects.list,storage.objects.get,storage.objects.create,storage.objects.delete). The same permissions apply to both standard and immutable (retention policy-enabled) GCS buckets; GCS enforces immutability at the bucket level, so no additional object-lock permissions are required. The predefinedroles/storage.objectAdminrole grants thestorage.objects.*permissions but does not includestorage.buckets.get; grantstorage.buckets.getseparately (for example, throughroles/storage.legacyBucketReader) or use an equivalent custom role that includes all the listed permissions. For the full provider-specific permission list and verification steps, see Configure Backup Locations in Federated Mode.noteGrant the role on the target bucket (bucket-scoped) or at the project level. Bucket-scoped grants take effect only when the bucket uses uniform bucket-level access (UBLA); UBLA is recommended so that IAM is the single source of truth for access. Project-level Owner or Editor roles do not grant object data-plane access under UBLA — you must assign
roles/storage.objectAdmin(or an equivalent custom role) explicitly. Without it, Stork cannot read or write backup data even if the service account has broad project-level access.
-
-
In addition to the backup location role, the Azure Managed Identity must have the minimum required Portworx Enterprise permissions for Workload Identity (Azure compute permissions for disks, VMs, and node pools), typically assigned via the
portworx-wli-role. For the complete, authoritative list, see Configure authentication for Gardener (or Prepare your AKS Cluster for AKS) in the Portworx Enterprise documentation. -
The Portworx Backup server has network connectivity to the Kubernetes API server of each shoot cluster for pushing CRs.
-
The Gardener project and shoot clusters you want to manage are accessible from the backup cluster (where Portworx Backup is installed).
-
All the application clusters must meet the requirements listed in Cluster prerequisites.
Verify Stork configuration on each application cluster
Before you onboard an application cluster, verify that Stork on that cluster is correctly configured to use Workload Identity for your cloud provider. In Federated mode, Stork authenticates directly to the backup location using Workload Identity; no credentials are stored on the Portworx Backup server. Onboarding fails if Stork Workload Identity is not configured correctly.
Workload Identity for Stork is configured automatically by the Portworx Operator from the StorageCluster (STC) specification during the Portworx Enterprise installation — see the provider setup links in each tab below. The steps in this section only verify that the existing configuration is correct. If a verification step fails, correct the configuration in the STC specification (or contact your cluster administrator) and re-run the checks. Do not configure Workload Identity by editing the Stork deployment or service account directly.
Perform the following verification steps on each application cluster, selecting the tab for your cloud provider:
- Azure (Managed Identity)
- AWS (IRSA)
- GCP (Workload Identity)
Azure Workload Identity for Stork is configured through the Portworx Operator as part of the Portworx Enterprise installation on each application cluster. For setup instructions, see Prepare your AKS Cluster in the Portworx Enterprise documentation. Once configured, complete the following verification steps.
In Federated mode, Azure Workload Identity (WLI) for Stork is configured through the StorageCluster (STC) custom resource, not through the Stork deployment manifest. The Managed Identity client ID and required labels are set in the STC spec and applied automatically by the Portworx Operator. You do not need to manually update the Stork service account or namespace.
-
Confirm that an Azure Managed Identity is provisioned for the application cluster with the required role on the target Azure Blob Storage account:
- Standard (non-immutable) Azure Blob Storage: verify the Storage Blob Data Contributor role is assigned.
- Immutable Azure Blob Storage: verify the custom role (for example,
portworx-backup-locked-role) is assigned with all the required permissions, including theMicrosoft.Storage/storageAccounts/blobServices/generateUserDelegationKey/actionpermission. This permission is required to generate user delegation keys for immutable containers. For the full permission list, see Prerequisites in Configure Backup Locations (Federated Mode).
noteThe Owner role on the Azure Storage account does not grant access to blob data. You must explicitly assign the appropriate role for your storage type. Without this, Stork cannot read or write backup data even if the identity has Owner-level access.
-
Verify that the Stork service account is annotated with the Managed Identity client ID:
kubectl get serviceaccount stork -n <portworx-installed-namespace> -o jsonpath='{.metadata.annotations}'The output should include
azure.workload.identity/client-id: <managed-identity-client-id>. If the annotation is missing, verify that the Managed Identity client ID is correctly set in theStorageCluster(STC) CR, or contact your cluster administrator. -
Verify that the
<portworx-installed-namespace>namespace is labeled to enable Azure Workload Identity:kubectl get namespace <portworx-installed-namespace> --show-labelsThe output should include
azure.workload.identity/use=true. If the label is missing, verify theStorageCluster(STC) CR configuration or contact your cluster administrator.noteAzure Workload Identity is typically enabled at the pod level via the
azure.workload.identity/use: "true"pod label, which is read by the mutating webhook. In Portworx deployments, the Portworx Operator also applies this label to the<portworx-installed-namespace>namespace as part of theStorageCluster(STC) configuration, which causes the webhook to inject the required environment variables and projected volume into all pods in the namespace that includes Stork. You verify this namespace-level label in this step. -
Verify that Stork is running:
kubectl get pods -n <portworx-installed-namespace> -l name=storkAll Stork pods should show a
Runningstatus.
AWS IRSA (IAM Roles for Service Accounts) for Stork is configured through the Portworx Operator as part of the Portworx Enterprise installation on each application cluster. For IRSA setup instructions for Gardener AWS shoots, contact your cluster administrator or refer to the AWS IAM roles for service accounts documentation. Once configured, complete the following verification steps.
In Federated mode, AWS IRSA for Stork is configured through the StorageCluster (STC) custom resource. The IAM role ARN is set via the STC workloadIdentity spec and the required service account annotation is applied automatically by the Portworx Operator. You do not need to manually update the Stork service account or the Stork deployment.
-
Confirm that an IAM role is provisioned and annotated to the Stork service account with the required S3 permissions on the target bucket. The role ARN is set via the STC
workloadIdentityspec; the Operator applies theeks.amazonaws.com/role-arnannotation. The IRSA trust policy must setsub=system:serviceaccount:<portworx-installed-namespace>:stork. -
Verify that the Stork service account is annotated with the IAM role ARN:
kubectl get serviceaccount stork -n <portworx-installed-namespace> -o jsonpath='{.metadata.annotations}'The output should include
eks.amazonaws.com/role-arn: arn:aws:iam::<account-id>:role/<irsa-role-name>. If the annotation is missing, verify that the IAM role ARN is correctly set in theStorageCluster(STC) CR, or contact your cluster administrator. -
Verify that the IRSA token environment variables are injected into the Stork pod:
STORK_POD=$(kubectl get pod -n <portworx-installed-namespace> -l name=stork -o jsonpath='{.items[0].metadata.name}')kubectl exec -n <portworx-installed-namespace> "$STORK_POD" -- env | grep -E 'AWS_WEB_IDENTITY_TOKEN_FILE|AWS_ROLE_ARN'The output should include both
AWS_WEB_IDENTITY_TOKEN_FILEandAWS_ROLE_ARN. If either variable is missing, IRSA is not correctly configured on the cluster. Verify that the IRSA mutating webhook is enabled and the service account annotation is set correctly.noteAWS_WEB_IDENTITY_TOKEN_FILEpoints to the projected service account token file (typically/var/run/secrets/eks.amazonaws.com/serviceaccount/token).AWS_ROLE_ARNcontains the IAM role ARN that Stork assumes when accessing the S3 bucket. These variables are injected automatically by the IRSA webhook when the service account annotation is present. -
Verify that Stork is running:
kubectl get pods -n <portworx-installed-namespace> -l name=storkAll Stork pods should show a
Runningstatus.
GCP Workload Identity for Stork is configured through the Portworx Operator as part of the Portworx Enterprise installation on each application cluster. It uses GCP Workload Identity Federation for Gardener (external) clusters, not GKE-native Workload Identity. For Workload Identity setup instructions for Gardener GCP shoots, contact your cluster administrator. Once configured, complete the following verification steps.
GKE-native Workload Identity is not supported. Portworx pods run with hostNetwork: true, which bypasses the GKE metadata server, so the iam.gke.io/gcp-service-account annotation and metadata-server-based authentication do not apply. Instead, the Portworx Operator mounts a credential configuration ConfigMap referenced in the STC spec and projects a Kubernetes service account token into the Stork pods.
In Federated mode, GCP Workload Identity for Stork is configured through the StorageCluster (STC) custom resource (spec.workloadIdentity.gcp.credentialsConfigMap and spec.stork.useWorkloadIdentity: true). The credential configuration and token projection are applied automatically by the Portworx Operator. You do not need to manually update the Stork deployment.
-
Confirm that a GCP service account is created and mapped to the Stork Kubernetes service account through Workload Identity Federation, with the required permissions on the target GCS bucket (
storage.buckets.get,storage.objects.list,storage.objects.get,storage.objects.create,storage.objects.delete). -
Verify that the credential configuration
ConfigMapreferenced by the STC spec exists in the Portworx namespace:kubectl get configmap -n <portworx-installed-namespace>The
ConfigMapname must match the value set inspec.workloadIdentity.gcp.credentialsConfigMapin theStorageCluster(STC) CR. If it is missing, re-check the Workload Identity Federation setup, or contact your cluster administrator. -
Confirm that the Stork pod is configured for Workload Identity Federation. The Portworx Operator sets the
GOOGLE_APPLICATION_CREDENTIALSenvironment variable and mounts the credential configuration and projected token into the pod. Verify this from a running Stork pod:STORK_POD=$(kubectl get pods -n <portworx-installed-namespace> -l name=stork -o jsonpath='{.items[0].metadata.name}')kubectl get pod -n <portworx-installed-namespace> "$STORK_POD" -o jsonpath='{.spec.containers[*].env[?(@.name=="GOOGLE_APPLICATION_CREDENTIALS")].value}'The command must return
/etc/workload-identity/credential-configuration.json. This confirms that Stork authenticates to GCS through Workload Identity Federation using Application Default Credentials (ADC).If the environment variable is empty, the Workload Identity Federation configuration is not applied. Re-check that
spec.workloadIdentity.gcp.credentialsConfigMapandspec.stork.useWorkloadIdentity: trueare set in theStorageCluster(STC) CR and that the credential configurationConfigMapexists, or contact your cluster administrator.noteYou can further confirm the wiring by inspecting the Stork pod spec (
kubectl get pod -n <portworx-installed-namespace> "$STORK_POD" -o yaml) for the credential configurationConfigMapmounted at/etc/workload-identity/and the projected service account token at/var/run/service-account/token. -
Verify that Stork is running:
kubectl get pods -n <portworx-installed-namespace> -l name=storkAll Stork pods should show a
Runningstatus.
Onboard Gardener shoot clusters
When Portworx Backup is running in Federated mode, it connects to the Gardener API server and discovers all available shoot clusters. No manual kubeconfig import is required.
To onboard Gardener shoot clusters, follow these steps:
-
Log in to the Portworx Backup web console.
-
From the left navigation pane, click Clusters > Cluster Configs.
The Clusters > Cluster Configs page displays all the Gardener cluster configurations added to Portworx Backup. If no clusters have been connected yet, the page shows:
Connect your first Kubernetes Cluster, standalone (or) Gardener managed.
No Kubernetes cluster is connected yet. Onboard a cluster to get started.
-
Click Connect cluster
The system prompts you to select the cluster type.
-
Click Gardener Cluster.
-
Specify the following information on the Add Gardener Cluster page, and click Connect.
Field Description Enter Gardener Config Name A unique name for this Gardener configuration within Portworx Backup. Used to identify the configuration in the UI — does not need to match the Gardener project name. Enter Project Name The name of the Gardener project that contains the shoot clusters you want to manage. Must match the project name exactly as it appears in the Gardener dashboard. Gardener Cluster Kubeconfig The kubeconfig for the Gardener API server (not a shoot cluster kubeconfig). Portworx Backup uses this to authenticate with the Gardener API and discover the shoot clusters in the specified project.
The service account referenced in this kubeconfig must have the following permissions on the Gardener API server:- Get/List Projects
- Get/List Shoots
- Create Token
- Create
shoots/adminkubeconfig(required to obtain shoot cluster kubeconfigs)
Enter Cluster Label A Kubernetes label (for example, px-backup_allotment=<value>) that filters which shoot clusters in the project are discovered and managed by Portworx Backup. Only clusters matching this label are onboarded.Auto Sync When enabled, Portworx Backup periodically updates the list of shoot clusters based on cluster labels. New matching clusters are added automatically. Shoot clusters that no longer exist in Gardener are deleted from Portworx Backup (existing backup data is retained in the backup location, but no new backups are created for the deleted cluster). Shoot clusters whose labels no longer match the configured label filter are marked as unmanaged.
For example, if a shoot cluster with labelpx-backup_allotment=oneis changed topx-backup_allotment=twoor the label is removed altogether, then the cluster is marked asunmanaged. You can remove unmanaged clusters manually from the Portworx Backup web console.
Important: Backup schedules associated with an unmanaged cluster stop executing. Existing backups are retained in the backup location, but no new backups are created until the cluster is returned to a managed state (by restoring the matching label) or re-onboarded.
When disabled, you must update the cluster list manually using the Manual Shoot Discovery option. For more information, see Manual discovery of shoot clusters.Auto Sync Schedule The interval at which shoot clusters are automatically discovered or synchronized (for example, Every 24 hours). Applicable when Auto Sync is enabled. For the available intervals and the custom range, see Configure auto sync schedule for Gardener clusters. Portworx Backup lists all discovered shoot clusters on the Clusters page.
-
Assign a backup location to each newly discovered cluster. For more information, see Configure Backup Locations in Federated Mode.
Onboard a standalone shoot cluster
In Federated mode, you can also onboard standalone shoot clusters that are not managed by a Gardener instance. These clusters are added manually using a kubeconfig.
Once onboarded, all backup operations are handled locally on the cluster by Stork. This behavior is the same for all clusters in Federated mode, regardless of how they are onboarded into Portworx Backup.
To add a standalone shoot cluster in Federated mode, follow these steps:
-
Log in to the Portworx Backup web console.
-
From the left navigation pane, click Clusters > All Clusters.
The Clusters > All Clusters page displays all the discovered shoot clusters and standalone Kubernetes clusters registered by Portworx Backup. If no clusters have been connected yet, the page shows:
Connect your first Kubernetes Cluster, standalone (or) Gardener managed.
No Kubernetes cluster is connected yet. Onboard a cluster to get started.
-
Click Connect cluster.
The system prompts you to Select the cluster type.
-
Select Kubernetes Clusters as the cluster type.
No Kubernetes provider selection (such as AKS, EKS, or GCP) is required in Federated mode. -
In the Connect Kubernetes Cluster form, specify the following information:
noteEnsure that the required Stork version is active on the cluster before connecting it: 26.3.0 or higher for Azure Blob Storage backup locations, or 26.4.0 or higher for AWS S3 and Google Cloud Storage (GCS) backup locations. In Federated mode, Stork must be deployed through the Portworx Operator as part of a Portworx Enterprise installation; standalone Stork deployments are not supported. To confirm the Stork version and Workload Identity configuration, see Verify Stork configuration on each application cluster.
Field Required Description Cluster Name Yes A unique name to identify this cluster in Portworx Backup. Kubeconfig Yes The kubeconfig for the cluster. Paste the output of kubectl config view --flatten --minifyinto the text area, or drag and drop (or upload) the kubeconfig file using the file upload option below the text area. -
Click Connect.
The cluster is added to the Clusters page. Portworx Backup pushes the necessary CRs to the cluster, and Stork on the cluster begins managing backup operations locally.
-
Assign a backup location to the cluster. In the Backup location column, click the assignment indicator or select Edit from the Actions menu, choose a backup location, and click Save. For more information, see Configure Backup Locations in Federated Mode.
Manual discovery of shoot clusters
Manual Shoot Discovery is not available while the Gardener Cluster Config status is In Progress. Wait for the current operation to complete before running a manual discovery.
You can manually discover Gardener shoot clusters at any time to retrieve the latest list of shoot clusters.
If cluster labels are added or removed, or project mappings are changed after the Gardener instance is connected to Portworx Backup, the list of shoot clusters may become outdated. Use the Manual Shoot Discovery option to update the list of associated shoot clusters in Portworx Backup.
To manually discover shoot clusters, follow these steps:
- Log in to the Portworx Backup web console.
- From the left navigation pane, click Clusters > Cluster Configs.
- Locate the Gardener cluster instance, and click the options menu (⋮) in its row.
- Click Manual Shoot Discovery.
Manual reauthentication of shoot clusters
Use Manual Shoot Reauthentication to refresh the kubeconfig for all shoot clusters associated with the Gardener cluster. This ensures that kubeconfig, tokens, and permissions remain valid and up to date.
If kubeconfig settings are modified (for example, due to security updates), performing this action immediately refreshes access for all associated shoot clusters.
This action also synchronizes the state between the Portworx Backup server and the shoot clusters. It is useful after network interruptions, configuration changes, or when cluster status appears outdated.
Shoot cluster kubeconfigs are obtained from the Gardener API (through the shoots/adminkubeconfig subresource) and are short-lived — the credentials they contain expire after a Gardener-defined time-to-live (TTL). Portworx Backup renews these credentials automatically during shoot discovery, including each Auto Sync cycle (see Configure auto sync schedule for Gardener clusters). If a kubeconfig expires before the next automatic refresh — for example, when Auto Sync is disabled or after a prolonged network interruption — operations against the affected shoot clusters fail until the credentials are renewed. Use Manual Shoot Reauthentication to force an immediate refresh in that case.
To refresh credentials for shoot clusters, follow these steps:
- Log in to the Portworx Backup web console.
- From the left navigation pane, click Clusters > Cluster Configs.
- Locate the Gardener cluster and click the options menu (⋮) in its row.
- Click Manual Shoot Reauthentication.
Configure auto sync schedule for Gardener clusters
When you add a Gardener cluster configuration to Portworx Backup, you can set an Auto Sync Schedule to control how often the list of shoot clusters is refreshed automatically. This ensures that newly added or removed shoot clusters are detected and updated without manual intervention.
The Auto Sync Schedule is only active when Auto Sync is enabled for the Gardener cluster configuration.
To configure the auto sync schedule, follow these steps:
-
Log in to the Portworx Backup web console.
-
From the left navigation pane, click Clusters > Cluster Configs.
-
Click Connect Cluster Config.
-
In the Add Gardener Cluster page, enable the Auto Sync toggle.
-
In the Auto Sync Schedule field, select the sync interval.
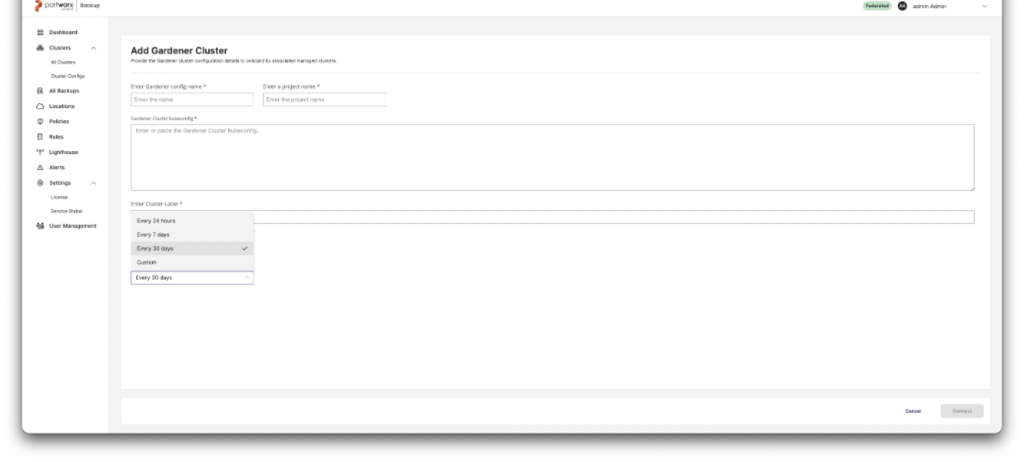
Available intervals: Every 24 hours, Every 7 days, Every 30 days, or Custom.
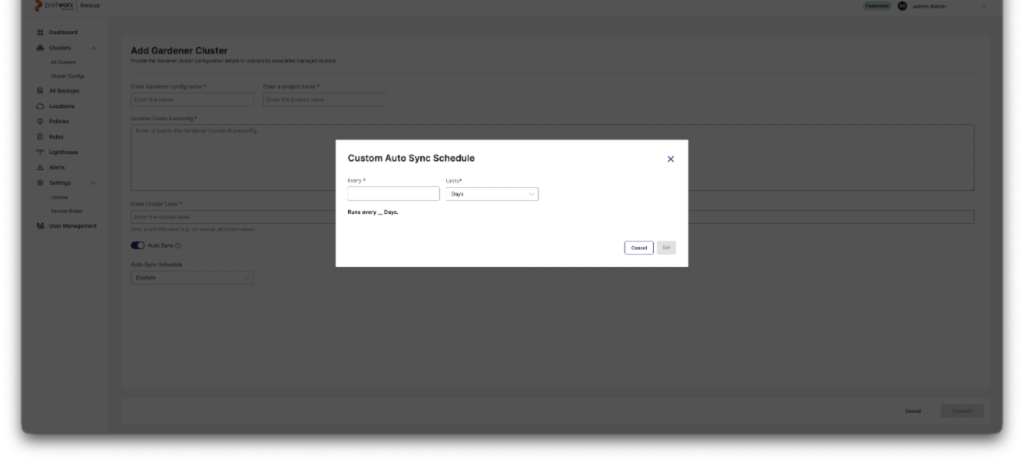
If you select Custom, the Custom Auto Sync Schedule dialog appears. Enter the frequency value in the Every field and select the unit from the drop-down, then click Set. The minimum configurable value is 15 minutes and the maximum is 90 days.
-
Complete the remaining fields and click Connect. For field information, see Onboard Gardener shoot clusters.
To update the auto sync schedule for an existing Gardener cluster configuration, use the Edit option. For more information, see Edit Gardener cluster configuration.
Edit Gardener cluster configuration
Editing a Gardener Cluster Config is not available while its status is In Progress or Deleting. Wait for the current operation to complete before making changes.
Use the edit operation to update the Gardener cluster configuration.
To edit a Gardener cluster configuration, follow these steps:
-
Log in to the Portworx Backup web console.
-
From the left navigation pane, click Clusters > Cluster Configs.
-
Locate the Gardener cluster instance and click the options menu (⋮) in its row.
-
Select Edit.
-
In the Edit Gardener Cluster page, update the required fields:
Field Editable/Non-Editable Description Gardener config name Non-Editable A unique name for this Gardener configuration within Portworx Backup. Used to identify the configuration in the UI — does not need to match the Gardener project name. Project name Non-editable The name of the Gardener project that contains the shoot clusters you want to manage. Must match the project name exactly as it appears in the Gardener dashboard. Gardener Cluster Kubeconfig Partially editable The kubeconfig for the Gardener API server (not a shoot cluster kubeconfig). Portworx Backup uses this to authenticate with the Gardener API and discover the shoot clusters in the specified project. You can update the kubeconfig (for example, to refresh credentials), but the updated kubeconfig must point to the same Gardener API server endpoint. Changing the endpoint is not supported.
The service account referenced in this kubeconfig must have the same Gardener API server permissions listed in Onboard Gardener shoot clusters.Cluster Label Non-editable A Kubernetes cluster label (for example, px-backup_allotment=<value>) that filters which shoot clusters in the project are discovered and managed by Portworx Backup. Only clusters matching this label are onboarded.Auto Sync Editable When enabled, Portworx Backup periodically updates the list of shoot clusters based on cluster labels. New matching clusters are added automatically. Shoot clusters that no longer exist in Gardener are deleted from Portworx Backup (backups remain in the backup location). Shoot clusters whose labels no longer match the configured label filter are marked as unmanaged.
For example, if a shoot cluster with labelpx-backup_allotment=oneis changed topx-backup_allotment=twoor the label is removed altogether, then the cluster is marked asunmanaged. You can remove unmanaged clusters manually from the Portworx Backup web console.
When disabled, you must update the cluster list manually using the Manual Shoot Discovery option. For more information, see Manual discovery of shoot clusters.Auto Sync Schedule Editable The interval at which shoot clusters are automatically discovered or synchronized (for example, Every 24 hours). Applicable when Auto Sync is enabled. For the available intervals and the custom range, see Configure auto sync schedule for Gardener clusters. -
Select the acknowledgment checkbox, and click Update.
Edit a standalone shoot cluster
Use the edit option to update the kubeconfig for a standalone shoot cluster. This is useful when cluster credentials change or the kubeconfig has expired.
To edit a standalone shoot cluster, follow these steps:
-
Log in to the Portworx Backup web console.
-
From the left navigation pane, click Clusters > All Clusters.
-
Locate the cluster and click the options menu (⋮) in its row.
-
Click Edit.
-
In the Edit Kubernetes Cluster page, update the required fields:
Field Editable/Non-Editable Description Cluster Name Non-editable The name used to identify this cluster in Portworx Backup. Kubeconfig Editable The kubeconfig for the cluster. Paste the updated kubeconfig content or upload a new kubeconfig file. -
Click Update.
Delete a Gardener shoot cluster or a standalone shoot cluster
To delete a Gardener shoot cluster or a standalone shoot cluster from Portworx Backup, follow these steps:
- Log in to the Portworx Backup web console.
- From the left navigation pane, click Clusters > All Clusters.
- Locate the Gardener shoot cluster or standalone shoot cluster, and click the options menu (⋮) in its row.
- Click Remove.
- Select the acknowledgment checkbox, and click Delete to confirm.
If the Gardener configuration is retained, the shoot cluster can be rediscovered and re-added during the next discovery cycle (manual or automatic, if Auto Sync is enabled). It appears with the same name but as a new cluster object with a new UUID.
For information on manual discovery, see Manual discovery of shoot clusters.
You can also add the cluster manually using a kubeconfig. For more information, see Onboard a standalone shoot cluster.
When a shoot cluster is deleted from Gardener (not from Portworx Backup), Portworx Backup handles the removal automatically through the Cluster Discovery configuration:
- If Auto Sync is enabled, the next Auto Sync cycle detects that the shoot cluster no longer exists in Gardener and removes it from Portworx Backup automatically.
- If Auto Sync is disabled, you must manually trigger Manual Shoot Discovery to update the cluster list. The deleted shoot cluster is removed from Portworx Backup after discovery completes.
Backups already stored in the backup location are not deleted when a shoot cluster is removed from Portworx Backup.
Delete a Gardener cluster configuration
Deleting a Gardener Cluster Config is not available while its status is In Progress. Wait for the current operation to complete before deleting.
Before deleting a Gardener cluster configuration, ensure that all associated shoot clusters have been removed from Portworx Backup. Portworx Backup prevents deletion of a Gardener cluster configuration if it still has associated shoot clusters. For more information on removing shoot clusters, see Delete a Gardener shoot cluster or a standalone shoot cluster.
To delete the Gardener cluster configuration from Portworx Backup, follow these steps:
- Log in to the Portworx Backup web console.
- From the left navigation pane, click Clusters > Cluster Configs.
- Locate the Gardener cluster and click the options menu (⋮) in its row.
- Click Remove.
- In the Delete Gardener Config dialog, select the acknowledgement checkbox, and click Delete.
Deleting a Gardener cluster configuration removes it from Portworx Backup and stops automatic discovery of new shoot clusters for that project. Any backups already stored in the backup location are not deleted.
Cluster states for Gardener-discovered clusters
The Managed and Unmanaged states apply only to shoot clusters discovered through a Gardener cluster configuration. Standalone clusters onboarded manually with a kubeconfig do not use these states. When Portworx Backup discovers shoot clusters through a Gardener cluster configuration, each cluster is assigned a state that reflects whether it is actively tracked by the discovery configuration.
| State | Description |
|---|---|
| Managed | The cluster was discovered through the Gardener API and its Kubernetes labels match the label filter configured in the CDC. Portworx Backup actively tracks this cluster and includes it in Auto Sync cycles. |
| Unmanaged | The cluster was previously discovered through the Gardener cluster configuration, but its labels no longer match the configured label filter. For example, the label was changed or removed. Portworx Backup no longer actively tracks this cluster, but it remains visible in the UI until you remove it manually. |
When a cluster transitions to Unmanaged, its backup schedules silently stop executing — Portworx Backup does not raise a separate alert or notification for this transition, and the cluster remains visible in the UI. Existing backups are retained in the backup location, but no new backups are created until the cluster returns to a Managed state (by restoring the matching label) or is re-onboarded. Monitor cluster state after label or Auto Sync changes so that backup coverage does not lapse unnoticed.
A shoot cluster that no longer exists in Gardener is deleted from Portworx Backup entirely and is not marked as unmanaged. Backups already stored in the backup location are retained in both cases.
To remove an unmanaged cluster, go to Clusters > All Clusters, locate the cluster, and select Remove from the actions menu. For more information, see Delete a Gardener shoot cluster or a standalone shoot cluster.
Next steps
Add a backup location. For more information, see Configure Backup Locations in Federated Mode.