Install Portworx on Spectro Cloud
You can install Portworx on Spectro Cloud to enable enterprise-grade cloud-native storage for your Kubernetes workloads. Portworx supports standard Kubernetes deployments running on Spectro Cloud. Portworx integrates natively with Spectro Cloud, ensuring persistent storage for demanding applications.
Before you install Portworx, prepare the Cluster Profile template to customize the Operating System Layer. After configuration, the cluster profile layers appear similar to the following.
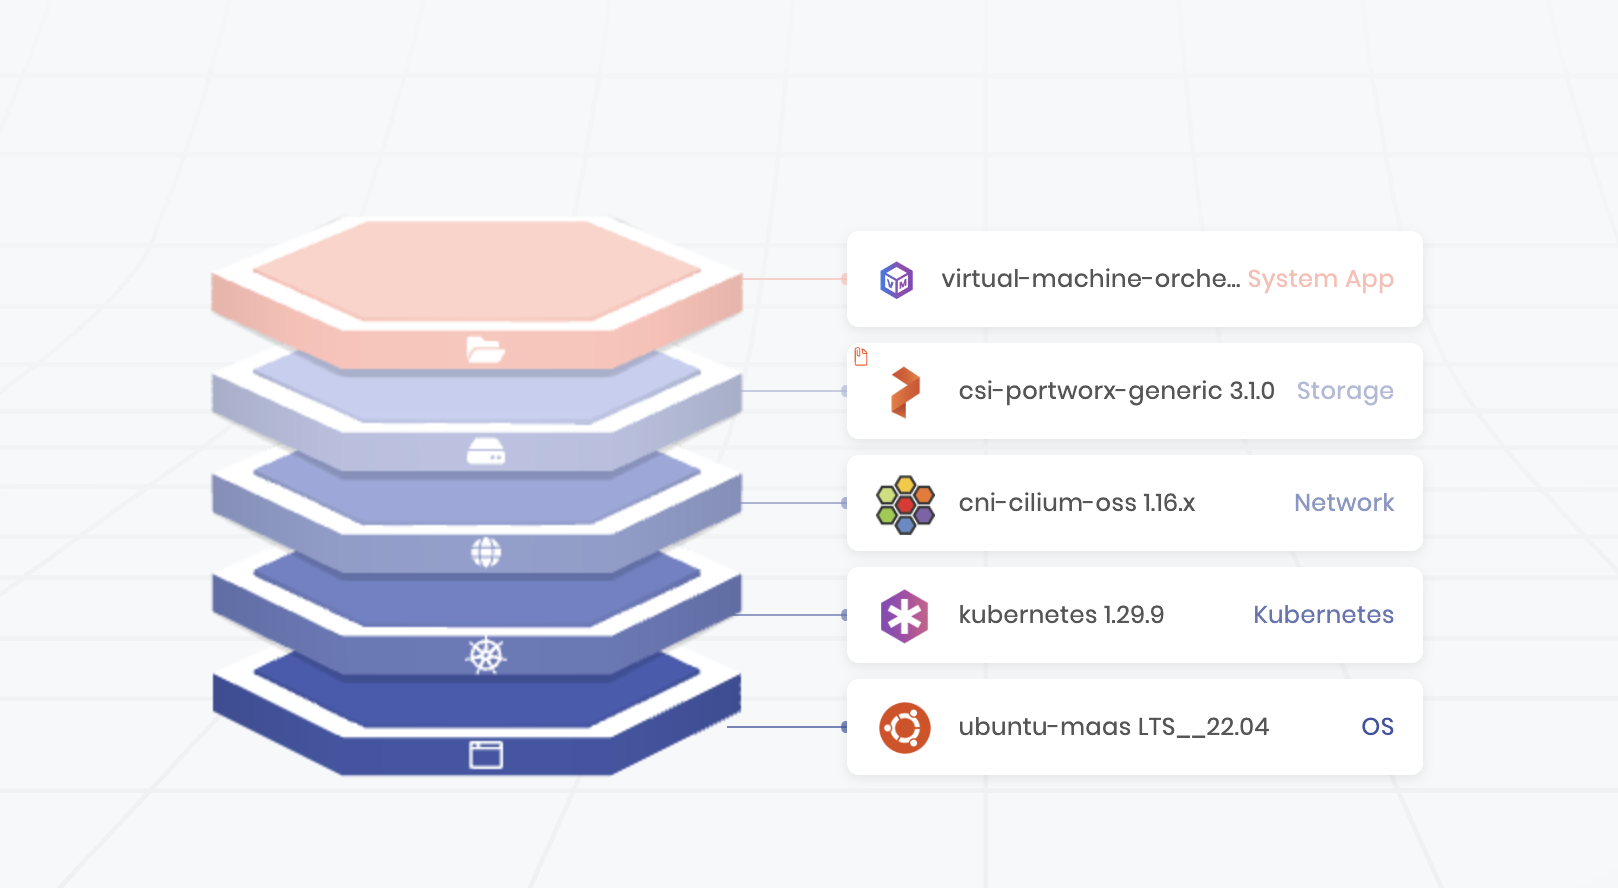
Note: The Network, System App, and other layers, can differ based on your configuration. For more information on Cluster profiles, see Spectro Cloud documentation.
Prerequisites
In addition to the System Requirements, ensure that your cluster meets the following requirements before installing Portworx Enterprise:
-
This installation procedure assumes the use of Canonical Metal as a Service (MAAS) as your infrastructure provider, deployed on Spectro Cloud and FlashArray with pre-provisioned volumes attached as LUNs over iSCSI as your storage array.
The following alternative storage configurations are also supported:- Any external storage array with pre-provisioned volumes.
- Local disks available within the server nodes.
- Fibre Channel (FC) connectivity instead of iSCSI.
- When using FlashArrays in cloud environments, configure cloud disks instead of pre-provisioned volumes.
For information on the infrastructure providers supported by Spectro Cloud, see Creating clusters on Palette.
-
For information on how to prepare Bare-Metal Cluster API (CAPI) clusters, see the Reliable Distributed Storage for Bare-Metal CAPI Clusters blog post. It covers essential prerequisites:
- Configure static IPs on all nodes.
- Remove all disks from the MAAS configuration to prevent data loss during repaving.
- Disabling the “Erase nodes disks prior to releasing” option.
Follow the blog for additional preparation steps.
These installation steps target a specific use case. If they do not match your requirements, follow the Bare Metal Install Guide or the FlashArray Direct Access guide for a more generic installation approach.
The following collection of tasks describe how to install Portworx on Spectro Cloud:
- Prepare your Cluster Profile
- Install Portworx
- Deploy Cluster Profile
- [Optional] Create an add-on Pack for Virtual Machine Orchestrator (VMO)
- Monitor Portworx Nodes
- Verify Portworx Pod Status
- Verify Portworx Cluster Status
- Verify pxctl Cluster Provision Status
Prepare your Cluster Profile
To configure your new cluster profile:
- Select the MAAS infrastructure provider in cloud type of the new cluster profile.
- Choose Ubuntu Base OS Pack as the base OS pack. This pack requires the following additional customizations:
These steps are essential only if your Portworx nodes use iSCSI to connect to a backend storage array. If the nodes rely only on locally attached drives, this configuration is not necessary. For more information about repaving behavior and configuration, see Repave Behavior and Configuration documentation.
Configuring OS Pack: Edit values under pack details for Portworx to work.
-
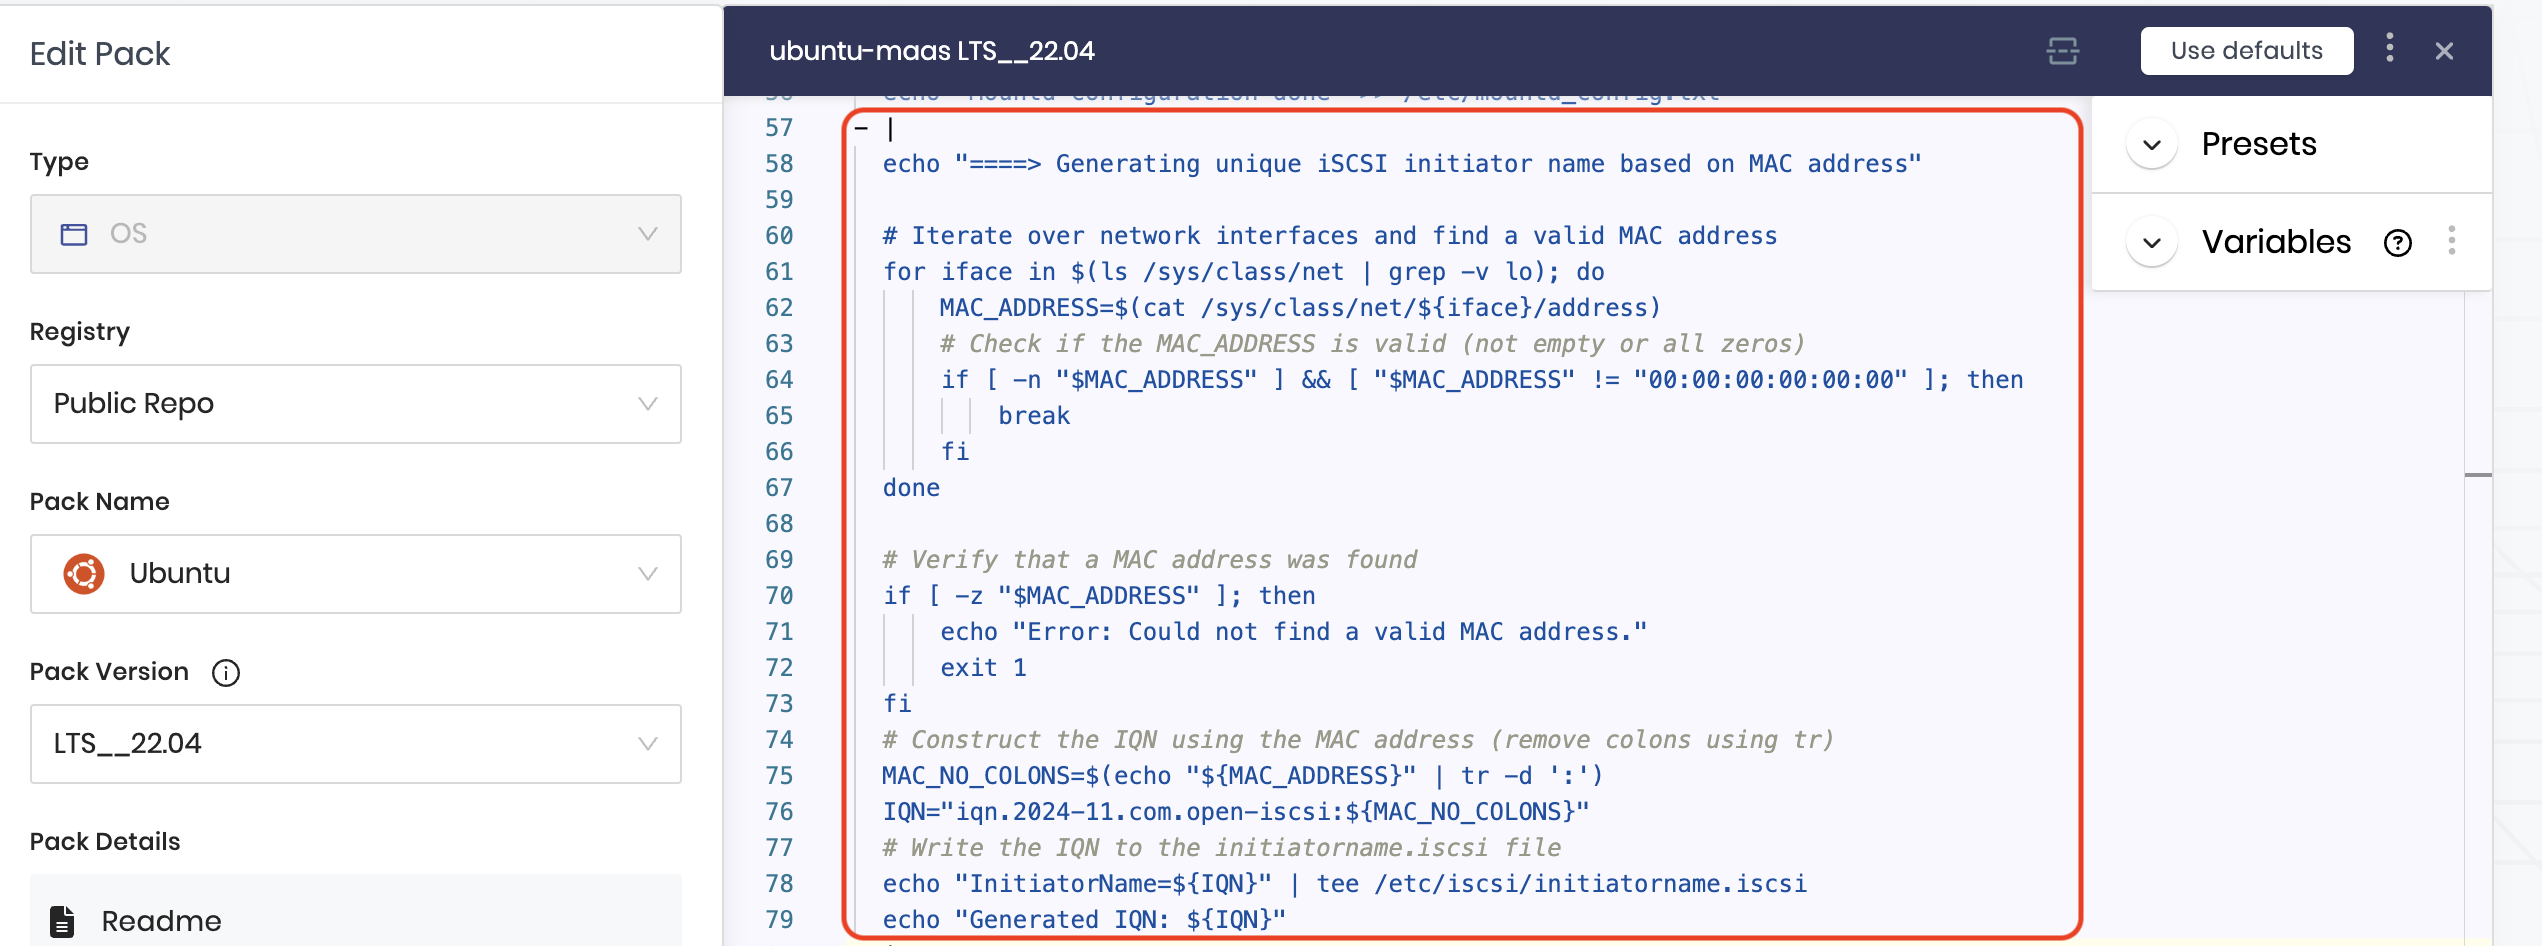
Unique iSCSI initiator name that doesn't change.
To ensure the iSCSI Initiator name remains consistent across reboots or node repaving, you need to implement a script that generates a unique iSCSI initiator name. This script can utilize the MAC address of the node’s active network interface, as shown in the example screenshot, or any other method such as the hostname or a different MAC address. The key requirement is that the method ensures a unique and persistent initiator name for the node.
-
Ensure node undergoes iSCSI discovery and login process before Portworx comes up on node.
Once the iSCSI initiator names are generated, each node must discover and log in to the iSCSI targets. To configure this, provide the FlashArray Portal IP using the variable
FLASHARRAY_PORTALS=XX.XX.XX.XX, as shown in the image. This step ensures that iSCSI discovery and login to iSCSI paths are re-established after a node repave, allowing Portworx to connect to the storage backend before starting.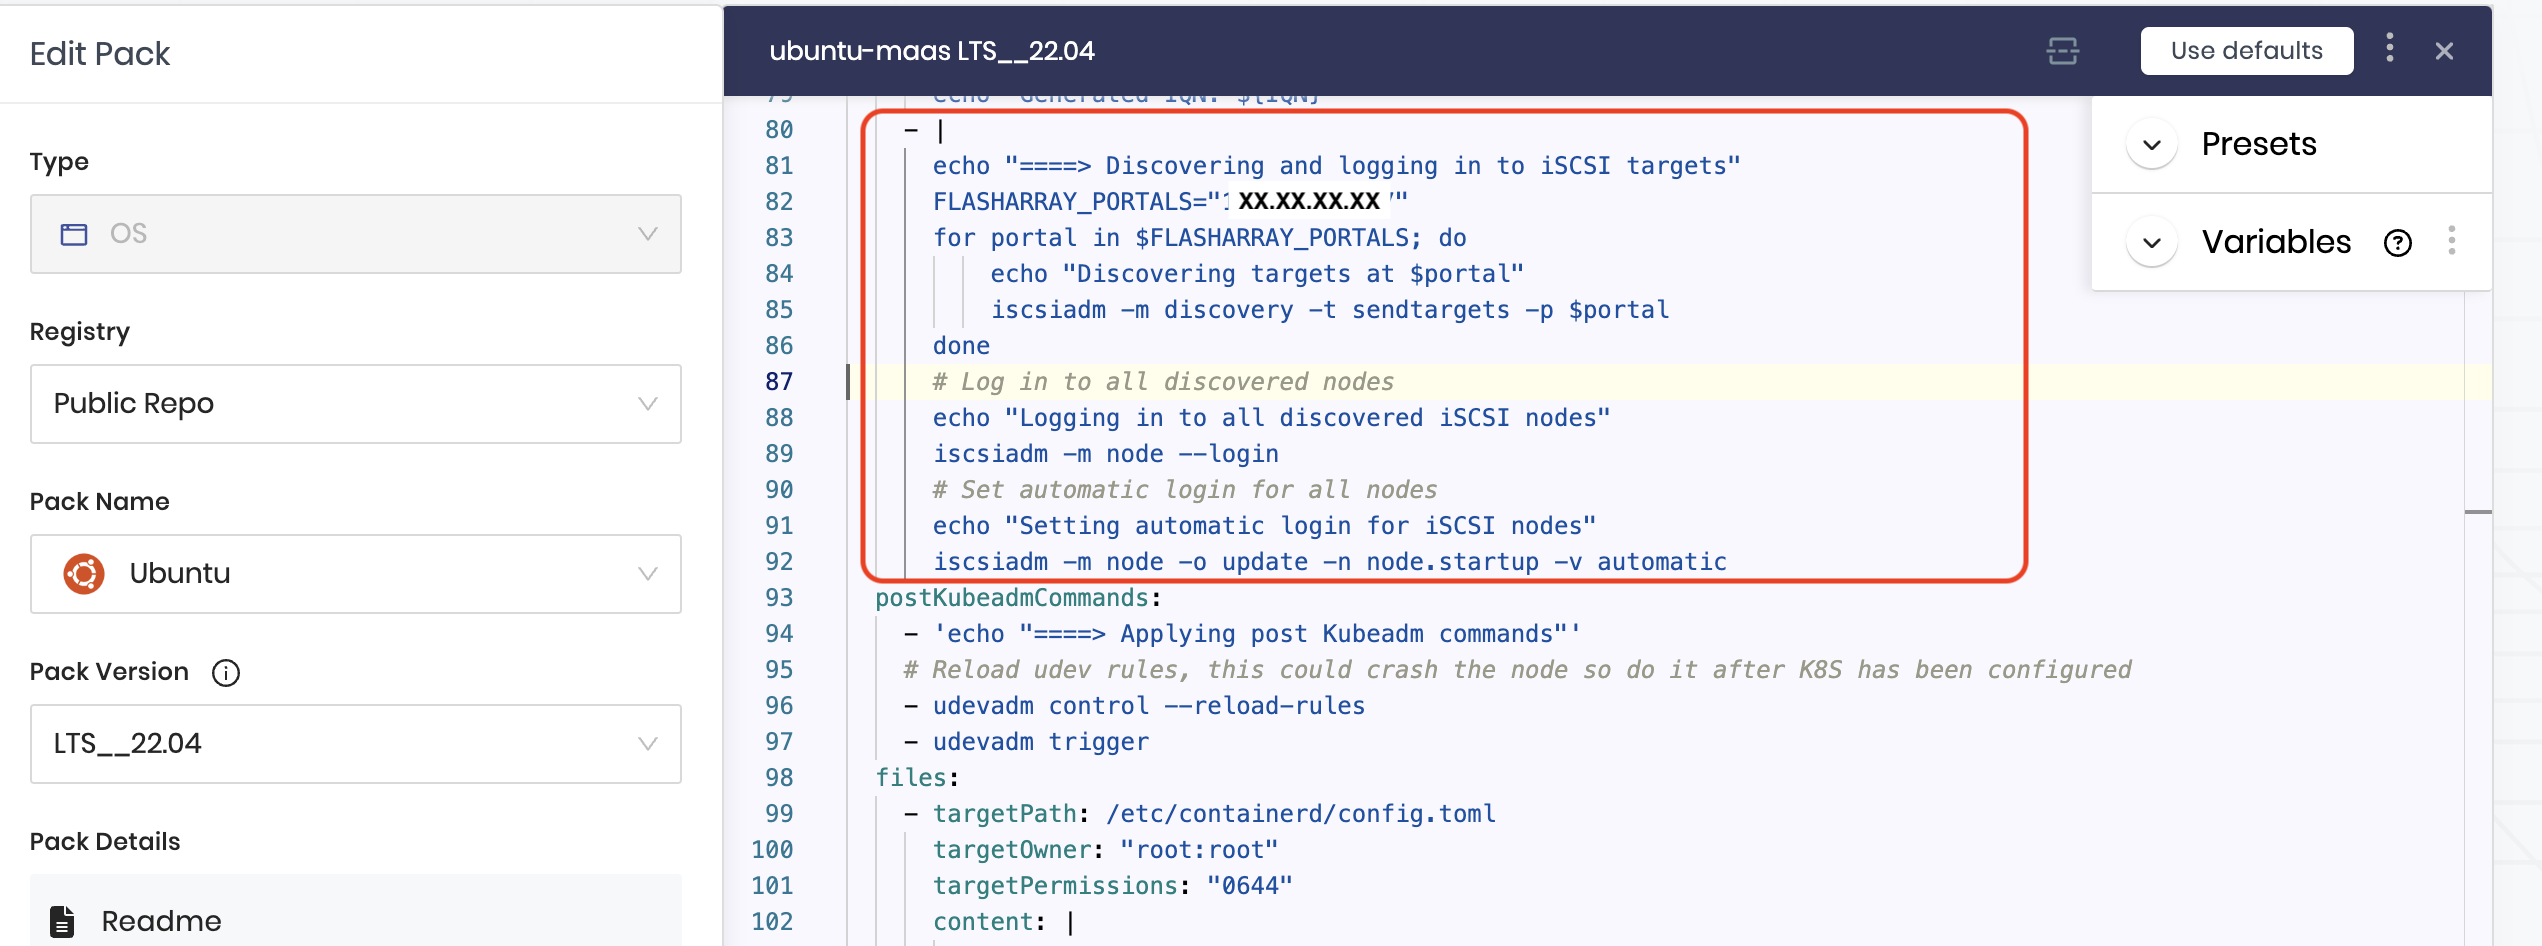
-
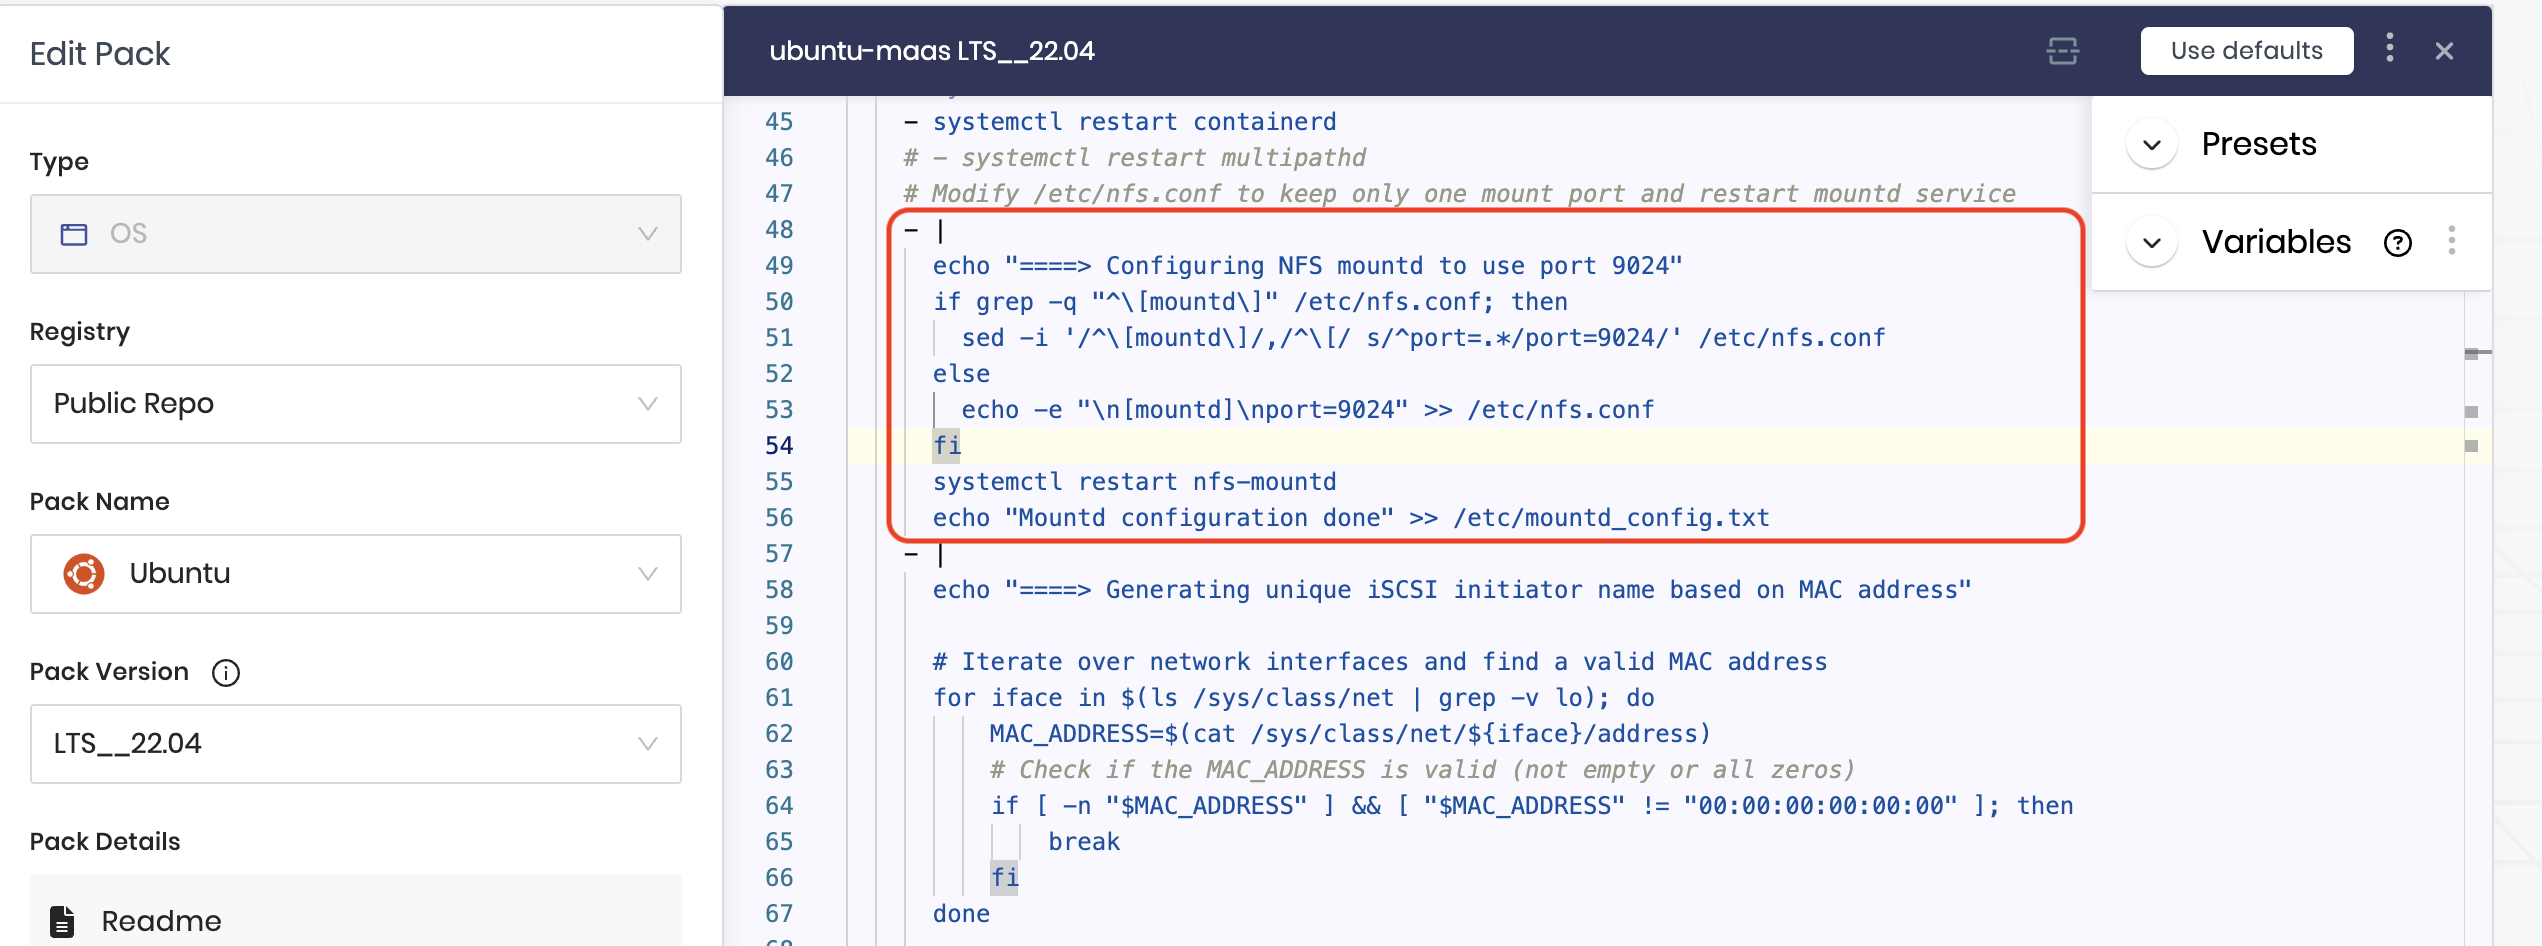
Ensure to keep only one NFS mount port.
To ensure NFS operates on a consistent port, configure it to prevent mounts on random or varying ports, which can occur in some OS distributions or if using NFSv3. This configuration is essential because Portworx SharedV4 volumes rely on NFS ports for communication, regardless of whether a storage array backend is used. For more details, see the Portworx documentation on opening NFS ports.
-
Configure Kubernetes and CNI layers in the profile. For more information, see Create Infrastructure Profile.
Install Portworx
In the Storage layer, select Portworx as the base storage pack.
Configure Portworx Pack.
The Portworx /w Operator pack provides you with options to choose the Pack Version from the left sidebar. You can configure the version of Portworx by changing the image tag associated with the image below in the values under Pack Details of the left sidebar:
When overriding the image version, you must only change .z versions (patch versions) within the same .y release. For example, if you are using the 3.2.0 pack, you can deploy 3.2.1 or 3.2.2, but you must not use it to deploy 3.3.0 or any other .y version upgrade.
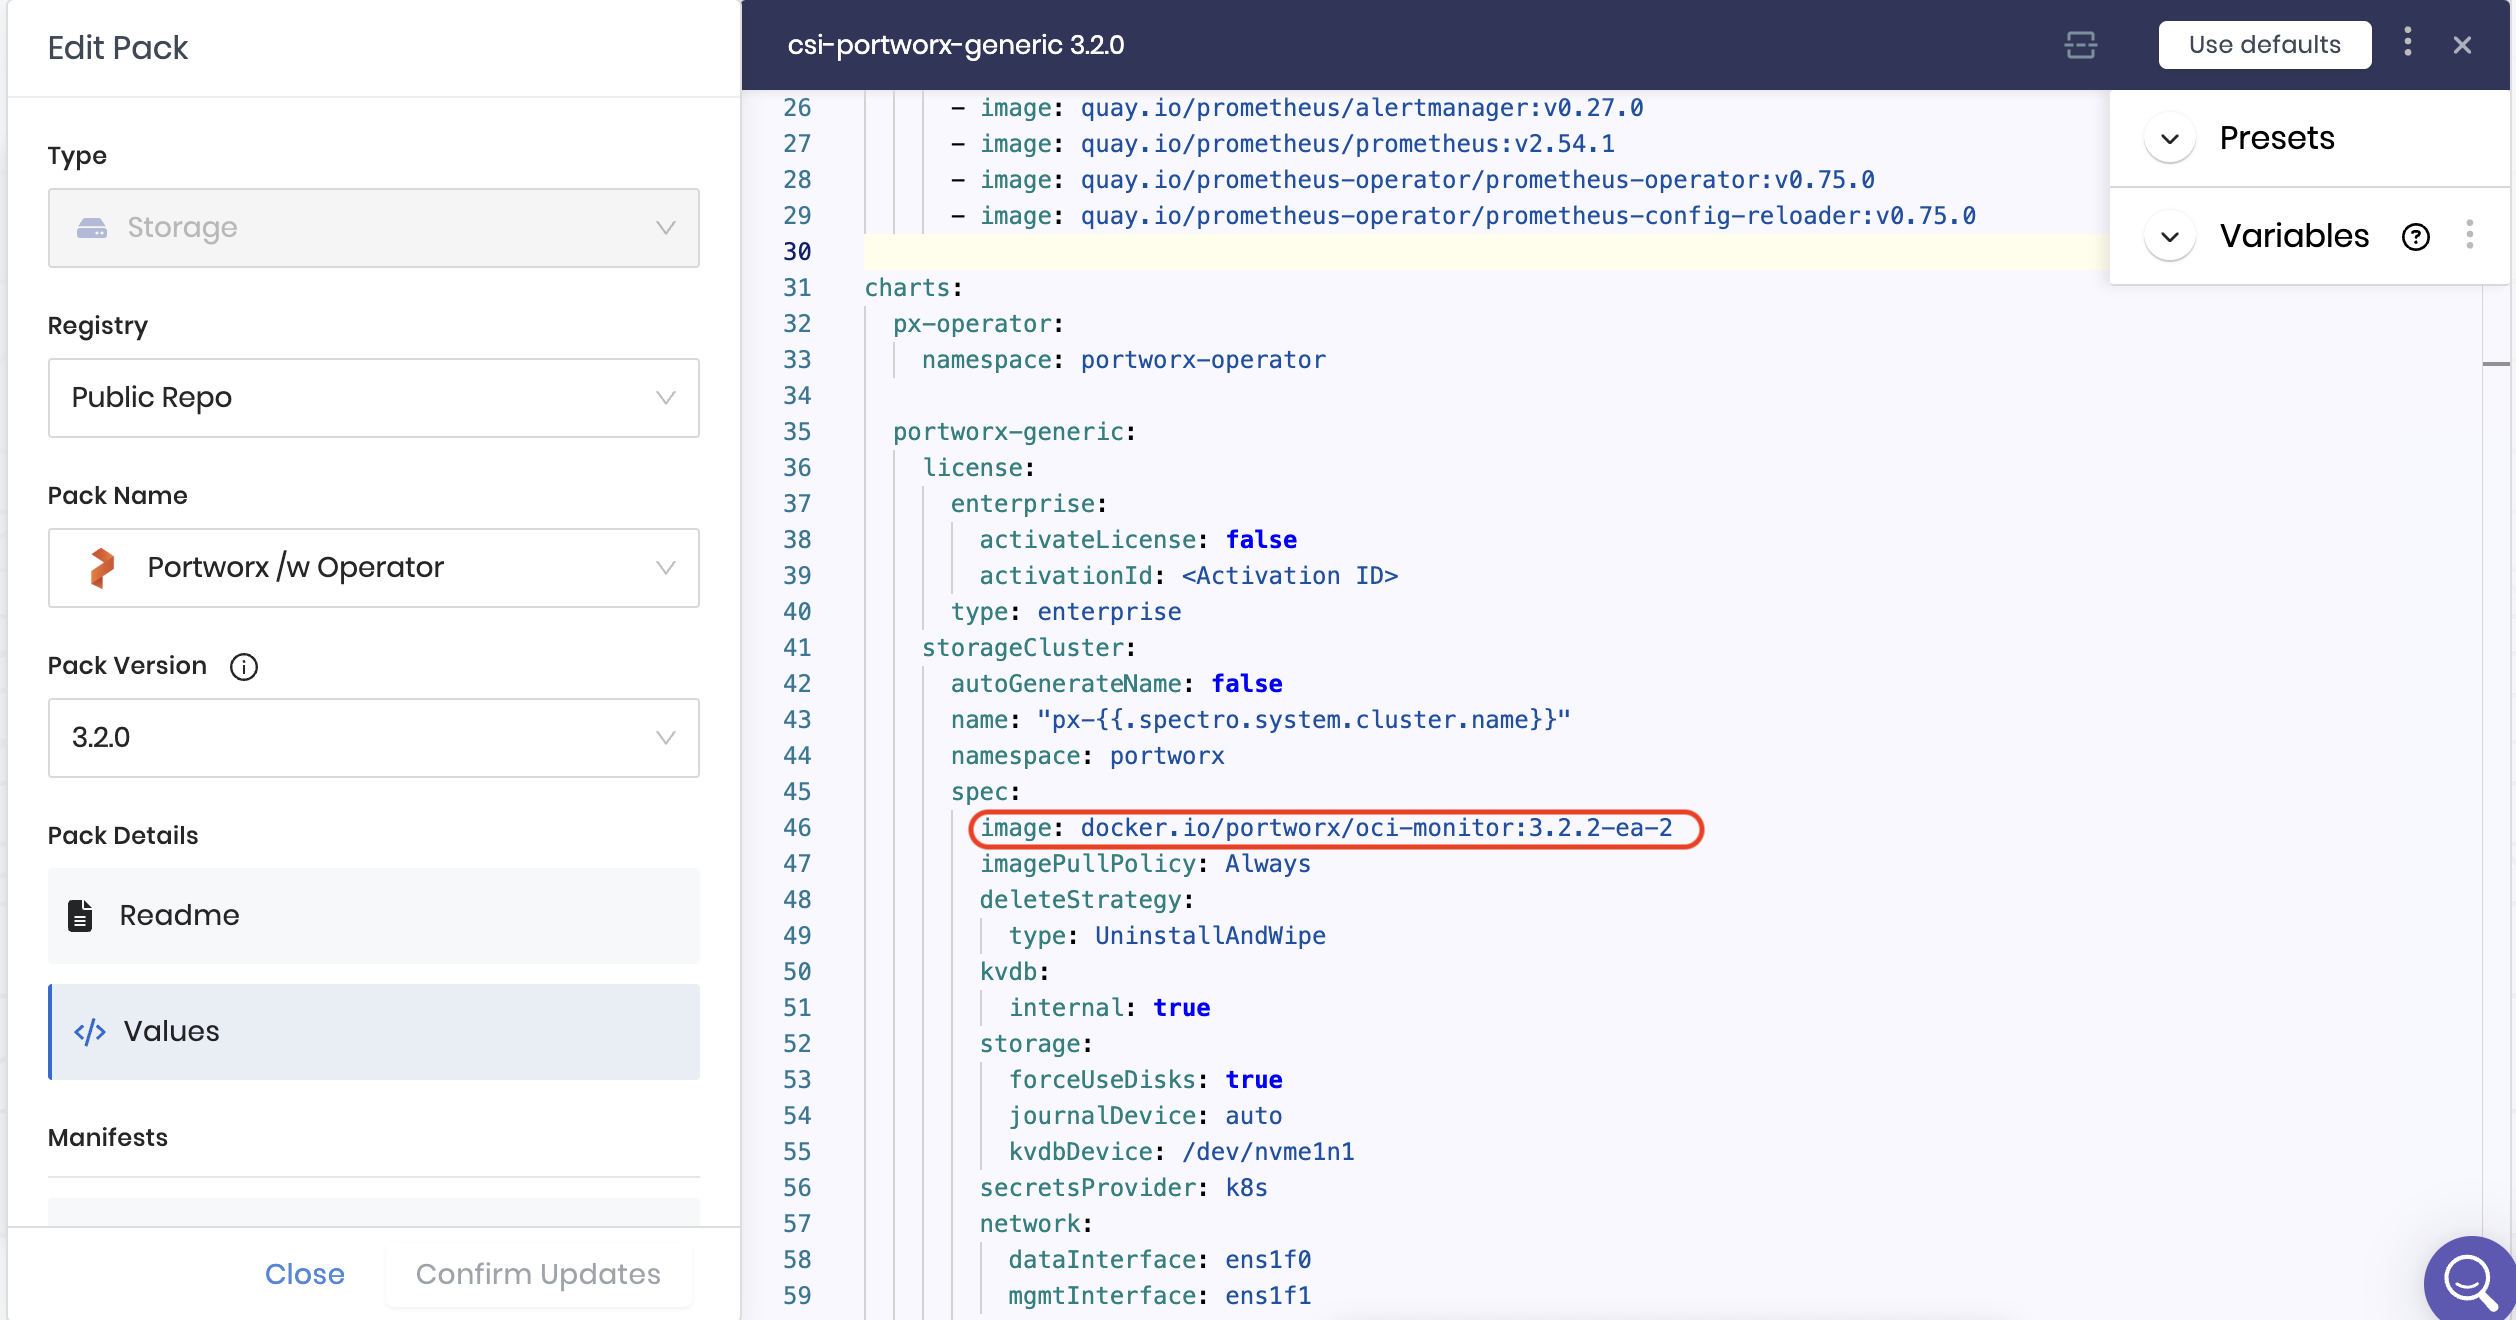
You can find those image names under Values.
- Generate the StorageCluster from the Portworx Central console. For additional configuration, see Spectro Cloud documentation Storage specification section and StorageCluster CRD.
- For detailed instructions on configuring Secrets and StorageClass parameters, see the operations section.
- To configure IAM permissions for example for AWS see Storage specification section on Spectro Cloud docs
- To configure Prometheus URL for Autopilot, see the Install and Setup page.
Add Pure Secrets Manifest
Create a secrets manifest to enable access to Pure FlashArray and attach it to the Portworx pack.

To enable Portworx to integrate with FlashArray, see Create a JSON configuration file
After this process is complete, select the next layer and finish up the cluster profile creation.
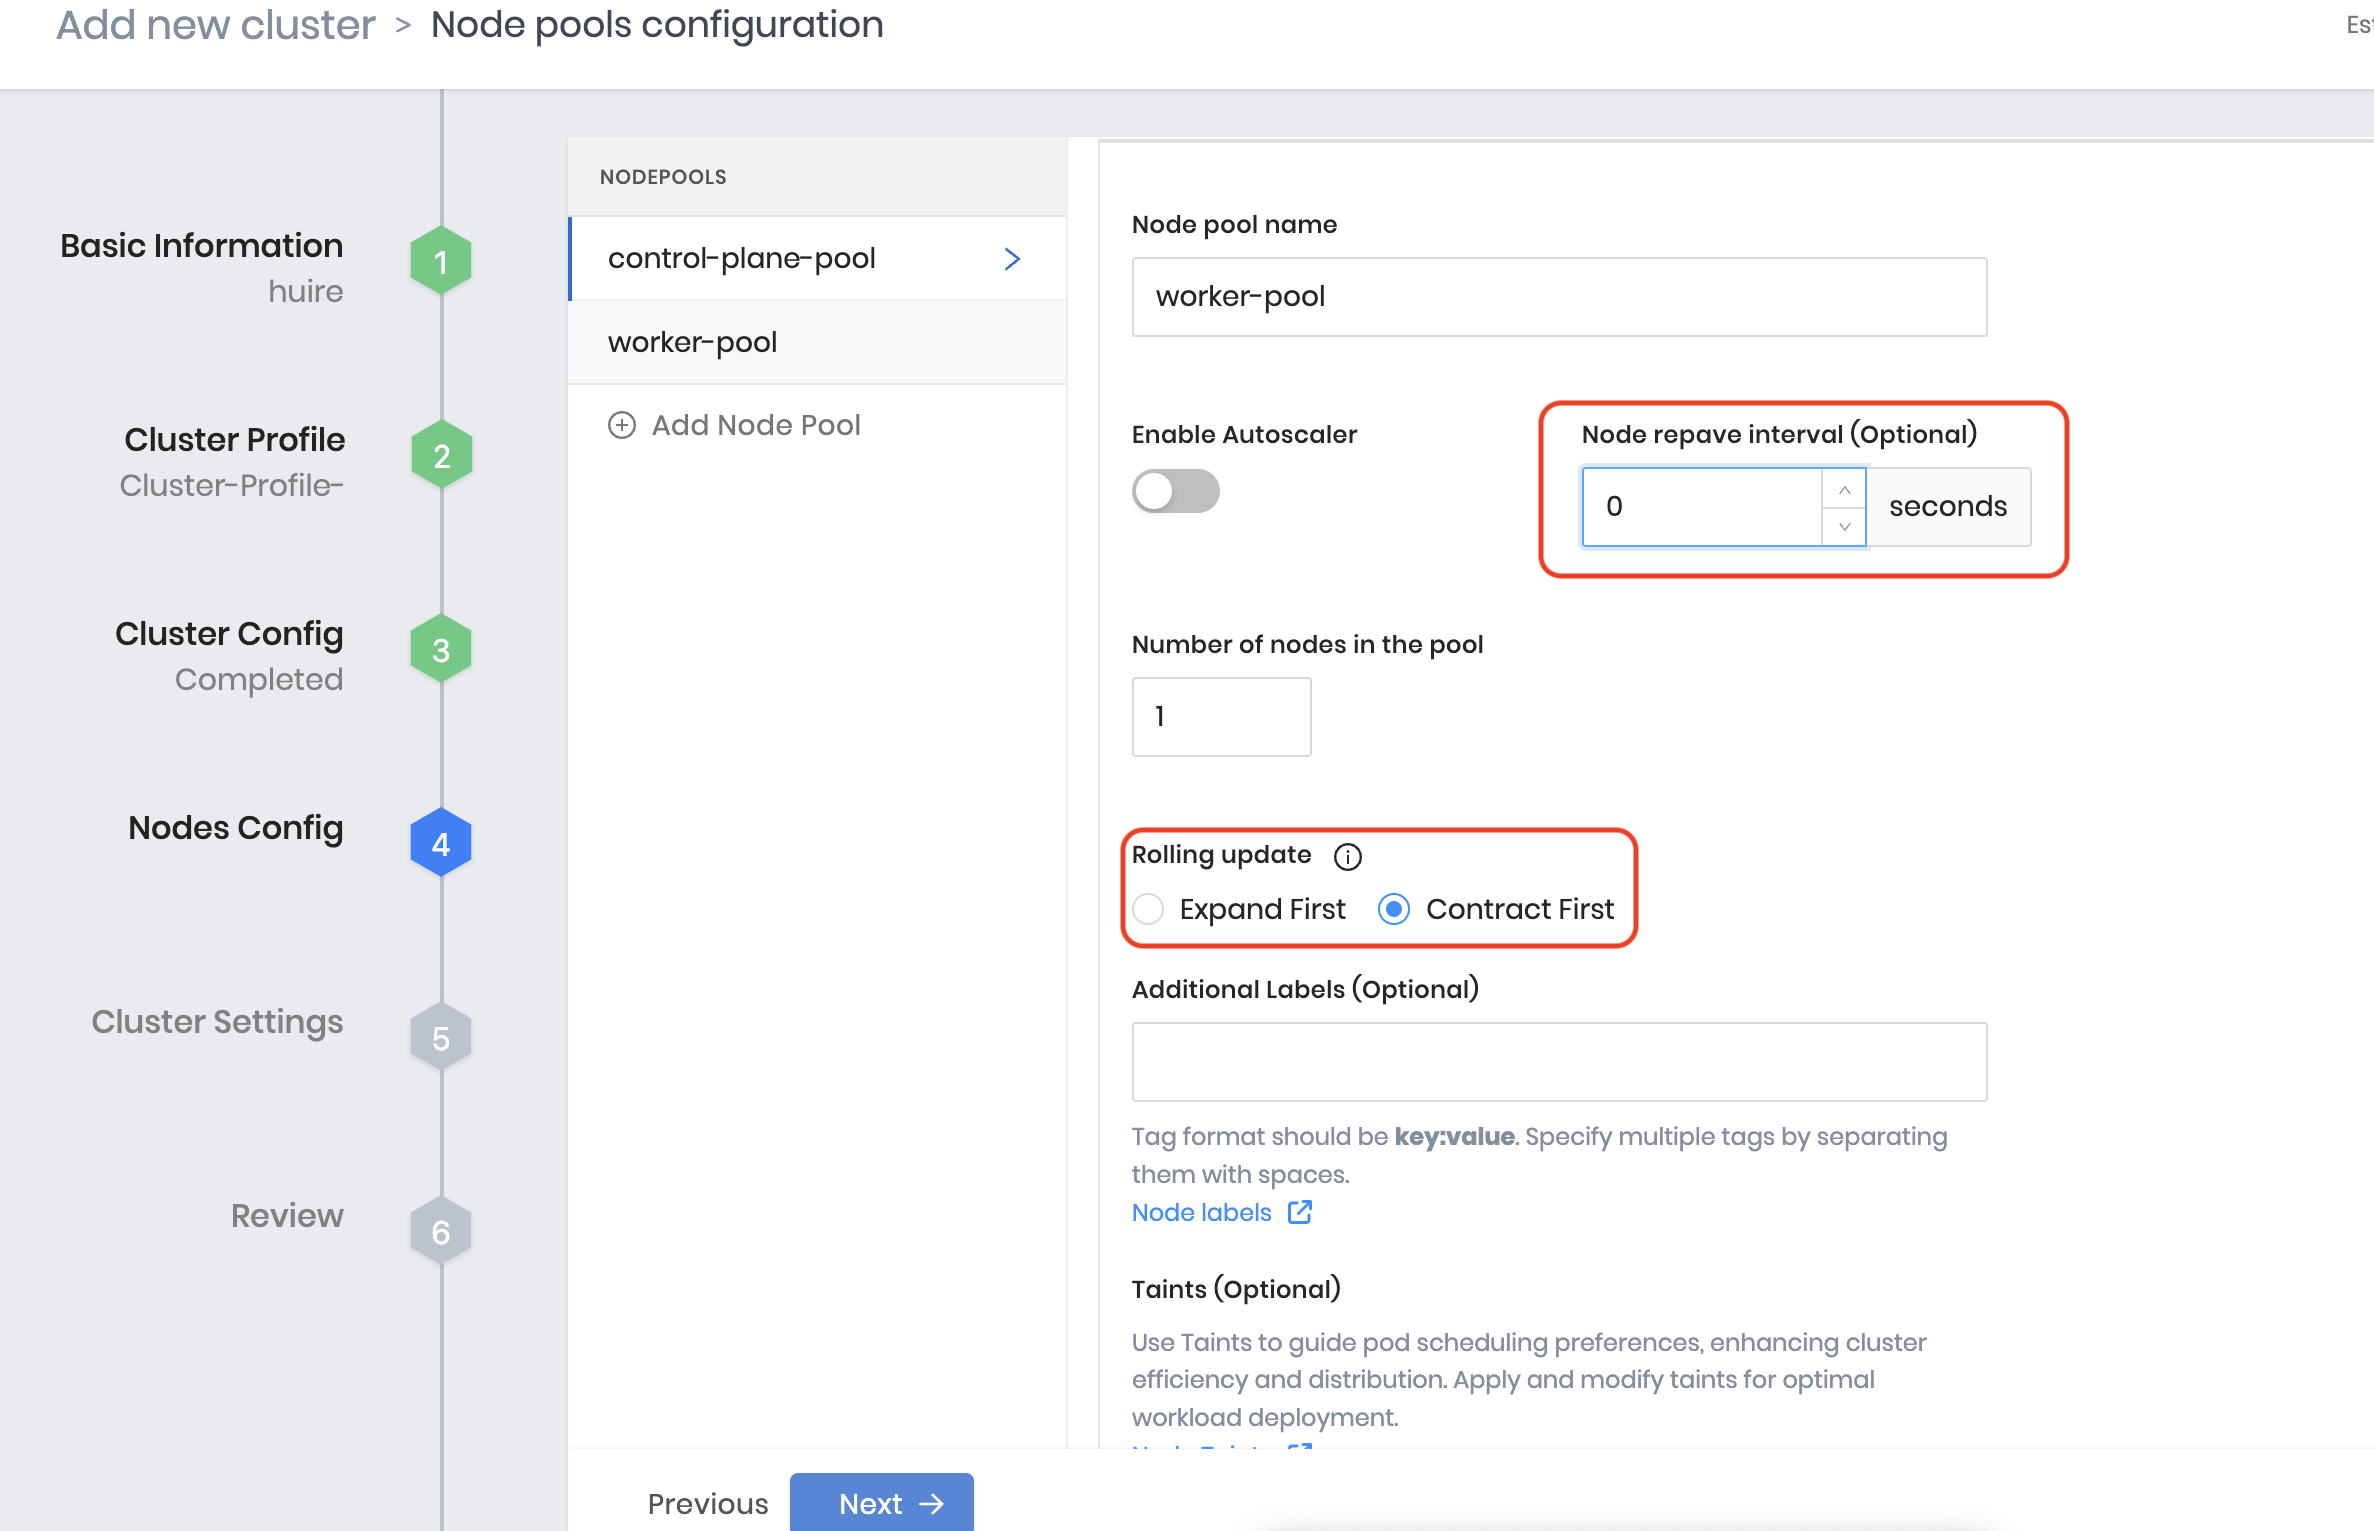
Deploy Cluster Profile
During deployment, configure the worker pool:
Set Node Repave interval to a minimum of 10 min i.e., 600 seconds at least, and select Rolling Update to Contract First.
[Optional] Create an add-on Pack for Virtual Machine Orchestrator (VMO)
Palette Virtual Machine Orchestrator (VMO) provides a unified platform for deploying, managing, and scaling Virtual Machines (VMs) and containerized applications within Kubernetes clusters. To create an add-on pack, refer Add Pack to Add-on Profile.
For more information on VMO, refer the Virtual Machine Orchestrator page on the Spectro Cloud documentation.
Monitor Portworx Nodes
-
Enter the following
kubectl getcommand and wait until all Portworx nodes show asReadyorOnlinein the output:kubectl -n <px-namespace> get storagenodes -l name=portworxNAME ID STATUS VERSION AGE
username-k8s1-node0 xxxxxxxx-xxxx-xxxx-xxxx-43cf085e764e Online 2.11.1-3a5f406 4m52s
username-k8s1-node1 xxxxxxxx-xxxx-xxxx-xxxx-4597de6fdd32 Online 2.11.1-3a5f406 4m52s
username-k8s1-node2 xxxxxxxx-xxxx-xxxx-xxxx-e2169ffa111c Online 2.11.1-3a5f406 4m52s -
Enter the following
kubectl describecommand with theNAMEof one of the Portworx nodes you retrieved above to show the current installation status for individual nodes:kubectl -n <px-namespace> describe storagenode <portworx-node-name>...
Events:
Type Reason Age From Message
---- ------ ---- ---- -------
Normal PortworxMonitorImagePullInPrgress 7m48s portworx, k8s-node-2 Portworx image portworx/px-enterprise:2.10.1.1 pull and extraction in progress
Warning NodeStateChange 5m26s portworx, k8s-node-2 Node is not in quorum. Waiting to connect to peer nodes on port 9002.
Normal NodeStartSuccess 5m7s portworx, k8s-node-2 PX is ready on this nodenote- The image pulled in the output differs based on the Portworx license type and version.
- For Portworx Enterprise, the default license activated on the cluster is a 30 day trial, that you can convert to a SaaS-based model or a generic fixed license.
Verify Portworx Pod Status
Enter the following command to list and filter the results for Portworx pods and specify the namespace where you have deployed Portworx:
kubectl get pods -n <px-namespace> -o wide | grep -e portworx -e px
NAME                                                    READY   STATUS    RESTARTS         AGE     IP                NODE                   NOMINATED NODE   READINESS GATES
portworx-api-774c2                                      1/1     Running   0                2m55s   192.168.121.196   username-k8s1-node0    <none>           <none>
portworx-api-t4lf9                                      1/1     Running   0                2m55s   192.168.121.99    username-k8s1-node1    <none>           <none>
portworx-api-dvw64                                      1/1     Running   0                2m55s   192.168.121.99    username-k8s1-node2    <none>           <none>
portworx-kvdb-94bpk                                     1/1     Running   0                4s      192.168.121.196   username-k8s1-node0    <none>           <none>
portworx-kvdb-8b67l                                     1/1     Running   0                10s     192.168.121.196   username-k8s1-node1    <none>           <none>
portworx-kvdb-fj72p                                     1/1     Running   0                30s     192.168.121.196   username-k8s1-node2    <none>           <none>
portworx-operator-58967ddd6d-kmz6c                      1/1     Running   0                4m1s    10.244.1.99       username-k8s1-node0    <none>           <none>
prometheus-px-prometheus-0                              2/2     Running   0                2m41s   10.244.1.105      username-k8s1-node0    <none>           <none>
px-cluster-xxxxxxxx-xxxx-xxxx-xxxx-3e9bf3cd834d-9gs79   2/2     Running   0                2m55s   192.168.121.196   username-k8s1-node0    <none>           <none>
px-cluster-xxxxxxxx-xxxx-xxxx-xxxx-3e9bf3cd834d-vpptx   2/2     Running   0                2m55s   192.168.121.99    username-k8s1-node1    <none>           <none>
px-cluster-xxxxxxxx-xxxx-xxxx-xxxx-3e9bf3cd834d-bxmpn   2/2     Running   0                2m55s   192.168.121.191   username-k8s1-node2    <none>           <none>
px-csi-ext-868fcb9fc6-54bmc                             4/4     Running   0                3m5s    10.244.1.103      username-k8s1-node0    <none>           <none>
px-csi-ext-868fcb9fc6-8tk79                             4/4     Running   0                3m5s    10.244.1.102      username-k8s1-node2    <none>           <none>
px-csi-ext-868fcb9fc6-vbqzk                             4/4     Running   0                3m5s    10.244.3.107      username-k8s1-node1    <none>           <none>
px-prometheus-operator-59b98b5897-9nwfv                 1/1     Running   0                3m3s    10.244.1.104      username-k8s1-node0    <none>           <none>
Note the name of a px-cluster pod. You will run pxctl commands from these pods in Verify Portworx Cluster Status.
Verify Portworx Cluster Status
You can find the status of the Portworx cluster by running pxctl status commands from a pod.
Enter the following kubectl exec command, specifying the pod name you retrieved in Verify Portworx Pod Status:
kubectl exec <pod-name> -n <px-namespace> -- /opt/pwx/bin/pxctl status
Defaulted container "portworx" out of: portworx, csi-node-driver-registrar
Status: PX is operational
Telemetry: Disabled or Unhealthy
Metering: Disabled or Unhealthy
License: Trial (expires in 31 days)
Node ID: xxxxxxxx-xxxx-xxxx-xxxx-70c31d0f478e
    IP: 192.168.121.99
    Local Storage Pool: 1 pool
    POOL    IO_PRIORITY     RAID_LEVEL      USABLE  USED    STATUS  ZONE    REGION
    0       HIGH            raid0           3.0 TiB 10 GiB  Online  default default
    Local Storage Devices: 3 devices
    Device  Path            Media Type              Size            Last-Scan
    0:1     /dev/vdb        STORAGE_MEDIUM_MAGNETIC 1.0 TiB         14 Jul 22 22:03 UTC
    0:2     /dev/vdc        STORAGE_MEDIUM_MAGNETIC 1.0 TiB         14 Jul 22 22:03 UTC
    0:3     /dev/vdd        STORAGE_MEDIUM_MAGNETIC 1.0 TiB         14 Jul 22 22:03 UTC
    * Internal kvdb on this node is sharing this storage device /dev/vdc  to store its data.
    total           -       3.0 TiB
    Cache Devices:
        * No cache devices
Cluster Summary
    Cluster ID: px-cluster-xxxxxxxx-xxxx-xxxx-xxxx-3e9bf3cd834d
    Cluster UUID: xxxxxxxx-xxxx-xxxx-xxxx-6f3fd5522eae
    Scheduler: kubernetes
    Nodes: 3 node(s) with storage (3 online)
    IP              ID                                      SchedulerNodeName       Auth            StorageNode     Used    Capacity        Status  StorageStatus       Version         Kernel                  OS
    192.168.121.196 xxxxxxxx-xxxx-xxxx-xxxx-fad8c65b8edc    username-k8s1-node0      Disabled        Yes             10 GiB  3.0 TiB         Online  Up 2.11.0-81faacc   3.10.0-1127.el7.x86_64  CentOS Linux 7 (Core)
    192.168.121.99  xxxxxxxx-xxxx-xxxx-xxxx-70c31d0f478e    username-k8s1-node1      Disabled        Yes             10 GiB  3.0 TiB         Online  Up (This node)      2.11.0-81faacc  3.10.0-1127.el7.x86_64  CentOS Linux 7 (Core)
    192.168.121.191 xxxxxxxx-xxxx-xxxx-xxxx-19d45b4c541a    username-k8s1-node2      Disabled        Yes             10 GiB  3.0 TiB         Online  Up  2.11.0-81faacc  3.10.0-1127.el7.x86_64  CentOS Linux 7 (Core)
Global Storage Pool
    Total Used      :  30 GiB
    Total Capacity  :  9.0 TiB
Status displays PX is operational when the cluster is running as expected.
Verify pxctl Cluster Provision Status
-
Access the Portworx CLI.
-
Run the following command to find the storage cluster:
kubectl -n <px-namespace> get storageclusterNAME CLUSTER UUID STATUS VERSION AGE
px-cluster-xxxxxxxx-xxxx-xxxx-xxxx-3e9bf3cd834d xxxxxxxx-xxxx-xxxx-xxxx-6f3fd5522eae Online 2.11.0 10mThe status must display the cluster is
Online. -
Run the following command to find the storage nodes:
kubectl -n <px-namespace> get storagenodesNAME ID STATUS VERSION AGE
username-k8s1-node0 xxxxxxxx-xxxx-xxxx-xxxx-fad8c65b8edc Online 2.11.0-81faacc 11m
username-k8s1-node1 xxxxxxxx-xxxx-xxxx-xxxx-70c31d0f478e Online 2.11.0-81faacc 11m
username-k8s1-node2 xxxxxxxx-xxxx-xxxx-xxxx-19d45b4c541a Online 2.11.0-81faacc 11mThe status must display the nodes are
Online. -
Verify the Portworx cluster provision status by running the following command.
Specify the pod name you retrieved in Verify Portworx Pod Status.kubectl exec <px-pod> -n <px-namespace> -- /opt/pwx/bin/pxctl cluster provision-statusNODE NODE STATUS POOL POOL STATUS IO_PRIORITY SIZE AVAILABLE USED PROVISIONED ZONE REGION RACK
0c99e1f2-9d49-xxxx-xxxx-xxxxxxxxxxxx Up 0 ( 8ec9e6aa-7726-xxxx-xxxx-xxxxxxxxxxxx ) Online HIGH 32 GiB 32 GiB 33 MiB 0 B default default default
1e89102f-0510-xxxx-xxxx-xxxxxxxxxxxx Up 0 ( 06fcc73a-7e2f-xxxx-xxxx-xxxxxxxxxxxx ) Online HIGH 32 GiB 32 GiB 33 MiB 0 B default default default
24508311-e2fe-xxxx-xxxx-xxxxxxxxxxxx Up 0 ( 58ab2e3f-a22e-xxxx-xxxx-xxxxxxxxxxxx ) Online HIGH 32 GiB 32 GiB 33 MiB 0 B default default default
What to do next
Create a PVC. For more information, see Create your first PVC.