Install Portworx on SUSE Virtualization
You can install Portworx on a SUSE Virtualization cluster to leverage high availability, scalable storage, and automation for your Kubernetes workloads. Portworx supports standard Kubernetes deployments running on a SUSE Virtualization cluster. The process integrates Portworx with a SUSE Virtualizations cluster, ensuring persistent storage for demanding applications.
This topic provides instructions for installing Portworx Enterprise on a SUSE Virtualization cluster with FlashArray. It details the necessary steps for configuring multipathing, deploying the Portworx operator and StorageCluster, and updating SUSE Virtualization's storage configurations.
Portworx installation on a SUSE Virtualization cluster is managed via Kubernetes manifests, generated through Portworx Central. You can apply a Portworx Operator and StorageCluster manifest to your SUSE Virtualization cluster, which automates and orchestrates the installation across all nodes. The operator-based deployment is recommended for ease of management and updates.
Architecture
The following architectural diagram illustrates a Portworx Enterprise deployment on a cluster running SUSE Virtualization, integrated with FlashArray for backend storage.
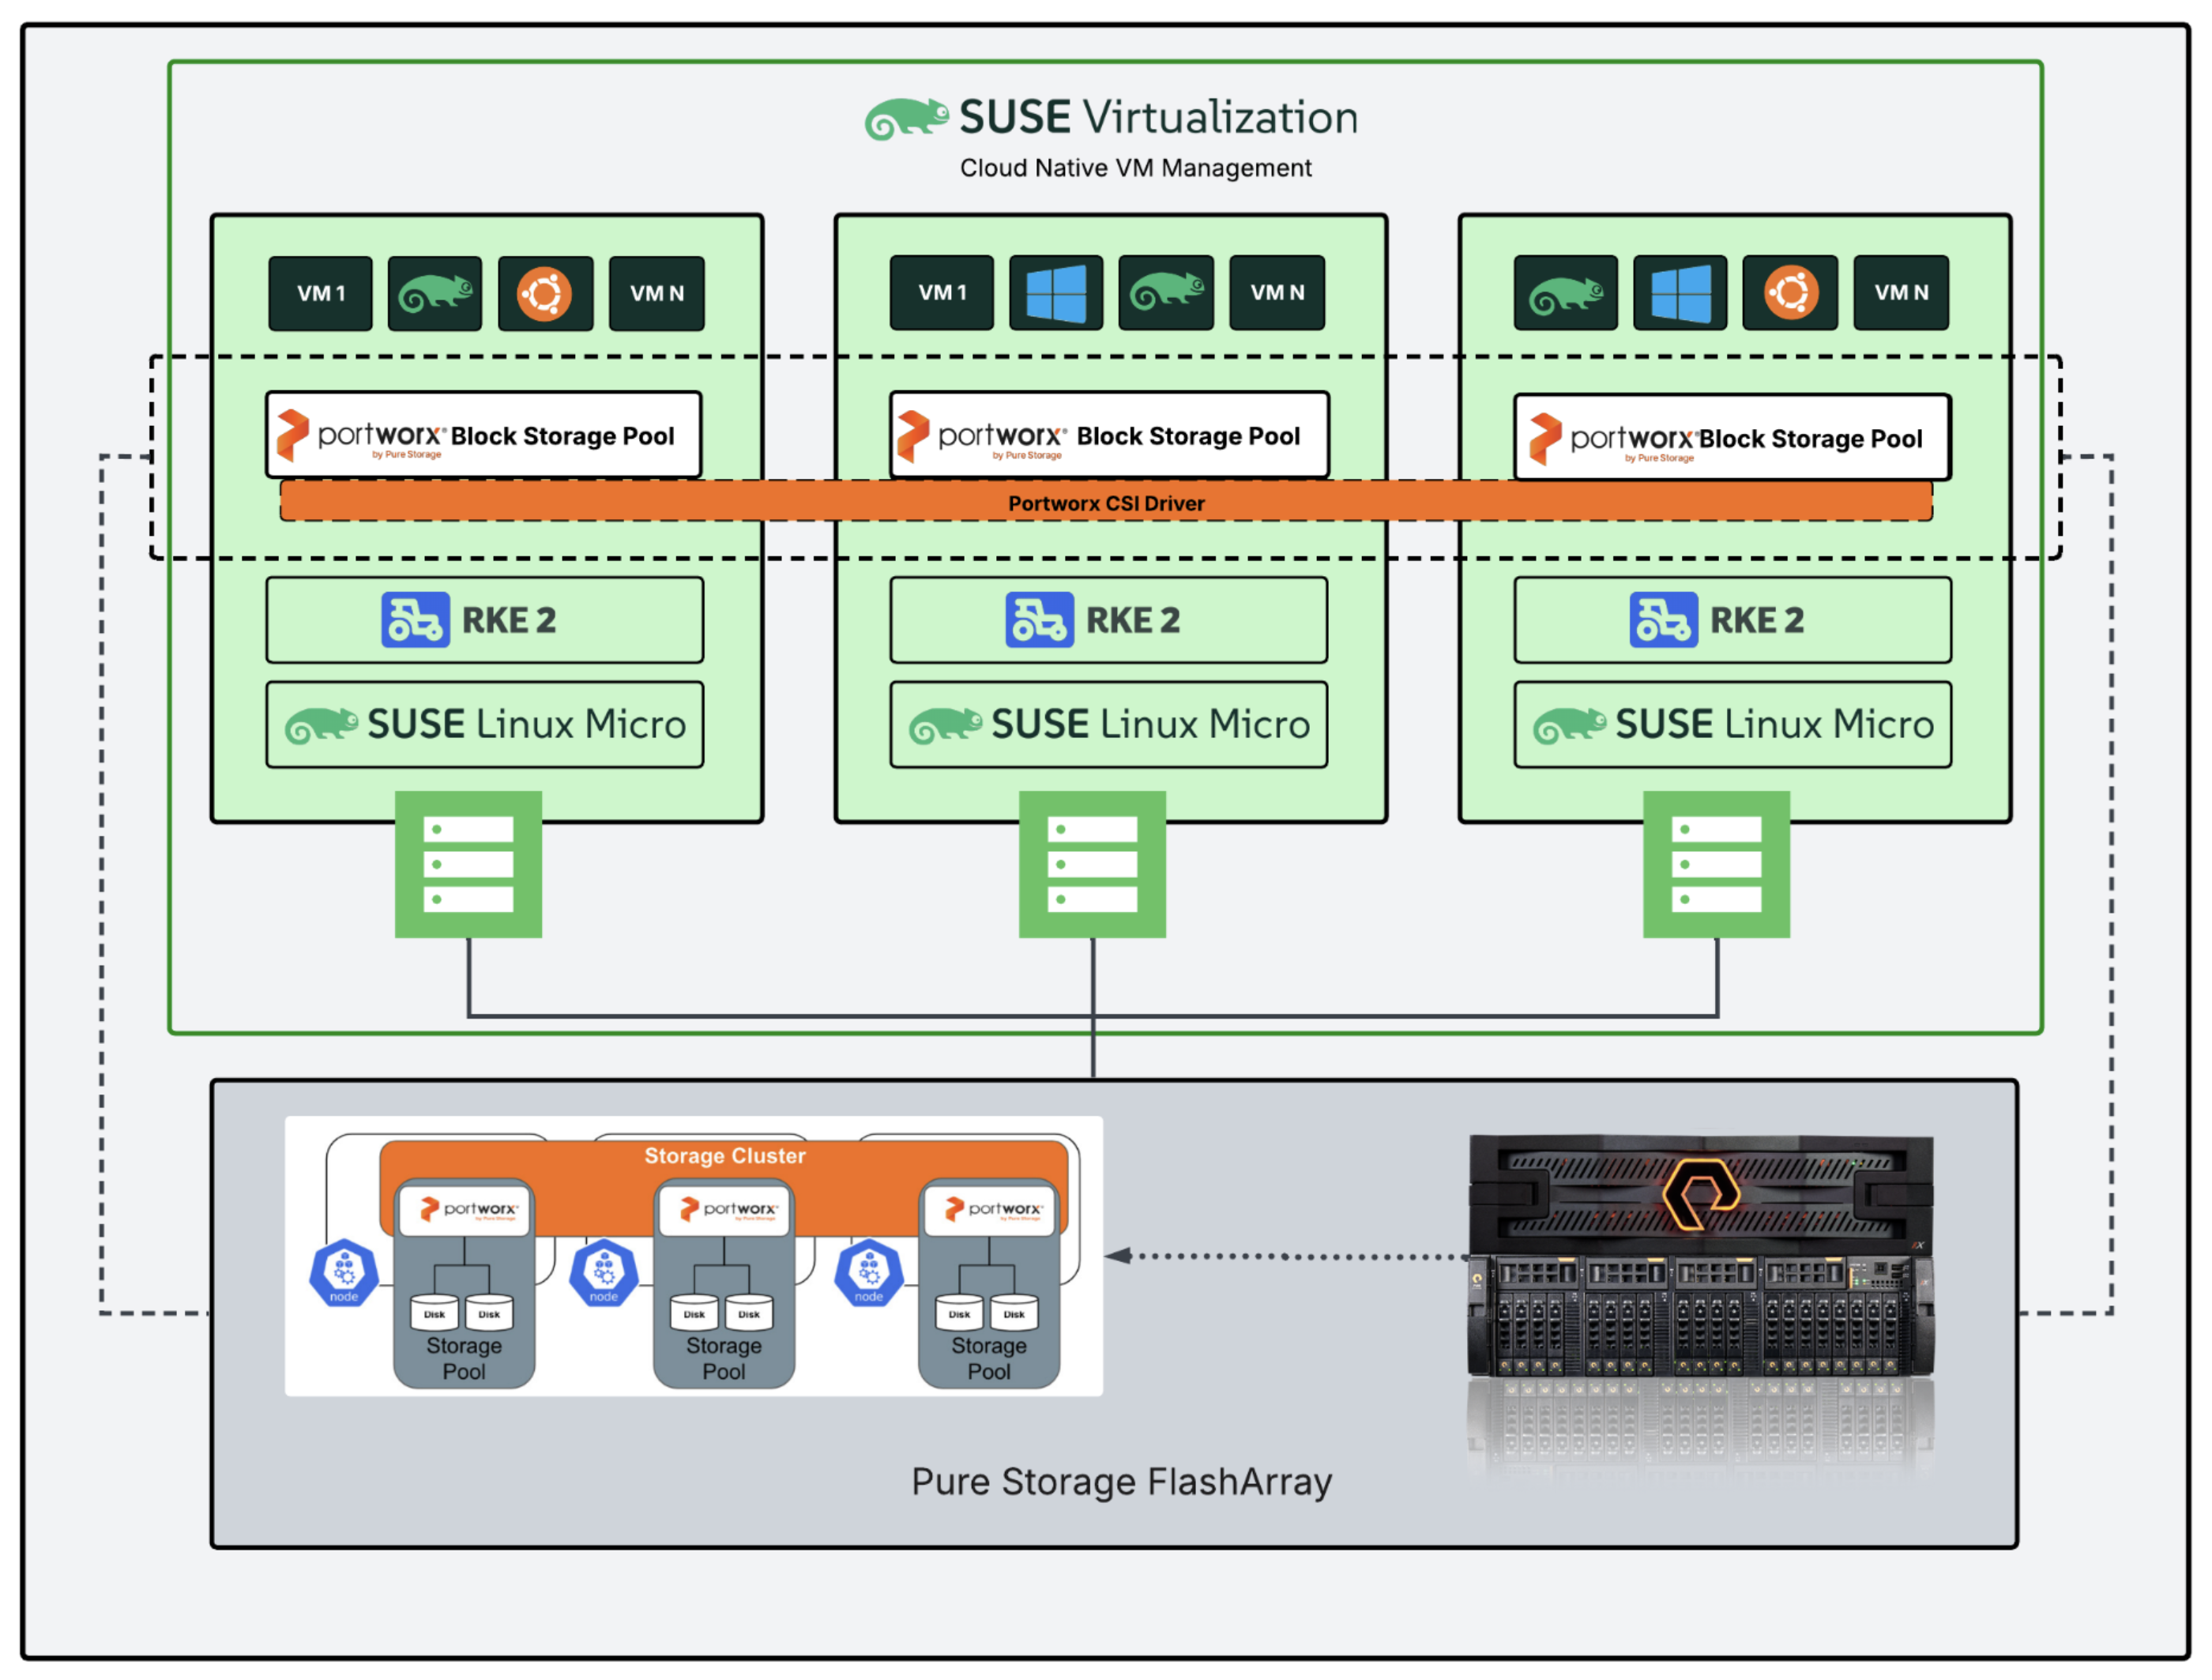
Each node in the SUSE Virtualization environment runs SUSE Linux Micro and is orchestrated by RKE2. These nodes host multiple virtual machines (VMs) running various guest operating systems, such as Ubuntu and Windows. Portworx is deployed on each node to create a distributed block storage pool, which is provisioned across the cluster. The Portworx CSI Driver enables dynamic provisioning of persistent volumes and orchestrates volume lifecycle operations across nodes. A storage cluster is formed using Portworx, which interfaces with FlashArray. FlashArray provides high-performance, external block storage that is connected to all nodes through multipathing.
Prerequisites
In addition to the System Requirements, ensure that your SUSE Virtualization cluster meets the following requirements before installing Portworx Enterprise:
- Use FlashArray as the storage backend.
- Attach the backing storage disks to each worker node.
- Allocate a dedicated disk for KVDB (internal or external) on at least three nodes. Each disk must have a unique device name across all KVDB nodes. For more information, see KVDB for Portworx.
- Disable kernel auto-updates on your cluster.
- Portworx does not support sharedv4 volumes on SUSE Virtualization nodes that use the SLE Micro operating system. The overlay filesystem on these nodes prevents Portworx from completing the required mount operations for sharedv4. Portworx supports only PX Raw RWX volumes for KubeVirt workloads on SUSE Virtualization.
- Synchronous disaster recovery and asynchronous disaster recovery for SUSE Virtualization is supported with Stork 26.2.0 or later and Portworx Enterprise 3.5.2 or later.
The following collection of tasks describe how to install Portworx on a SUSE Virtualization cluster:
- Configure multipathing for FlashArray
- Configure Udev rules
- Apply Multipath and Udev configurations
- Set up user access in FlashArray
- Create pure.json file
- Add FlashArray configuration to a kubernetes secret
- Generate Portworx Specification
- Deploy Portworx Operator
- Deploy StorageCluster
- Create a StorageClass
- Update the CSI Driver Configuration
- Create a VM
- Verify Portworx Installation
Complete all the tasks to install Portworx.
Configure multipathing for FlashArray
To ensure compatibility between Portworx Enterprise and FlashArray, configure the multipath settings on your cluster before installation.
- FlashArray and Portworx Enterprise do not support user-friendly names. Set
user_friendly_namestonobefore installing Portworx Enterprise on your cluster. This ensures consistent device naming conventions between Portworx and FlashArray. - Add
polling_interval 10as recommended by RHEL Linux settings. This defines how often the system checks for path status updates. - To avoid interference from the multipathd service during Portworx volume operations, set the pxd device denylist rule.
Your /etc/multipath.conf file must follow this structure:
defaults {
   user_friendly_names no
   enable_foreign "^$"
   polling_interval    10
}

devices {
   device {
       vendor                      "NVME"
       product                     "Everpure FlashArray"
       path_selector               "queue-length 0"
       path_grouping_policy        group_by_prio
       prio                        ana
       failback                    immediate
       fast_io_fail_tmo            10
       user_friendly_names         no
       no_path_retry               0
       features                    0
       dev_loss_tmo                60
   }
   device {
       vendor                   "PURE"
       product                  "FlashArray"
       path_selector            "service-time 0"
       hardware_handler         "1 alua"
       path_grouping_policy     group_by_prio
       prio                     alua
       failback                 immediate
       path_checker             tur
       fast_io_fail_tmo         10
       user_friendly_names      no
       no_path_retry            0
       features                 0
       dev_loss_tmo             600
   }
}

blacklist_exceptions {
       property "(SCSI_IDENT_|ID_WWN)"
}

blacklist {
     devnode "^pxd[0-9]*"
     devnode "^pxd*"
     device {
       vendor "VMware"
       product "Virtual disk"
     }
}
Configure Udev rules
Configure queue settings with Udev rules on all nodes. For recommended settings for FlashArray, see Applying Queue Settings with Udev.
Apply Multipath and Udev configurations
Apply the Multipath and Udev configurations created in the previous sections for the changes to take effect.
Use a CloudInitConfig in SUSE Virtualization to apply multipath and Udev configuration files consistently across all nodes.
- Add the configuration files to the CloudInitConfig, as shown in the following example:
apiVersion: node.harvesterhci.io/v1beta1
kind: CloudInit
metadata:
  name: <your-cloudinit-config-name>
spec:
  contents: |
    stages:
      network:
      - name: "Configure Everpure"
        files:
        - path: /etc/udev/rules.d/99-pure-storage.rules
          permissions: 0644
          content: |
            <plaintext-udev_conf>
        - path: /etc/multipath.conf
          content: |
            <plaintext-multipath_conf>
          permissions: 0644
      - name: "Start multipathd service"
        systemctl:
          enable:
          - multipathd
          start:
          - multipathd
  filename: 99_multipathd.yaml
  matchSelector: {}
-
Apply the CloudInitConfig to your cluster:
kubectl apply -f <your-cloudinit-config-name>.yaml
Set up user access in FlashArray
To establish secure communication between Portworx and FlashArray, you must create a user account and generate an API token. This token serves as an authentication mechanism, allowing Portworx to interact with FlashArray and perform storage operations on behalf of the authorized user. This configuration ensures each tenant has access only to their assigned storage volumes.
This section provides the steps to generate an API token, which serves as your authorization within the FlashArray environment.
A FlashArray pod is a logical grouping on the storage array and is not related to Kubernetes pods.
-
Create a new user:
- In the FlashArray dashboard, from the left navigation pane, click Settings.
The system displays the Settings page. - Click the Access tab.
- In the Users section, click the vertical ellipsis on the top-right side, and select Create User.
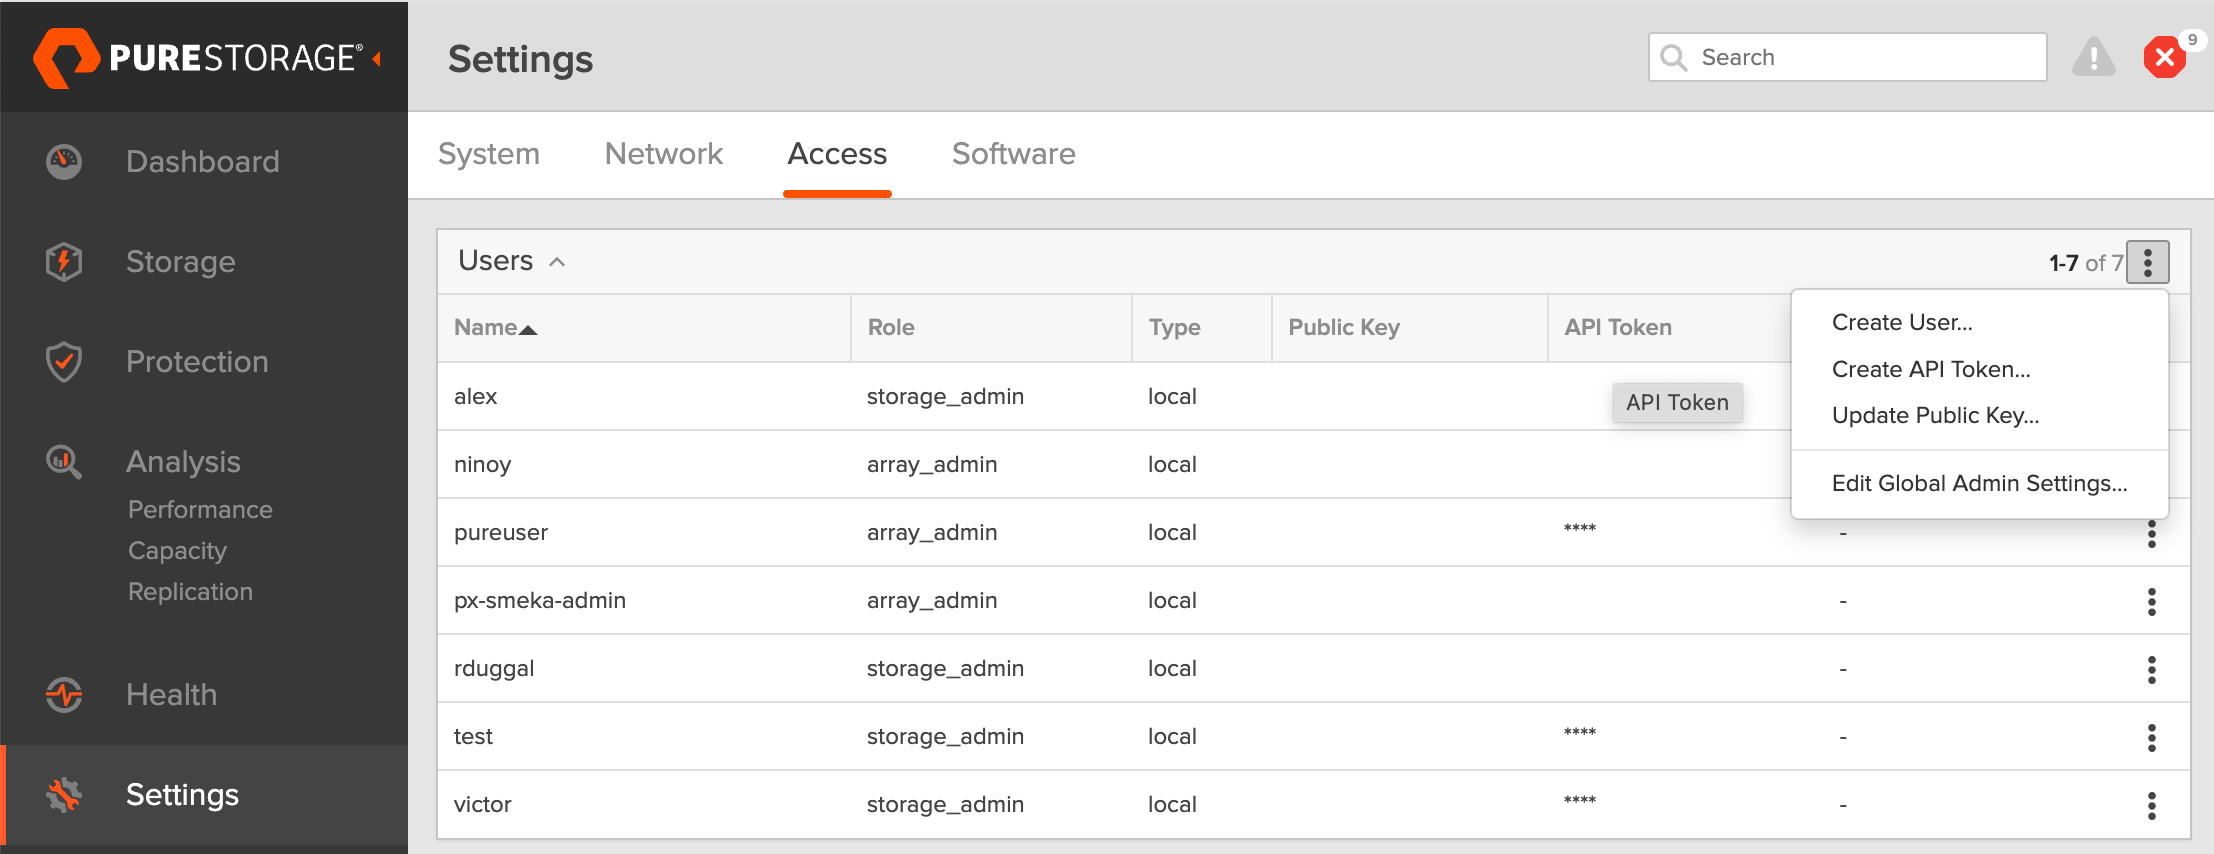
- In the Create User window, enter the details and set the role as Storage Admin.
- Click Create to add the new user.
- In the FlashArray dashboard, from the left navigation pane, click Settings.
-
Generate an API token:
- To create a token for the user, select the user from the Users list, click the vertical ellipsis on the right-hand side of the username, and select Create API Token.

- In the API Token window, leave the Expires in field empty to create a token that never expires.
- Click Create.
- Save the token information to avoid needing to recreate it later.
- To create a token for the user, select the user from the Users list, click the vertical ellipsis on the right-hand side of the username, and select Create API Token.
Create pure.json file
To integrate Portworx Enterprise with FlashArray, create a JSON configuration file (named pure.json) containing essential information about the FlashArray environment. This file should include the management endpoints and the API token you generated.
- Management endpoints: These are URLs or IP addresses that Portworx uses to communicate with FlashArray through API calls. To locate these, go to Settings > Network in your FlashArray dashboard. Note the IP addresses or hostnames of your management interfaces, prefixed with vir, indicating virtual interfaces.
important
For an IPv6 address, ensure that the IP address is enclosed in square brackets. For example: "MgmtEndPoint": "[XXXX:XXXX:XXXX:XXXX:XXXX:XXXX:XXXX:XXXX]".
- API token: Generated in the previous section.
Use the information above to create a JSON file. The following is a template for the configuration content, which you must populate with your specific information:
If you are configuring both FlashArray and FlashBlade, you can add FlashBlade configuration information in the same file. For more information, see the JSON file.
{
  "FlashArrays": [
    {
      "MgmtEndPoint": "<fa-management-endpoint>",
      "APIToken": "<fa-api-token>"
    }
  ]
}
Add FlashArray configuration to a kubernetes secret
To enable Portworx Enterprise to access the FlashArray configuration, add the pure.json file to a Kubernetes secret by running the following command to create a secret named px-pure-secret:
kubectl create secret generic px-pure-secret --namespace <stc-namespace> --from-file=pure.json
secret/px-pure-secret created
- The specific name
px-pure-secretis required so that Portworx Enterprise can correctly identify and access the Kubernetes secret upon startup. This secret securely stores the FlashArray configuration details and allows Portworx Enterprise to access this information within the Kubernetes environment. - Ensure that the
px-pure-secretis in the same namespace where you plan to install Portworx Enterprise.
Generate Portworx Specification
To install Portworx, you must first generate Kubernetes manifests that you will deploy in your SUSE Virtualization cluster by following these steps.
-
Sign in to the Portworx Central console.
The system displays the Welcome to Portworx Central! page. -
In the Portworx Enterprise section, select Generate Cluster Spec.
The system displays the Generate Spec page. -
From the Portworx Version dropdown menu, select the Portworx version to install.
-
From the Platform dropdown menu, select Pure FlashArray.
-
From the Distribution Name dropdown menu, select Rancher Kubernetes Engine (RKE).
-
(Optional) To customize the configuration options and generate a custom specification, click Customize and perform the following steps:
noteTo continue without customizing the default configuration or generating a custom specification, proceed to Step 10.
- Basic tab:
- To use an existing etcd cluster, do the following:
- Select the Your etcd details option.
- In the field provided, enter the host name or IP and port number. For example,
http://test.com.net:1234.
To add another etcd cluster, click the + icon.noteYou can add up to three etcd clusters.
- Select one of the following authentication methods:
- Disable HTTPS – To use HTTP for etcd communication.
- Certificate Auth – To use HTTPS with an SSL certificate.
For more information, see Secure your etcd communication. - Password Auth – To use HTTPS with username and password authentication.
- To use an internal Portworx-managed key-value store (KVDB), do the following:
- Select the Built-in option.
- TLS for internal KVDB is enabled, by default. If Cert-Manager is already running in your Kubernetes cluster, deselect the Deploy Cert-Manager for TLS certificates option to avoid installation failures.
- Select Next.
- To use an existing etcd cluster, do the following:
- Storage tab:
- To enable Portworx to provision drives using a specification, do the following:
- Select the Create Using a Spec option.
- Select PX-Store Version: (Optional) To designate PX-StoreV1 as the datastore, select PX-StoreV1. By default, the system selects PX-StoreV2 as the datastore.
- From the Select type of storage area network dropdown, choose one of the following:
- iSCSI
- Fibre Channel
- NVMe-oF RDMA
- NVMe-oF TCP
Using the above SAN type, the volumes from FlashArray will be connected to the Portworx nodes.
- To add one or more storage drive types for Portworx to use, click + Add Drive.
- Configure the following fields for the drive:
- Size (GB) - Specify the size of the drive in gigabytes.
- Pure FA Pod Name (only if you enable multi-tenancy) - Enter a FlashArray pod name in this field.
- Action - Use the trash icon to remove a drive type from the configuration.
- Initial Storage Nodes (Optional): Enter the number of storage nodes to create across zones and node pools.
- From the Default IO Profile dropdown menu, select Auto.
This enables Portworx to automatically choose the best I/O profile based on detected workload patterns. - From the Journal Device dropdown menu, select one of the following:
- None – To use the default journaling setting.
- Auto – To automatically allocate journal devices.
- Custom – To manually enter a journal device path.
Enter the path of the journal device in the Journal Device Path field.
- To enable Portworx to use all available, unused, and unmounted drives on the node, do the following:
- Select the Consume Unused option.
- (Optional) To designate PX-StoreV1 as the datastore, clear the PX-StoreV2 checkbox. By default, the system selects PX-StoreV2 as the datastore.
- For PX-StoreV2, in the Metadata Path field, enter a pre-provisioned path for storing the Portworx metadata.
The path must be at least 64 GB in size. - From the Select type of storage area network dropdown, choose one of the following:
- iSCSI
- Fibre Channel
- NVMe-oF RDMA
- NVMe-oF TCP
Using the above SAN type, the volumes from FlashArray will be connected to the Portworx nodes.
- From the Journal Device dropdown menu, select one of the following:
- None – To use the default journaling setting.
- Auto – To automatically allocate journal devices.
- Custom – To manually enter a journal device path.
Enter the path of the journal device in the Journal Device Path field.
- Select the Use unmounted disks even if they have a partition or filesystem on it. Portworx will never use a drive or partition that is mounted checkbox to use unmounted disks, even if they contain a partition or filesystem.
Portworx will not use any mounted drive or partition.
- To enable Portworx to use existing drives on a node, do the following:
- Select the Use Existing Drives option.
- (Optional) To designate PX-StoreV1 as the datastore, clear the PX-StoreV2 checkbox. By default, the system selects PX-StoreV2 as the datastore.
- For PX-StoreV2, in the Metadata Path field, enter a pre-provisioned path for storing the Portworx metadata.
The path must be at least 64 GB in size. - From the Select type of storage area network dropdown, choose one of the following:
- iSCSI
- Fibre Channel
- NVMe-oF RDMA
- NVMe-oF TCP
Using the above SAN type, the volumes from FlashArray will be connected to the Portworx nodes.
- In the Drive/Device field, specify the block drive(s) that Portworx uses for data storage.
To add another block drive, click the + icon. - (Optional) In the Pool Label field, assign a custom label in key:value format to identify and categorize storage pools.
For more information refer to How to assign custom labels to device pools. - From the Journal Device dropdown menu, select one of the following:
- None – To use the default journaling setting.
- Auto – To automatically allocate journal devices.
- Custom – To manually enter a journal device path.
Enter the path of the journal device in the Journal Device Path field.
- Select Next.
- To enable Portworx to provision drives using a specification, do the following:
- Network tab:
- In the Interface(s) section, do the following:
- Enter the Data Network Interface to be used for data traffic.
- Enter the Management Network Interface to be used for management traffic.
- In the Advanced Settings section, do the following:
- Enter the Starting port for Portworx services.
- Select Next.
- In the Interface(s) section, do the following:
- Deployment tab:
- In the Kubernetes Distribution section, under Are you running on either of these?, select Rancher Kubernetes Engine (RKE).
- In the Component Settings section:
- Select the Enable Stork checkbox to enable Stork.
- Select the Restrict Data Protection RBAC to restrict RBAC permissions for Stork (if enabled) and Operator. You will not be able to use Backup and DR capabilities with this restriction. For more information, see Restrict Data Protection RBAC.
- Select the Enable Monitoring checkbox to enable monitoring of Portworx components and resources.
- To configure the monitoring stack, select one of the following:
- Portworx Managed - To enable Portworx to install and manage Prometheus and Operator automatically.
Ensure that no other Prometheus Operator instance already running on the cluster. - User Managed - To configure and manage your own monitoring stack.
- Portworx Managed - To enable Portworx to install and manage Prometheus and Operator automatically.
- Select the Enable Autopilot checkbox to enable Portworx Autopilot. For User Managed monitoring stack, Portworx supports the following metrics providers that Autopilot will use to fetch metrics for rule evaluation and automated actions.
- Prometheus - Provide a valid Prometheus URL
- Datadog - Provide a valid Datadog URL, Secret Name and Secret Namespace. To create a Secret, refer to enable Datadog.
For more information on Autopilot, see Expanding your Storage Pool with Autopilot.
- To configure the monitoring stack, select one of the following:
- Select the Enable Telemetry checkbox to enable telemetry in the StorageCluster spec.
For more information, see Enable Pure1 integration for upgrades on a SUSE Virtualization cluster. - Enter the prefix for the Portworx cluster name in the Cluster Name Prefix field.
- Select the Secrets Store Type from the dropdown menu to store and manage secure information for features such as CloudSnaps and Encryption.
- In the Environment Variables section, enter name-value pairs in the respective fields.
- In the Registry and Image Settings section:
- Enter the Custom Container Registry Location to download the Docker images.
- Enter the Kubernetes Docker Registry Secret that serves as the authentication to access the custom container registry.
- From the Image Pull Policy dropdown menu, select Default, Always, IfNotPresent, or Never.
This policy influences how images are managed on the node and when updates are applied.
- In the Security Settings section, select the Enable Authorization checkbox to enable Role-Based Access Control (RBAC) and secure access to storage resources in your cluster.
- Click Finish.
- In the summary page, enter a name for the specification in the Spec Name field, and tags in the Spec Tags field.
- Click Download.yaml to download the yaml file with the customized specification or Save Spec to save the specification.
- Click Save & Download to generate the specification.
You can either copy the kubectl apply command from the Central UI and apply it to your Kubernetes cluster, or download the YAML file and apply it using the file name.
Deploy Portworx Operator
Use the Operator specifications you generated in the Generate Portworx Specification section, and deploy Portworx Operator by running the following command.
kubectl apply -f '<url-generated-from-portworx-central-spec-gen>'
namespace/portworx created
serviceaccount/portworx-operator created
clusterrole.rbac.authorization.k8s.io/portworx-operator created
clusterrolebinding.rbac.authorization.k8s.io/portworx-operator created
deployment.apps/portworx-operator created
Deploy StorageCluster
-
(Optional) If you are using SUSE Virtualization version 1.6.0 or later, do the following. Otherwise, skip to the next step.
- Create a Stork
SnapshotStorageClassobject.
apiVersion: storage.k8s.io/v1kind: StorageClassmetadata:name: stork-snapshot-scannotations:cdi.harvesterhci.io/storageProfileVolumeModeAccessModes: |{"Block":["ReadWriteOnce"]}provisioner: stork-snapshotallowVolumeExpansion: truereclaimPolicy: DeletevolumeBindingMode: Immediate- Apply the StorageClass:
kubectl apply -f stork-snapshot-sc.yaml - Create a Stork
-
Use the StorageCluster specifications you generated in the Generate Portworx Specification section, and deploy StorageCluster by running the following command.
kubectl apply -f '<url-generated-from-portworx-central-spec-gen>'storagecluster.core.libopenstorage.org/px-cluster-xxxxxxxx-xxxx-xxxx-xxxx-8dfd338e915b created
After deployment, Portworx detects that the FlashArray secret is present when it starts up and can use the specified FlashArray as a storage provider.
Create a StorageClass
Create a StorageClass if one does not already exist. The following is an example StorageClass.
- Create the px-kubevirt-sc.yaml file:
apiVersion: storage.k8s.io/v1
kind: StorageClass
metadata:
  name: px-rwx-block-kubevirt
provisioner: pxd.portworx.com
parameters:
  cdi.kubevirt.io/storage.contentType: kubevirt
  repl: "3"
  nodiscard: "true" # Disables discard operations on the block device
volumeBindingMode: Immediate
allowVolumeExpansion: true
- Run the following command to apply your StorageClass:
kubectl apply -f px-kubevirt-sc.yaml
Update the CSI Driver Configuration
-
Log in to the SUSE Virtualization UI.
-
Navigate to Advanced > Settings.
-
Search and select
csi-driver-config. -
Click the vertical ellipsis, and select Edit Setting to access the configuration options.
-
Set the Provisioner to the third-party CSI driver.
pxd.portworx.com. -
Configure the Volume Snapshot Class Name to
px-csi-snapclass. This setting points to the name of the VolumeSnapshotClass used for creating volume snapshots or VM snapshots.
Create a VM
Refer to the applicable version of the SUSE Virtualization: Create a Virtual Machine guide and KubeVirt user guide to create a KubeVirt VM.
Once the VMs are created, each VM will start running in a virt-launcher pod.
Verify Portworx Installation
You can use the SUSE Virtualization console to verify that the VM is backed by Portworx and FlashArray.
-
Log in to the SUSE Virtualization console.
-
Go to Virtual Machines > Your VM > Volumes.
-
Confirm that the attached disk is the
px-rwx-block-kubevirtStorageClass.