Prepare your Environment to Install Portworx Enterprise with Everpure Cloud Dedicated
This page includes detailed system requirements that are specific to Everpure Cloud Dedicated to ensure a seamless deployment and optimal performance of Portworx Enterprise in your Azure and AWS cluster environment.
Before you begin preparing your environment, ensure that you have a Kubernetes cluster that meets the system requirements for installing Portworx Enterprise.
The following collection of tasks describe how to prepare your environment for Portworx installation.
Complete all the tasks to prepare your environment for installation.
Software requirements
Install the following system packages on all nodes, including the control plane node, to support storage provisioning and data path operations when using Everpure Cloud Dedicated.
| Category | Requirement |
|---|---|
| Packages | Ensure that the latest versions of the following packages are installed on nodes where you plan to run Portworx Enterprise:
|
| Red Hat Systems | Ensure that the second action, CAPACITY_DATA_HAS_CHANGED, is uncommented in the 90-scsi-ua.rules file, and restart the udev service. |
| CSI Snapshot Feature | To use the CSI snapshot feature, set spec.csi.installSnapshotController: true in the Storage Cluster manifest to enable it. |
Physical network requirements
This section outlines the physical network prerequisites for Portworx to communicate with Everpure Cloud Dedicated.
Before you install Portworx, ensure proper connectivity and protocol configuration for optimal performance and compatibility between your cluster nodes and Everpure Cloud Dedicated.
- Ensure that each node can access the Everpure Cloud Dedicated management IP address.
- Use one of the following storage networking protocols supported by Portworx Enterprise in Everpure Cloud Dedicated Environments:
- iSCSI: For block storage over IP networks.
- NVMe-oF TCP: For high-performance and low-latency storage access.
- Ensure your cluster has an operational Everpure Cloud Dedicated with an existing data plane connectivity layout (iSCSI or NVMe-TCP).
- Ensure that storage node iSCSI initiators are on the same VLAN as the Everpure Cloud Dedicated iSCSI target ports.
- Obtain an API token for a user on your Everpure Cloud Dedicated with at least
storage_adminpermissions. See your array documentation for instructions. - If using multiple NICs to connect to an iSCSI host, ensure all NICs are accessible from the Everpure Cloud Dedicated management IP address.
Configure the multipath.conf file
- Everpure Cloud Dedicated and Portworx Enterprise do not support user-friendly names. Set
user_friendly_namestonobefore installing Portworx Enterprise on your cluster. This ensures consistent device naming conventions between Portworx and Everpure Cloud Dedicated. - Add
polling_interval 10as recommended by RHEL Linux settings. This defines how often the system checks for path status updates. - To avoid interference from the multipathd service during Portworx volume operations, set the pxd device denylist rule.
Your /etc/multipath.conf file should follow this structure:
Set find_multipaths to no in the defaults section because each controller has only one iSCSI path.
blacklist {
  devnode "^pxd[0-9]*"
  devnode "^pxd*"
  device {
    vendor "VMware"
    product "Virtual disk"
  }
}

defaults {
  polling_interval 10
  find_multipaths no
}

devices {
  device {
    vendor                "NVME"
    product               "FlashArray"
    path_selector         "queue-length 0"
    path_grouping_policy  group_by_prio
    prio                  ana
    failback              immediate
    fast_io_fail_tmo      10
    user_friendly_names   no
    no_path_retry         0
    features              0
    dev_loss_tmo          60
  }
  device {
    vendor                "PURE"
    product               "FlashArray"
    path_selector         "service-time 0"
    hardware_handler      "1 alua"
    path_grouping_policy  group_by_prio
    prio                  alua
    failback              immediate
    path_checker          tur
    fast_io_fail_tmo      10
    user_friendly_names   no
    no_path_retry         0
    features              0
    dev_loss_tmo          600
  }
}
Configure udev rules
Configure queue settings with Udev rules on all nodes. For recommended settings for Everpure Cloud Dedicated, refer to Applying Queue Settings with Udev.
Apply multipath and udev configurations
Apply the multipath and udev configurations created in the previous sections so the changes take effect.
- OpenShift Container Platform
- Other Kubernetes platforms
Use a MachineConfig in OpenShift to apply multipath and udev configuration files consistently across all nodes.
-
Encode the configuration files in base64 format and add them to the MachineConfig, as shown in the following example:
apiVersion: machineconfiguration.openshift.io/v1kind: MachineConfigmetadata:creationTimestamp:labels:machineconfiguration.openshift.io/role: workername: <your-machine-config-name>spec:config:ignition:version: 3.2.0storage:files:- contents:source: data:text/plain;charset=utf-8;base64,<base64-encoded-multipath-conf>filesystem: rootmode: 0644overwrite: truepath: /etc/multipath.conf- contents:source: data:text/plain;charset=utf-8;base64,<base64-encoded-udev_conf>filesystem: rootmode: 0644overwrite: truepath: /etc/udev/rules.d/99-pure-storage.rulessystemd:units:- enabled: truename: iscsid.service- enabled: truename: multipathd.service -
Apply the MachineConfig to your cluster:
oc apply -f <your-machine-config-name>.yaml
-
Update the
multipath.conffile as described in Configure themultipath.conffile and restart themultipathdservice on all nodes:systemctl restart multipathd.service -
Create the udev rules as described in Configure udev rules and apply them on all nodes:
udevadm control --reload-rules && udevadm trigger
Set up user access in Everpure Cloud Dedicated
To establish secure communication between Portworx and Everpure Cloud Dedicated, you should create a user account and generate an API token. This token acts as an authentication key, allowing Portworx to interact with Everpure Cloud Dedicated and perform storage operations on behalf of the authorized user. This section provides the steps to generate an API token, which serves as your authorization within the Everpure Cloud Dedicated environment.
Secure multi-tenancy
If multiple users share a single Everpure Cloud Dedicated, you can enable secure multi-tenancy using Everpure Cloud Dedicated realms and pods. A realm isolates tenant-specific storage, and a pod groups volumes within that realm.
To enable this feature:
- Create a realm and pod on the Everpure Cloud Dedicated.
- Add the realm to the
px-pure-secretfile. - Reference the pod name in the
StorageClusterspecification.
A Everpure Cloud Dedicated pod is a logical grouping on the storage array and is not related to Kubernetes pods.
This configuration ensures that each tenant can access only their assigned storage volumes.
- Everpure Cloud Dedicated without secure multi-tenancy
- Everpure Cloud Dedicated with secure multi-tenancy
-
Create a user:
- In your Everpure Cloud Dedicated dashboard, select Settings in the left pane.
- On the Settings page, select Access.
- In the Users section, click the vertical ellipsis in the top-right corner and select Create User:
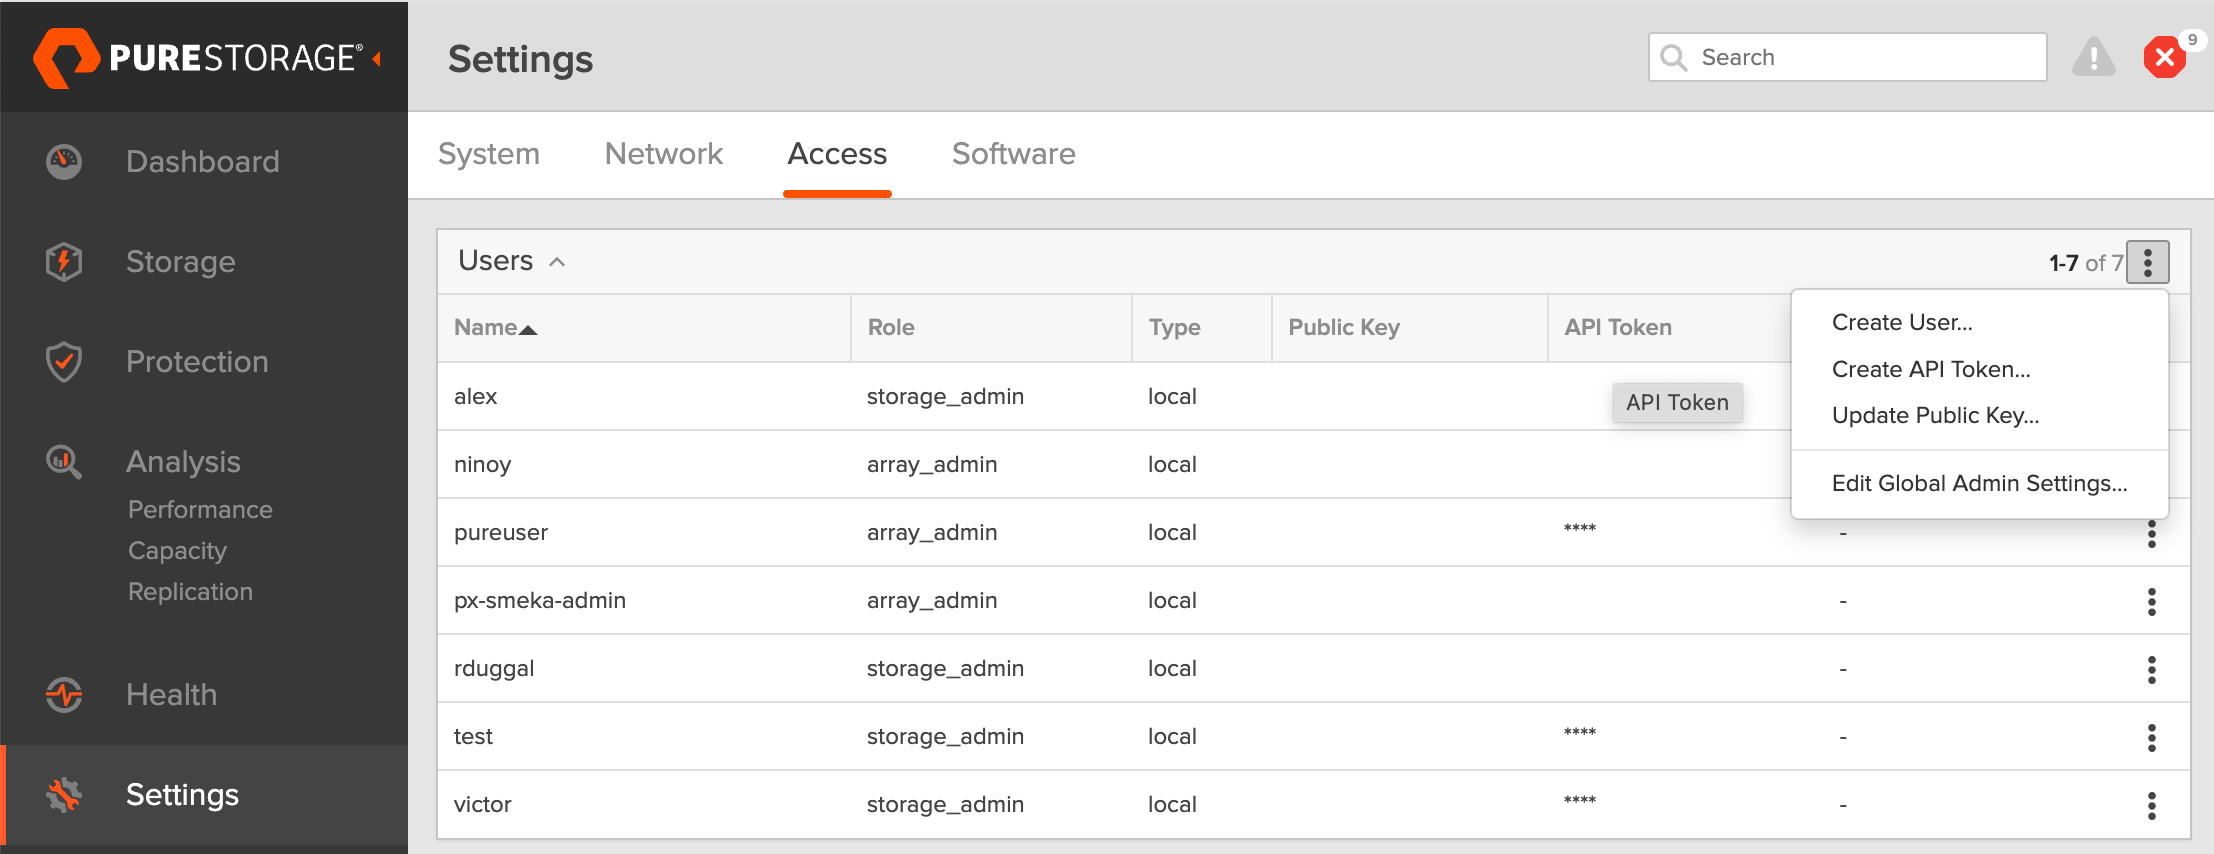
- In the Create User window, enter your details and set the role to Storage Admin.
- Select Create to add the new user.
-
Generate an API token:
- To create a token for the user you created, select the user from the Users list, click the vertical ellipsis in the right-hand corner of the username, and select Create API Token:

- In the API Token window, leave the Expires in field blank if you want to create a token that never expires, and click Create.
- Save this information to avoid the need to recreate the token.
- To create a token for the user you created, select the user from the Users list, click the vertical ellipsis in the right-hand corner of the username, and select Create API Token:
The following steps must be performed on the Everpure Cloud Dedicated CLI.
-
Create a realm for each customer: All volumes from the Portworx Enterprise installation will be placed within this realm, ensuring customer-specific data isolation.
purerealm create <customer1-realm>Name Quota Limit<customer1-realm> - -
Create a pod inside the realm: A pod in Everpure Cloud Dedicated defines a boundary where specific volumes are placed.
purepod create <customer1-realm>::<fa-pod-name>noteStretched Everpure Cloud Dedicated pods (pods spanning multiple Everpure Cloud Dedicated) are not supported.
By assigning realms and pods in Everpure Cloud Dedicated, you ensure that different users interact only with the specific storage resources allocated to them.
-
Create a policy for a realm: Ensure that you have administrative privileges on Everpure Cloud Dedicated before proceeding. This policy grants users access to their respective realms with defined capabilities.
purepolicy management-access create --realm <customer1-realm> --role storage --aggregation-strategy all-permissions <realm-policy>For basic privileges, use the following command:
purepolicy management-access create --realm <customer1-realm> --role storage --aggregation-strategy least-common-permissions <realm-policy> -
Verify the created policy: This step ensures that the policy has been set up correctly with the right permissions.
purepolicy management-access listName Type Enabled Capability Aggregation Strategy Resource Name Resource Type<realm-policy> admin-access True all all-permissions <customer1-realm> realmsThis policy ensures that users linked to the specified realm can perform storage operations within their allocated realm.
-
Create a user linked to a policy: This command creates a user with the access rights defined by the policy. You must create a password that the user can use to log in to Everpure Cloud Dedicated, as shown in the output:
pureadmin create --access-policy <realm-policy> <Everpure-Cloud-Dedicated-user>Enter password:Retype password:Name Type Access Policy<Everpure-Cloud-Dedicated-user> local <realm-policy>This step ensures that users are securely connected to their designated realms with appropriate access.
-
Sign in as the new user in the Everpure Cloud Dedicated CLI.
-
Create an API token. and copy the created token for using next step.
pureadmin create --api-token
Create pure.json file
To integrate Portworx Enterprise with Everpure Cloud Dedicated, create a JSON configuration file (named pure.json) containing essential information about the Everpure Cloud Dedicated environment. This file should include the management endpoints and the API token you generated.
- Management endpoints: URLs or IP addresses that Portworx uses to communicate with Everpure Cloud Dedicated. In the Everpure Cloud Dedicated dashboard, go to Settings > Network and note the IP addresses or hostnames of management interfaces (prefixed with vir, indicating virtual interfaces).
- API token: The token you generated in the previous section.
- Realm (secure multi-tenancy only): Realms define tenant boundaries. When multiple Everpure Cloud Dedicated instances are attached to a cluster, specify a realm to isolate volumes per tenant.
Use the information above to create a JSON file. Below is a template you can populate with your values:
You must enter the Everpure Cloud Dedicated endpoint details in the FlashArray section of the pure.json file.
- Everpure Cloud Dedicated without secure multi-tenancy
- Everpure Cloud Dedicated with secure multi-tenancy
{
  "FlashArrays": [
    {
      "MgmtEndPoint": "<Everpure Cloud-dedicated-management-endpoint>",
      "APIToken": "<Everpure Cloud-dedicated-api-token>"
    }
  ]
}
{
  "FlashArrays": [
    {
      "MgmtEndPoint": "<first-Everpure Cloud-dedicated-management-endpoint1>",
      "APIToken": "<first-Everpure Cloud-dedicated-api-token>",
      "Realm": "<first-Everpure Cloud-dedicated-realm>"
    }
  ]
}
Add Everpure Cloud Dedicated configuration to a Kubernetes Secret
To enable Portworx Enterprise to access the Everpure Cloud Dedicated configuration, add the pure.json file to a Kubernetes secret by running the following command to create a secret named px-pure-secret:
- OpenShift
- Kubernetes
oc create secret generic px-pure-secret --namespace <stc-namespace> --from-file=pure.json=<file path>
secret/px-pure-secret created
kubectl create secret generic px-pure-secret --namespace <stc-namespace> --from-file=pure.json=<file path>
secret/px-pure-secret created
- The specific name
px-pure-secretis required so that Portworx Enterprise can correctly identify and access the Kubernetes secret upon startup. This secret securely stores the Everpure Cloud Dedicated configuration details and allows Portworx Enterprise to access this information within the Kubernetes environment. - Ensure that the
px-pure-secretis in the same namespace where you plan to install Portworx Enterprise.
Volume attachment limits
Portworx Enterprise supports up to 256 FADA volume attachments per node when using Everpure Cloud Dedicated. .
The effective limit depends on the Linux storage stack, host bus adapter (HBA), and driver configuration.
Before deploying Portworx, ensure that the operating system (OS) and HBAs are configured to support the number of attachments required for your workloads.
Use the following command to inspect the LUN limit on your nodes:
cat /sys/module/scsi_mod/parameters/max_luns
Configure FlashArray connectivity
- iSCSI
- NVMe-oF/TCP
If you are using the iSCSI protocol, follow the instructions below to verify the iSCSI setup:
-
Run the following command from the node to discover your iSCSI targets:
iscsiadm -m discovery -t st -p <flash-array-interface-endpoint>10.13.xx.xx0:3260,207 iqn.2010-06.com.purestorage:flasharray.xxxxxxx10.13.xx.xx1:3260,207 iqn.2010-06.com.purestorage:flasharray.xxxxxxx -
Run the following command on each node to verify that each node has a unique initiator:
cat /etc/iscsi/initiatorname.iscsiInitiatorName=iqn.1994-05.com.redhat:xxxxx -
If the initiator names are not unique, assign a new unique initiator name:
echo "InitiatorName=`/sbin/iscsi-iname`" > /etc/iscsi/initiatorname.iscsiimportantReplace the initiator names on any nodes that have duplicates with the newly generated unique names.
-
After making changes, restart the iSCSI service:
systemctl restart iscsid
If you are using the NVMe-oF/TCP protocol, complete the following steps to ensure that the prerequisites are met and to optimize performance for FlashArray.
Prerequisites
-
Supported Operating System: RHEL 9.4 and Ubuntu 22.04
-
Supported Multipath version:
multipath-tools(0.8.7 or later) -
Supported NVMe CLI version
Operating System NVMe CLI version RHEL version earlier than 9.4
Ubuntu version earlier than 22.04Version 1.16 RHEL version 9.4 to 9.5
Ubuntu version 22.04 or laterVersion 2.6 RHEL version 9.6 or later Version 2.11 -
Ensure that device mapper multipath is used by default. To verify, check if the multipath parameter exists under
/sys/module/nvme_core/parameters/. If it exists, it should be set toN, which indicates that native NVMe multipath is supported but disabled. If there is no multipath parameter, the kernel doesn’t support native NVMe multipath, and device mapper multipath is used by default, which is expected.modprobe nvme_corecat /sys/module/nvme_core/parameters/multipath # Should return `N` -
Make sure that NVMe-oF/TCP interface is enabled in FlashArray. Optimize NVMe performance settings
The following settings are recommended to optimize performance and ensure that NVMe storage devices function efficiently within a multipath environment:
-
Disable I/O scheduler: NVMe devices manage their own queuing and prioritize requests, making kernel-level I/O scheduling unnecessary.
cat /sys/block/nvme0n1/queue/scheduler # Should return '[none] mq-deadline' -
Enable blk-mq: Enabling block multi-queue (blk-mq) for multipath devices allows the system to use multiple I/O queues, improving parallel request handling.
cat /sys/module/dm_mod/parameters/use_blk_mq # Should return 'Y'
After modifying the configuration, restart the multipathd service:
systemctl restart multipathd.service
Verify NVMe Qualified Name (NQN)
After installing the NVMe CLI, verify the NVMe Qualified Name (NQN) on all nodes:
-
Run the following command on each node to verify whether each node has a unique NVMe Qualified Name (NQN):
cat /etc/nvme/hostnqnnqn.2014-08.org.nvmexpress:uuid:xxxxxxx-xxxx-xxxx-xxxx-c6412d6e0e77 -
If the NQNs are not unique, assign a new name using the following command to prevent potential conflicts in networked environments:
nvme gen-hostnqn > /etc/nvme/hostnqn
By ensuring that these settings are properly configured, you can optimize NVMe performance and maintain stable connectivity with FlashArray in an NVMe-oF/TCP environment.
Once you set up Everpure Cloud Dedicated, storage operations such as creating or resizing a PVC, and taking snapshots are the same as on FlashArray. Refer to the FlashArray sections in this documentation for guidance on performing these tasks.