Prepare FlashBlade Environment for Direct Access Storage Provisioning with Portworx
This page includes detailed system requirements that are specific to FlashBlade to ensure a seamless deployment and optimal performance of Portworx Enterprise in your Kubernetes environment.
Before you begin preparing your environment, ensure that all system requirements for installing Portworx are met.
The following collection of tasks describe how to prepare your environment for Portworx installation.
Complete all the tasks to prepare your environment for installation.
Software requirements
-
Before you begin preparing your environment, ensure that all system requirements for installing Portworx are met.
-
Ensure that the FlashBlade is running a supported Purity version. For supported versions, see Supported FlashArray and FlashBlade Models and Versions.
-
NFS Utilities: Ensure that the latest version of NFS utilities is installed on all nodes, including the control plane node.
Physical network requirements
- Ensure FlashBlade is accessible as a shared resource from all cluster nodes.
- Verify that both the NFS endpoint (
NFSEndPoint) and management endpoint (MgmtEndPoint) IP addresses are reachable from all nodes.
Set up user access in FlashBlade
To establish secure communication between Portworx and FlashBlade, you need a user account with an API token. The token serves as a key for Portworx to authenticate with FlashBlade and perform storage operations on behalf of an authorized user. This section provides the steps to generate an API token, which encapsulates your authorization within the FlashBlade environment.
-
Create a user:
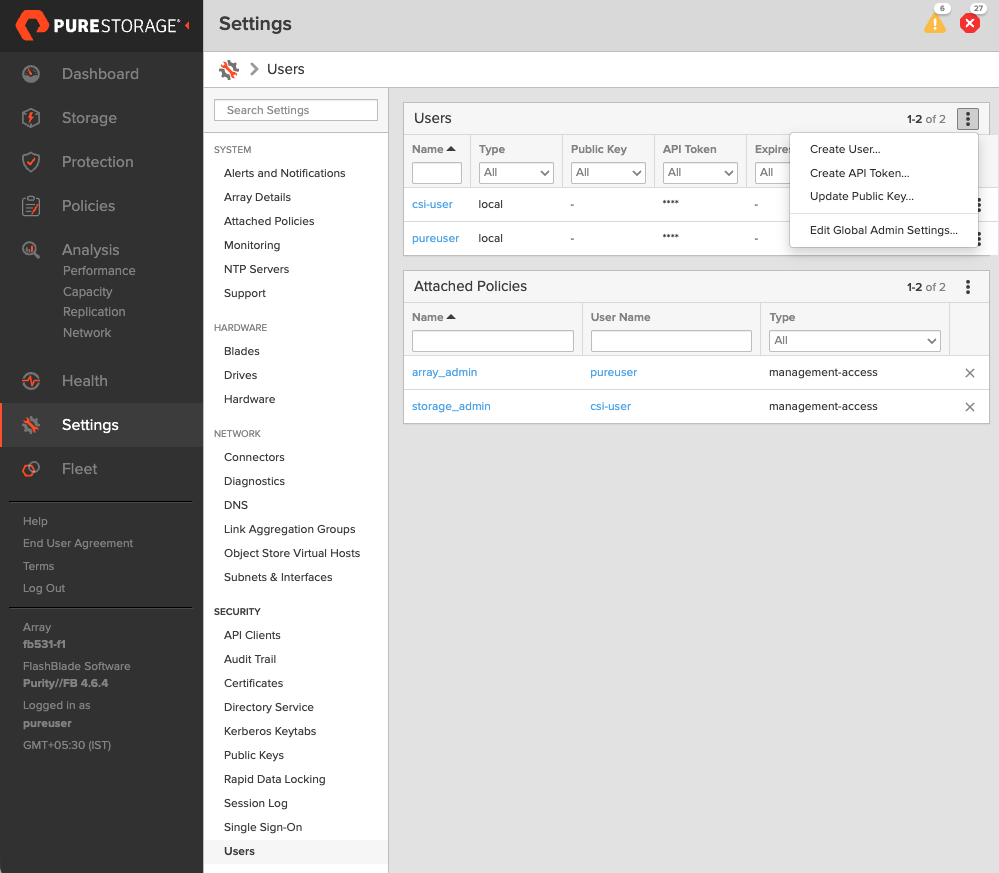
- In your FlashBlade dashboard, select Settings in the left pane.
- On the Settings page, select Users.
- In the Users section, click the vertical ellipsis in the top-right corner and select Create User:
- In the Create User window, enter your details and set the Access Policies to Storage Admin.
- Select Create to add the new user.
-
Generate an API token:
- To create a token for the user you created, select the user from the Users list, click the vertical ellipsis in the right-hand corner of the username, and select Create API Token:
- In the API Token window, leave the Expires in field blank if you want to create a token that never expires, and click Create.
- Save this information to avoid the need to recreate the token.
Create pure.json file
To integrate Portworx with FlashBlade, create a JSON configuration file (named pure.json) containing essential information about the FlashBlade environment. This file should include the management endpoints and the API token you generated.
You can provision Portworx Enterprise to automatically create and maintain the pure.json configuration file by enabling Portworx Fusion Controller in your Portworx cluster. After you enable Portworx Fusion Controller, you do not need to manually generate or manage individual FlashArray or FlashBlade tokens or update the configuration file when arrays are added or removed from the fleet. Portworx Fusion Controller handles discovery and token management through Fusion Coordinator, reducing operational overhead and simplifying integration with Portworx Enterprise.
For more information on how to enable Portworx Fusion Controller, see Enable Portworx Fusion Controller.
- Management endpoints: These are URLs or IP addresses that Portworx uses to communicate with FlashBlade through API calls. To locate these, go to Settings > Subnets & Interfaces in your FlashBlade dashboard. Note the IP addresses or hostnames of your management interfaces, prefixed with vir, indicating virtual interfaces.
- API token: Generated in the previous section.
- NFSEndPoint NFS endpoint of FlashBlade.
Add the FlashBlade configuration to the Kubernetes secret by following these steps:
Use the above information to create a JSON file. Below is a template for the configuration content, which you should populate with your specific information:
-
If you are configuring both FlashArray and FlashBlade, you can add FlashBlade configuration information in the same file. Refer to the JSON file for more information.
-
Portworx Enterprise refreshes your Everpure credentials every 5 minutes. During each cycle, Portworx Enterprise reads the
pure.jsonconfiguration from the secret store (Kubernetes or Vault) and updates the internal device registry. If you add new FlashArray or FlashBlade entries topure.json, Portworx Enterprise automatically discovers and registers them within approximately 5 minutes. No restart or manual intervention is required.
  {
    "FlashBlades": [
      {
    "MgmtEndPoint": "FB end point 1",
    "APIToken": "<api-token-for-fb-management-endpoint1>",
    "NFSEndPoint": "<fb-nfs-endpoint>",
  },
    {
    "MgmtEndPoint": "FB end point 2",
    "APIToken": "<api-token-for-fb-management-endpoint2>",
    "NFSEndPoint": "<fb-nfs-endpoint2>",
  }
  ]
  }
Add FlashBlade configuration to a secret store provider
- Kubernetes
- Vault
To enable Portworx to access the FlashBlade configuration, add the pure.json file to a Kubernetes secret by running the following command to create a secret named px-pure-secret:
kubectl create secret generic px-pure-secret --namespace <stc-namespace> --from-file=pure.json=<file path>
secret/px-pure-secret created
The specific name px-pure-secret is required so that Portworx can correctly identify and access the Kubernetes secret upon startup. This secret securely stores the FlashBlade configuration details and allows Portworx to access this information within the Kubernetes environment.
When using Portworx with Pure Storage FlashBlade, you can supply the FlashBlade credentials by creating a secret in Vault. Follow the steps below to properly create and verify the secret.
Step 1: Create the Secret
Store FlashBlade credentials (that includes management endpoint and API token) as key-value pairs at the path secret/pureJson. If you are not using a custom backend path, use secret as shown. If you are using a custom secret path, replace secret with your custom path.
Run the following command, substituting the placeholder values with your actual credentials:
vault kv put secret/pureJson pure.json=<contents of the pure.json configuration file>
If your custom secret path is, for example, customPath:
vault kv put customPath/pureJson pure.json=<contents of the pure.json configuration file>
Step 2: Retrieve and Verify the Secret
To ensure that the secret was created correctly, use this command:
vault kv get secret/pureJson
The command should return an output similar to the following:
========== Data ==========
Key                 Value
---                 -----
pure.json         {
                      "FlashBlades": [
                        {
                          "MgmtEndPoint": "FB end point",
                          "APIToken": "<api-token-for-fb-management-endpoint>",
                          "NFSEndPoint": "<fb-nfs-endpoint>"
                        }
                      ]
                    }