Install Portworx on Kubernetes with Pure Storage FlashArray
You can install Portworx with Pure Storage FlashArray as a cloud storage provider. This allows you to store your data on-premises with FlashArray while benefiting from Portworx cloud drive features, such as:
- Automatically provisioning block volumes
- Expanding a cluster by adding new drives or expanding existing ones
- Support for PX-Backup and Autopilot
Just like with other cloud providers, Portworx will create and manage the underlying storage pool volumes on the registered arrays.
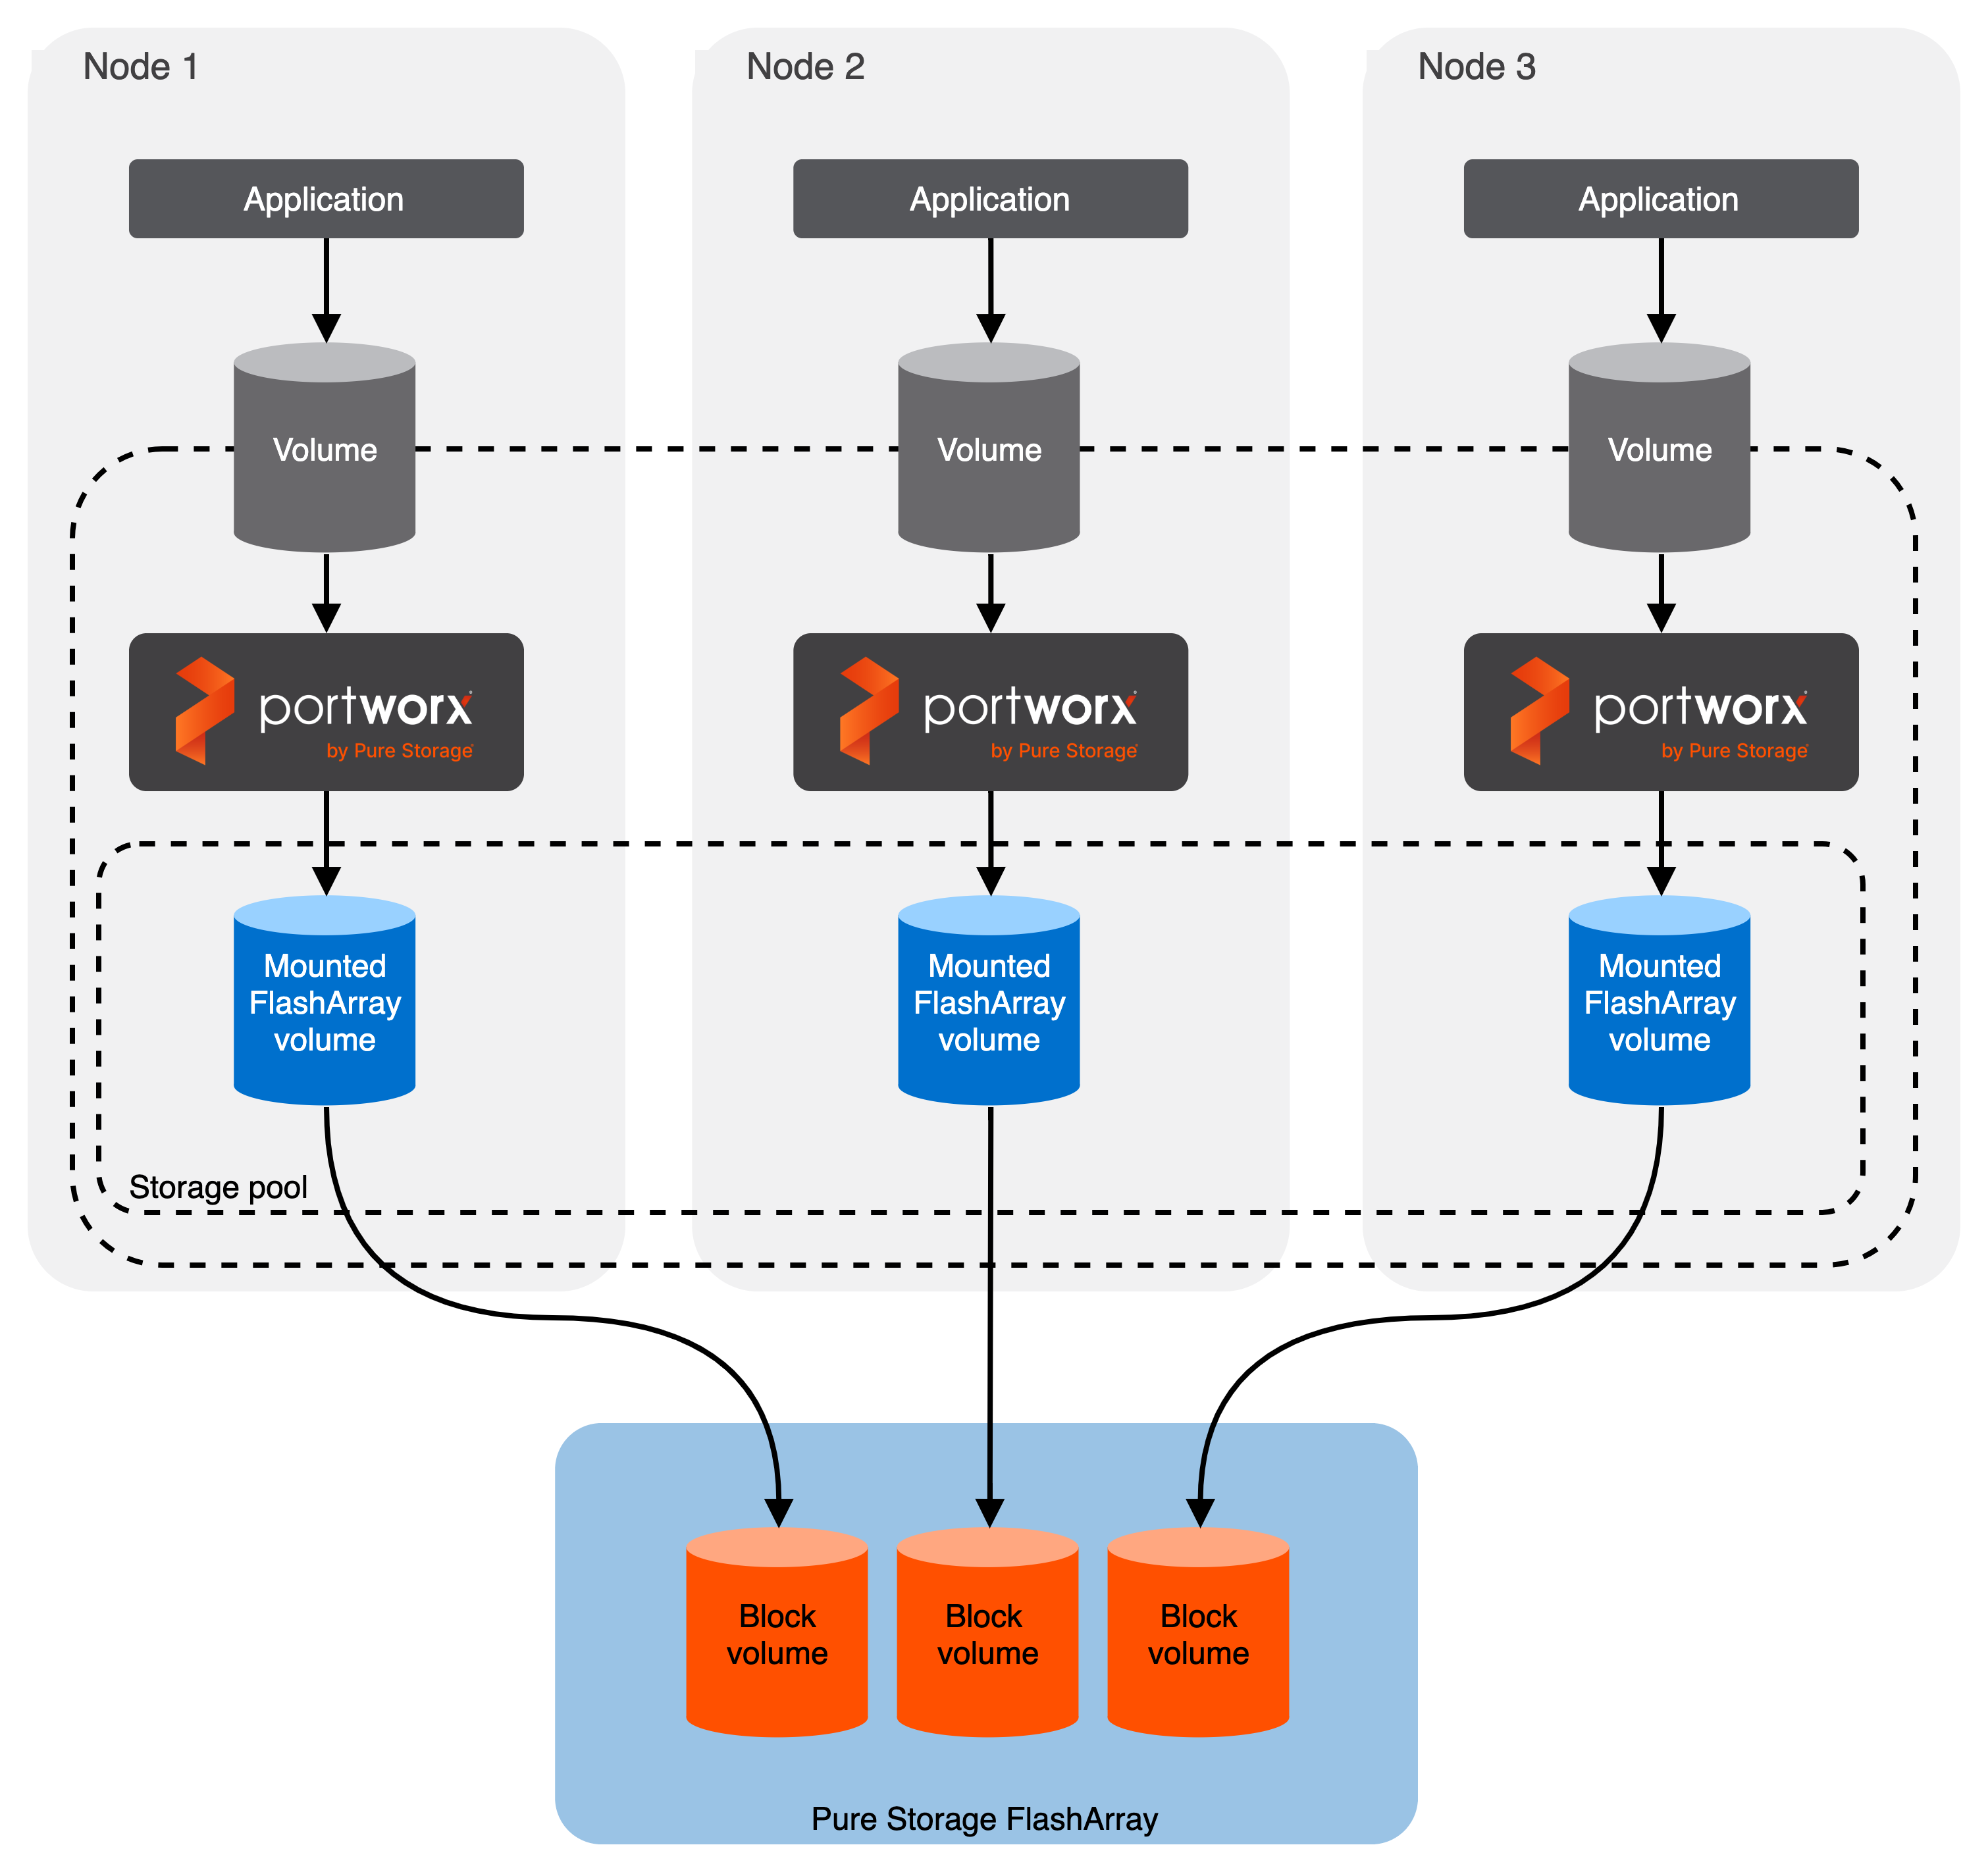
Architecture
- Portworx runs on each node and forms a storage pool based on configuration information provided in the storageCluster spec.
- When a user creates a PVC, Portworx provisions the volume from the storage pool.
- The PVCs consume space on the storage pool, and if space begins to run low, Portworx can add or expand drive space from FlashArray.
- If a node goes down for less than 2 minutes, Portworx will reattach FlashArray volumes when it recovers. If a node goes down for more than two minutes, a storageless node in the same zone will take up the volumes and assume the identity of the downed storage node.
Prerequisites
- Have an on-premise Kubernetes cluster with FlashArray.
- FlashArray must be running a minimum Purity//FA version of at least 4.8. Refer to the Supported models and versions topic for more information.
- The FlashArray should be time-synced with the same time service as the Kubernetes cluster.
- Install the latest Linux multipath software package on your operating system. This package must include
kpartx. Refer to the Linux recommended settings article of the Pure Storage documentation for recommendations. - Both multipath and iSCSI, if being used, should have their services enabled in
systemdso that they start after reboots. - If using Fibre Channel, install the latest Fibre Channel initiator software for your operating system.
- If using iSCSI, have the latest iSCSI initiator software for your operating system.
- If using multiple NICs to connect to an iSCSI host, configure these interfaces using the steps in the Create Additional Interfaces (Optional) section on the Configuring Linux Host for iSCSI with FlashArray page.
Configure your physical environment
Before you install Portworx, ensure that your physical network is configured appropriately and that you meet the prerequisites. You must provide Portworx with your FlashArray configuration details during installation.
- Each FlashArray management IP address can be accessed by each node.
- Your cluster contains an up-and-running FlashArray with an existing dataplane connectivity layout (iSCSI, Fibre Channel).
- If you're using iSCSI, the storage node iSCSI initiators are on the same VLAN as the FlashArray iSCSI target ports.
- If you are using multiple network interface cards (NICs) to connect to an iSCSI host, then all of them must be accessible from the FlashArray management IP address.
- If you're using Fibre Channel, the storage node Fibre Channel WWNs have been correctly zoned to the FlashArray Fibre Channel WWN ports.
- You have an API token for a user on your FlashArray with at least
storage_adminpermissions. Check the documentation on your device for information on generating an API token.
(Optional) Set iSCSI interfaces on FlashArray
If you are using iSCSI protocol, you can its interfaces on FlashArray using the following steps:
- Run the following command to get the available iSCSI interface within your environment:You can use the output in the next step.
iscsiadm -m iface - Run the following command to specify which network interfaces on the FlashArray system are allowed to handle iSCSI traffic. Replace
<interface-value>by the value you retried in the previous step:pxctl cluster options update --flasharray-iscsi-allowed-ifaces <interface-value>
Configure your software environment
Configure your software environment within a computing infrastructure. It involves preparing both the operating system and the underlying network and storage configurations.
Follow the instructions below to disable secure boot mode and configure the multipath.conf file appropriately. These configurations ensure that the system's software environment is properly set up to allow Portworx to interact correctly with the hardware components, like storage devices (using protocols such as iSCSI or Fibre Channel), and to function correctly within the network infrastructure.
Disable secure boot mode
Portworx requires the secure boot mode to be disabled to ensure it can operate without restrictions. Here's how to disable secure boot mode across different platforms:
- RHEL/CentOS
- VMware
For REHL/CentOS you can perform the following steps to check and disable the secure boot mode:
Check the status of secure boot mode:
/usr/bin/mokutil --sb-stateIf secure boot is enabled, disable it:
/usr/bin/mokutil --disable-validationApply changes by rebooting your system:
reboot
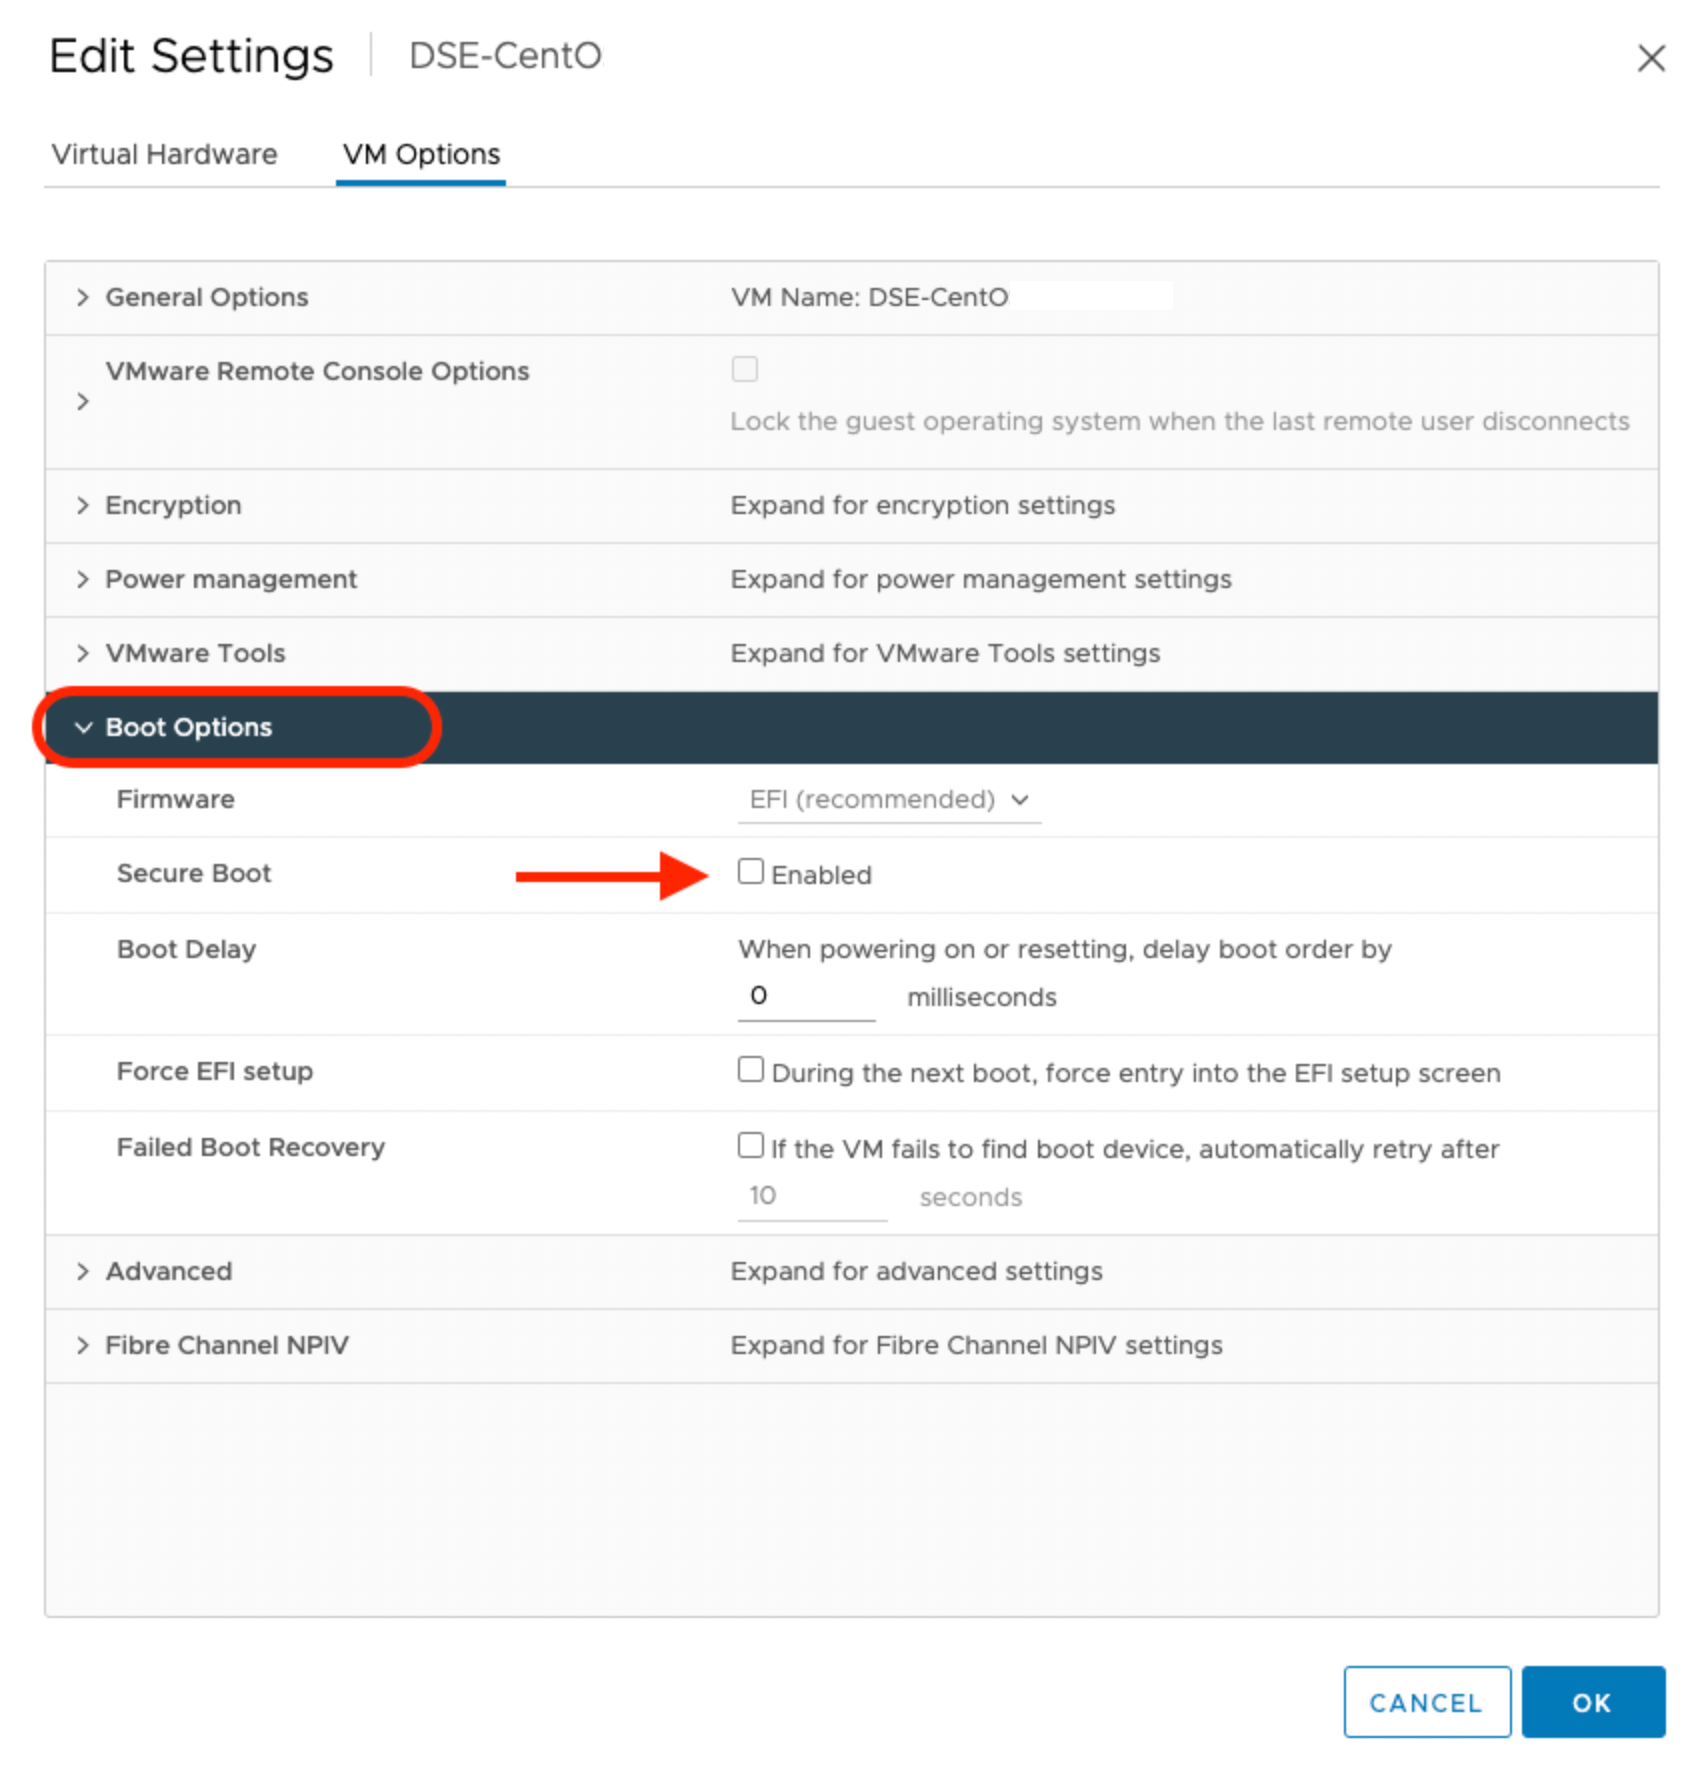
For VMware, navigate to the Edit Setting window of the virtual machine on which you are planning to deploy Portworx. Ensure that the checkbox against the Secure Boot option under VM Options is not selected, as shown in the following screenshot:
Verify the status of the secure boot mode
Run the following command to ensure that the secure boot mode is off:
/usr/bin/mokutil --sb-state
SecureBoot disabled
Configure the multipath.conf file
- For
defaults:- FlashArray and Portworx does not support user friendly names, disable it and set it to
nobefore installing Portworx on your cluster. This ensures Portworx and FlashArray use consistent device naming conventions. - Add
polling 10as per the RHEL Linux recommended settings. This defines how often the system checks for path status updates.
- FlashArray and Portworx does not support user friendly names, disable it and set it to
- To prevent any interference from
multipathdservice on Portworx volume operations, set the pxd device denylist rule.
Your multipath.conf file should resemble the following structure:
- RHEL/CentOS
- Ubuntu
defaults {
    user_friendly_names no
    find_multipaths yes
    enable_foreign "^$"
        polling_interval   10
}

devices {
    device {
        vendor                      "NVME"
        product                     "Pure Storage FlashArray"
        path_selector               "queue-length 0"
        path_grouping_policy        group_by_prio
        prio                        ana
        failback                    immediate
        fast_io_fail_tmo            10
        user_friendly_names         no
        no_path_retry               0
        features                    0
        dev_loss_tmo                60
        find_multipaths             yes
    }
    device {
        vendor                   "PURE"
        product                  "FlashArray"
        path_selector            "service-time 0"
        hardware_handler         "1 alua"
        path_grouping_policy     group_by_prio
        prio                     alua
        failback                 immediate
        path_checker             tur
        fast_io_fail_tmo         10
        user_friendly_names      no
        no_path_retry            0
        features                 0
        dev_loss_tmo             600
        find_multipaths          yes
    }
}

blacklist_exceptions {
        property "(SCSI_IDENT_|ID_WWN)"
}

blacklist {
      devnode "^pxd[0-9]*"
      devnode "^pxd*"
      device {
        vendor "VMware"
        product "Virtual disk"
      }
}
defaults {
    user_friendly_names no
    find_multipaths yes
}

devices {
    device {
        vendor                      "NVME"
        product                     "Pure Storage FlashArray"
        path_selector               "queue-length 0"
        path_grouping_policy        group_by_prio
        prio                        ana
        failback                    immediate
        fast_io_fail_tmo            10
        user_friendly_names         no
        no_path_retry               0
        features                    0
        dev_loss_tmo                60
        find_multipaths             yes
    }
    device {
        vendor                   "PURE"
        product                  "FlashArray"
        path_selector            "service-time 0"
        hardware_handler         "1 alua"
        path_grouping_policy     group_by_prio
        prio                     alua
        failback                 immediate
        path_checker             tur
        fast_io_fail_tmo         10
        user_friendly_names      no
        no_path_retry            0
        features                 0
        dev_loss_tmo             600
        find_multipaths          yes
    }
}
blacklist {
      devnode "^pxd[0-9]*"
      devnode "^pxd*"
      device {
        vendor "VMware"
        product "Virtual disk"
      }
}
Deploy Portworx
Once you've configured your environment and ensured that you meet the prerequisites, you're ready to deploy Portworx.
Create a JSON configuration file
Create a JSON file named pure.json that contains your FlashArray information. This file contains the essential FlashArray configuration information, such as management endpoints and API tokens, that Portworx needs to communicate with and manage the FlashArray storage devices:
{
  "FlashArrays": [
    {
      "MgmtEndPoint": "<first-fa-management-endpoint>",
      "APIToken": "<first-fa-api-token>"
    }
  ]
}
You can add FlashBlade configuration information to this file if you're configuring both FlashArray and FlashBlade together. Refer to the JSON file reference for more information.
Create a Kubernetes Secret
The specific name px-pure-secret is required so that Portworx can correctly identify and access the Kubernetes secret upon startup. This secret securely stores the FlashArray configuration details and allows Portworx to access this information within the Kubernetes environment.
Enter the following kubectl create command to create a Kubernetes secret called px-pure-secret:
kubectl create secret generic px-pure-secret --namespace kube-system --from-file=pure.json=<file path>
secret/px-pure-secret created
Generate and apply the spec
Generate an install spec for your on-prem cluster.
noteBy default, iSCSI is set as your protocol for data transfer. To change this option, click Customize and navigate to the Storage window. Select a different option from the Select type of storage area network dropdown.
(Optional) If you are using multiple NICs for iSCIS host, then add the following environment variable to your StorageCluster spec. Replace
<nic-interface-names>with comma-separated names of NICs such as"eth1,eth2":env:
- name: flasharray-iscsi-allowed-ifaces
value: "<nic-interface-names>"noteIf you have multiple NICs on your virtual machine, then FlashArray does not distinguish the NICs that include iSCSI and the others without iSCSI. This list must be provided, otherwise Portworx may potentially use only one of the provided interfaces.
Apply the spec:
kubectl apply -f <spec-file>
Once deployed, Portworx detects that the FlashArray secret is present when it starts up and uses the described FlashArray(s) as the storage provider. It then picks a backend for each drive to use, creates volumes, and attaches the volumes using iSCSI or Fibre Channel.