How to deploy OpenShift hosted clusters with Portworx
OpenShift supports a deployment model called Hosted Control Planes (HCP) that decouples the control plane of a cluster from its worker nodes by hosting the control plane components in a separate, centralized OpenShift cluster. This centralized cluster can act as a management plane for multiple hosted clusters allowing resource consolidation.
Portworx Enterprise supports storage operations for both the management (including live migration support for Kubevirt VMs) and hosted clusters with FlashArray as the storage backend.
Hosted Cluster Deployment Model
The hosted cluster deployment model provides a scalable, multi-tenant OpenShift environment where the control plane resources for hosted clusters are isolated, while sharing the same physical infrastructure and storage backend. This model comprises a single centralized management cluster, and one or more hosted clusters.
Management Cluster
The OpenShift cluster hosts the control planes (API server, etcd, controller manager, etc.) for other clusters. Control planes run as pods inside this cluster.
Hosted Cluster
A hosted cluster is a fully functional OpenShift cluster whose control plane is hosted (as pods) in the hosting cluster, while its worker nodes run as OpenShift Virtualization VMs (Kubevirt VMs).
Architecture
Worker nodes for hosted clusters are provisioned through NodePools, and can be created on any Openshift supported platforms as VMs, bare metal nodes, or cloud instances, including Kubevirt VMs.
KubeVirt VMs are provisioned in the management cluster and serve as worker nodes for the hosted cluster. Each hosted cluster runs in its own namespace with a dedicated Hosted Control Plane, ensuring isolation of workloads, control plane resources, and lifecycle operations.
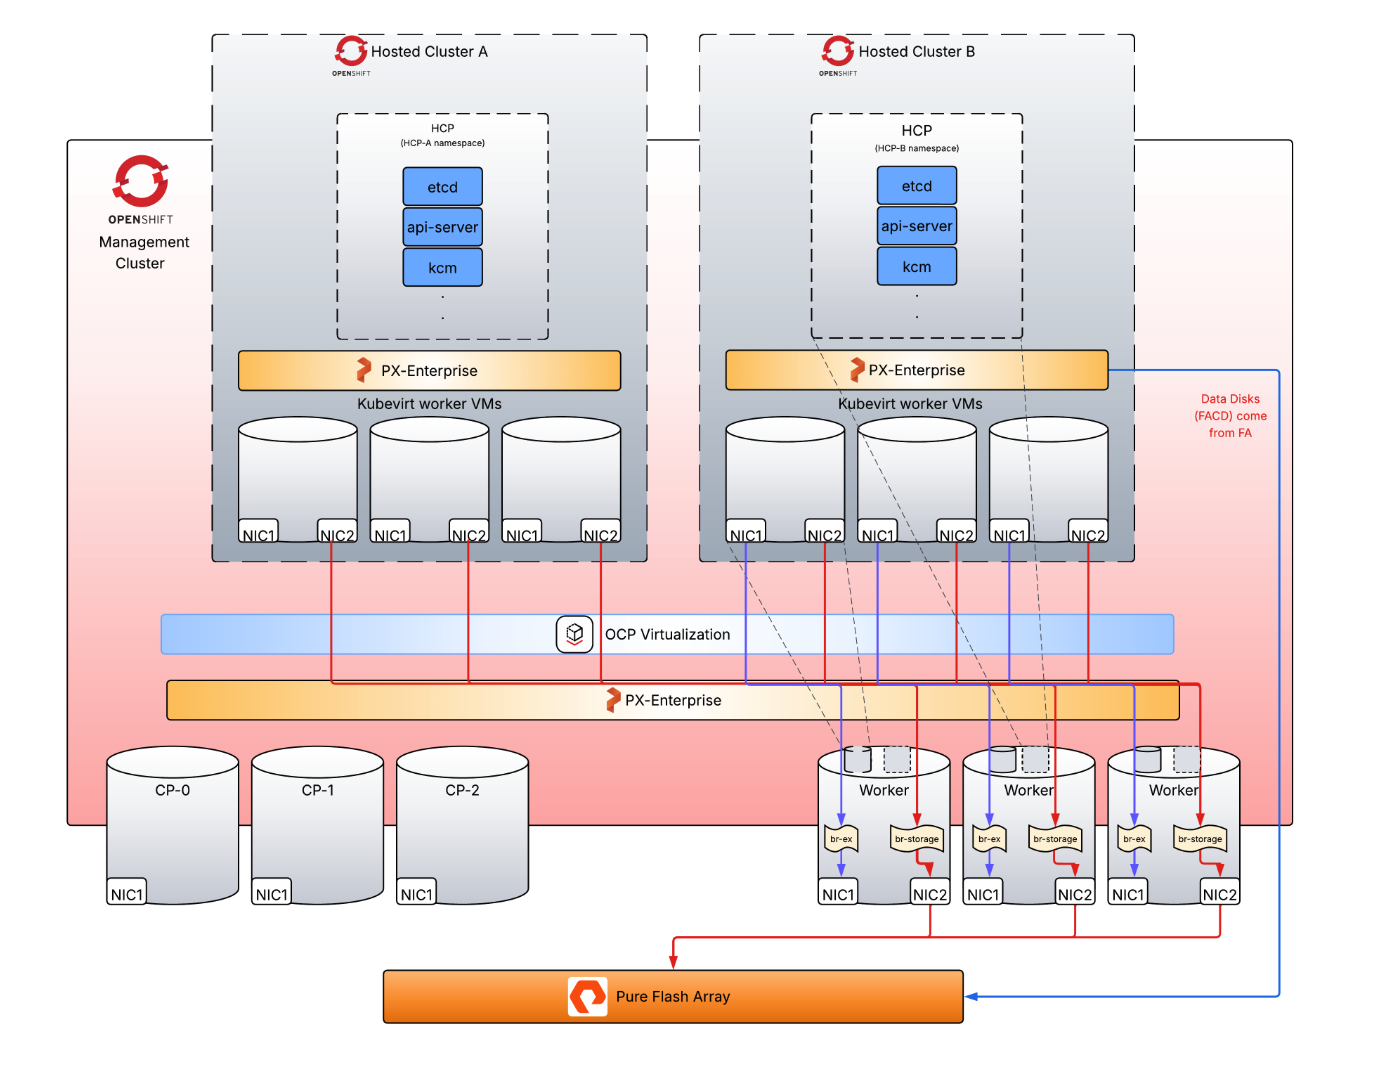
On the management cluster, Portworx Enterprise is deployed. KubeVirt VM root disks are PVCs from this PXE cluster.
On the hosted clusters A and B, Portworx Enterprise is deployed. Portworx Enterprise has access to the iSCSI network to FlashArray and is deployed with cloud drives.
Preparing your management cluster
Once you have an OpenShift cluster, there are a few prerequisites on how to deploy Portworx Enterprise on it so that hosted clusters(also running Portworx Enterprise) can work seamlessly.
Step 2 and step 5 have to be performed to use a secondary network for storage I/O. If you can use the default pod network for storage, you need not create a bridge on infra nodes, NetworkAttachmentDefinition and keep the default data/mgmt interface on StorageClass for Portworx deployment.
Skip step 2 and step 5 in case you use the default pod network for storage.
1. From Operator hub, deploy the following operators:
-
NMState operator: This is required to create NodeNetworkConfigurationPolicy, using which you can configure the required networking in the management cluster nodes.
-
Multicluster engine for Kubernetes Operator: Required to create and manage multiple clusters.
-
MetalLB Operator: Required to provide a LoadBalancer to hosted cluster’s services like
kubeapi-server. -
Openshift Virtualization: Required to create KubeVirt VMs for the hosted cluster.
Skip step 2 in case you can use the default pod network for storage.
2. Create a NMState: Using NMState operator, create a NMState. It will then display option to create NNCPs. Create NNCP to create a Linux bridge on management nodes (Per node NNCP to assign static IPs unless you are using DHCP). Specify the management node interface name in port field which will be enslaved by the bridge.
apiVersion: nmstate.io/v1
kind: NodeNetworkConfigurationPolicy
metadata:
  name: br-storage-b38-bm
spec:
  nodeSelector:
    kubernetes.io/hostname: ini528-b38-bm
  desiredState:
    interfaces:
    - name: br-storage
      type: linux-bridge
      state: up
      ipv4:
        enabled: true
        address:
        - ip: 10.xx.xxx.101
          prefix-length: 20
        - ip: 169.xxx.xxx.1
          prefix-length: 24
        dhcp: false
      bridge:
        options: {}
        port:
        - name: ens1f1.400
3. Create a MachineConfig: Create a MachineConfig to install FlashArray multipath dependencies in management cluster nodes.
apiVersion: machineconfiguration.openshift.io/v1
kind: MachineConfig
metadata:
  labels:
    machineconfiguration.openshift.io/role: worker
  name: worker-iscsi-configuration
spec:
  config:
    ignition:
      version: 3.2.0
    storage:
      files:
        - contents:
            source: 'data:text/plain;charset=utf-8;base64,YmxhY2tsaXN0IHsKICAgICAgZGV2bm9kZSAiXnB4ZFswLTldKiIKICAgICAgZGV2bm9kZSAiXnB4ZCoiCiAgICAgIGRldmljZSB7CiAgICAgICAgdmVuZG9yICJWTXdhcmUiCiAgICAgICAgcHJvZHVjdCAiVmlydHVhbCBkaXNrIgogICAgICB9Cn0KZGVmYXVsdHMgewogdXNlcl9mcmllbmRseV9uYW1lcyBubwogZmluZF9tdWx0aXBhdGhzIHllcwogcG9sbGluZ19pbnRlcnZhbCAgMTAKfQpkZXZpY2VzIHsKICAgIGRldmljZSB7CiAgICAgICAgdmVuZG9yICAgICAgICAgICAgICAgICAgICAgICJOVk1FIgogICAgICAgIHByb2R1Y3QgICAgICAgICAgICAgICAgICAgICAiUHVyZSBTdG9yYWdlIEZsYXNoQXJyYXkiCiAgICAgICAgcGF0aF9zZWxlY3RvciAgICAgICAgICAgICAgICJxdWV1ZS1sZW5ndGggMCIKICAgICAgICBwYXRoX2dyb3VwaW5nX3BvbGljeSAgICAgICAgZ3JvdXBfYnlfcHJpbwogICAgICAgIHByaW8gICAgICAgICAgICAgICAgICAgICAgICBhbmEKICAgICAgICBmYWlsYmFjayAgICAgICAgICAgICAgICAgICAgaW1tZWRpYXRlCiAgICAgICAgZmFzdF9pb19mYWlsX3RtbyAgICAgICAgICAgIDEwCiAgICAgICAgdXNlcl9mcmllbmRseV9uYW1lcyAgICAgICAgIG5vCiAgICAgICAgbm9fcGF0aF9yZXRyeSAgICAgICAgICAgICAgIDAKICAgICAgICBmZWF0dXJlcyAgICAgICAgICAgICAgICAgICAgMAogICAgICAgIGRldl9sb3NzX3RtbyAgICAgICAgICAgICAgICA2MAogICAgfQogICAgZGV2aWNlIHsKICAgICAgICB2ZW5kb3IgICAgICAgICAgICAgICAgICAgIlBVUkUiCiAgICAgICAgcHJvZHVjdCAgICAgICAgICAgICAgICAgICJGbGFzaEFycmF5IgogICAgICAgIHBhdGhfc2VsZWN0b3IgICAgICAgICAgICAic2VydmljZS10aW1lIDAiCiAgICAgICAgaGFyZHdhcmVfaGFuZGxlciAgICAgICAgICIxIGFsdWEiCiAgICAgICAgcGF0aF9ncm91cGluZ19wb2xpY3kgICAgIGdyb3VwX2J5X3ByaW8KICAgICAgICBwcmlvICAgICAgICAgICAgICAgICAgICAgYWx1YQogICAgICAgIGZhaWxiYWNrICAgICAgICAgICAgICAgICBpbW1lZGlhdGUKICAgICAgICBwYXRoX2NoZWNrZXIgICAgICAgICAgICAgdHVyCiAgICAgICAgZmFzdF9pb19mYWlsX3RtbyAgICAgICAgIDEwCiAgICAgICAgdXNlcl9mcmllbmRseV9uYW1lcyAgICAgIG5vCiAgICAgICAgbm9fcGF0aF9yZXRyeSAgICAgICAgICAgIDAKICAgICAgICBmZWF0dXJlcyAgICAgICAgICAgICAgICAgMAogICAgICAgIGRldl9sb3NzX3RtbyAgICAgICAgICAgICA2MDAKICAgIH0KfQ=='
          filesystem: root
          mode: 420
          overwrite: true
          path: /etc/multipath.conf
        - contents:
            source: 'data:text/plain;charset=utf-8;base64,IyBSZWNvbW1lbmRlZCBzZXR0aW5ncyBmb3IgUHVyZSBTdG9yYWdlIEZsYXNoQXJyYXkuCiMgVXNlIG5vbmUgc2NoZWR1bGVyIGZvciBoaWdoLXBlcmZvcm1hbmNlIHNvbGlkLXN0YXRlIHN0b3JhZ2UgZm9yIFNDU0kgZGV2aWNlcwpBQ1RJT049PSJhZGR8Y2hhbmdlIiwgS0VSTkVMPT0ic2QqWyEwLTldIiwgU1VCU1lTVEVNPT0iYmxvY2siLCBFTlZ7SURfVkVORE9SfT09IlBVUkUiLCBBVFRSe3F1ZXVlL3NjaGVkdWxlcn09Im5vbmUiCkFDVElPTj09ImFkZHxjaGFuZ2UiLCBLRVJORUw9PSJkbS1bMC05XSoiLCBTVUJTWVNURU09PSJibG9jayIsIEVOVntETV9OQU1FfT09IjM2MjRhOTM3KiIsIEFUVFJ7cXVldWUvc2NoZWR1bGVyfT0ibm9uZSIKCiMgUmVkdWNlIENQVSBvdmVyaGVhZCBkdWUgdG8gZW50cm9weSBjb2xsZWN0aW9uCkFDVElPTj09ImFkZHxjaGFuZ2UiLCBLRVJORUw9PSJzZCpbITAtOV0iLCBTVUJTWVNURU09PSJibG9jayIsIEVOVntJRF9WRU5ET1J9PT0iUFVSRSIsIEFUVFJ7cXVldWUvYWRkX3JhbmRvbX09IjAiCkFDVElPTj09ImFkZHxjaGFuZ2UiLCBLRVJORUw9PSJkbS1bMC05XSoiLCBTVUJTWVNURU09PSJibG9jayIsIEVOVntETV9OQU1FfT09IjM2MjRhOTM3KiIsIEFUVFJ7cXVldWUvYWRkX3JhbmRvbX09IjAiCgojIFNwcmVhZCBDUFUgbG9hZCBieSByZWRpcmVjdGluZyBjb21wbGV0aW9ucyB0byBvcmlnaW5hdGluZyBDUFUKQUNUSU9OPT0iYWRkfGNoYW5nZSIsIEtFUk5FTD09InNkKlshMC05XSIsIFNVQlNZU1RFTT09ImJsb2NrIiwgRU5We0lEX1ZFTkRPUn09PSJQVVJFIiwgQVRUUntxdWV1ZS9ycV9hZmZpbml0eX09IjIiCkFDVElPTj09ImFkZHxjaGFuZ2UiLCBLRVJORUw9PSJkbS1bMC05XSoiLCBTVUJTWVNURU09PSJibG9jayIsIEVOVntETV9OQU1FfT09IjM2MjRhOTM3KiIsIEFUVFJ7cXVldWUvcnFfYWZmaW5pdHl9PSIyIgoKIyBTZXQgdGhlIEhCQSB0aW1lb3V0IHRvIDYwIHNlY29uZHMKQUNUSU9OPT0iYWRkfGNoYW5nZSIsIEtFUk5FTD09InNkKlshMC05XSIsIFNVQlNZU1RFTT09ImJsb2NrIiwgRU5We0lEX1ZFTkRPUn09PSJQVVJFIiwgQVRUUntkZXZpY2UvdGltZW91dH09IjYwIgo='
          filesystem: root
          mode: 420
          overwrite: true
          path: /etc/udev/rules.d/99-pure-storage.rules
    systemd:
      units:
        - enabled: true
          name: iscsid.service
        - enabled: true
          name: multipathd.service
4. Deploy Portworx Enterprise on management cluster: Deploy Portworx Enterprise by creating a px-pure-secret and the StorageCluster Custom resource.
Skip step 5 to configure network in case you can use the default pod network for storage.
5. Configure network: Set spec.network.dataInterface/mgmtInterface to the bridge interface name created in step 1. Replace br-storage in the given spec with the correct bridge interface name.
spec:
    network:
      dataInterface: br-storage
      mgmtInterface: br-storage
Create hosted OpenShift cluster
A hosted cluster comprises the hosted control plane, and a nodepool which will run the KubeVirt VMs which will act as worker nodes in the cluster.
-
Using Multicluster engine operator, enable Hypershift by creating a MultiClusterEngine CR. This will allow you to create new clusters.
apiVersion: multicluster.openshift.io/v1kind: MultiClusterEnginemetadata:name: multiclusterenginespec:overrides:components:- name: hypershift-previewenabled: true -
Follow the steps to create a LoadBalancer using MetalLB operator.
-
Add wildcards to ingress controller to allow external traffic to console. This will allow you to access hosted cluster’s console.
oc patch ingresscontroller -n openshift-ingress-operator default --type=json -p '[{ "op": "add", "path": "/spec/routeAdmission", "value": {wildcardPolicy: "WildcardsAllowed"}}]' -
Create a
clustersnamespace. -
Create a configmap in
clustersnamespace, which can be referenced in Nodepool spec for the hosted cluster. This configmap essentially bundles the MachineConfig which can be applied to each VM of the hosted cluster. It is required to configure multipath & udev for FlashArray.apiVersion: v1kind: ConfigMapmetadata:name: machine-config-fanamespace: clustersdata:config: |apiVersion: machineconfiguration.openshift.io/v1kind: MachineConfigmetadata:labels:machineconfiguration.openshift.io/role: workername: multipath-udev-configspec:config:ignition:version: 3.2.0storage:files:- contents:source: data:text/plain;charset=utf-8;base64,ZGVmYXVsdHMgewogICAgdXNlcl9mcmllbmRseV9uYW1lcyBubwogICAgZW5hYmxlX2ZvcmVpZ24gIl4kIgogICAgcG9sbGluZ19pbnRlcnZhbCAgICAxMAogICAgZmluZF9tdWx0aXBhdGhzIHllcwp9CgpkZXZpY2VzIHsKICAgIGRldmljZSB7CiAgICAgICAgdmVuZG9yICAgICAgICAgICAgICAgICAgICAgICJOVk1FIgogICAgICAgIHByb2R1Y3QgICAgICAgICAgICAgICAgICAgICAiUHVyZSBTdG9yYWdlIEZsYXNoQXJyYXkiCiAgICAgICAgcGF0aF9zZWxlY3RvciAgICAgICAgICAgICAgICJxdWV1ZS1sZW5ndGggMCIKICAgICAgICBwYXRoX2dyb3VwaW5nX3BvbGljeSAgICAgICAgZ3JvdXBfYnlfcHJpbwogICAgICAgIHByaW8gICAgICAgICAgICAgICAgICAgICAgICBhbmEKICAgICAgICBmYWlsYmFjayAgICAgICAgICAgICAgICAgICAgaW1tZWRpYXRlCiAgICAgICAgZmFzdF9pb19mYWlsX3RtbyAgICAgICAgICAgIDEwCiAgICAgICAgdXNlcl9mcmllbmRseV9uYW1lcyAgICAgICAgIG5vCiAgICAgICAgbm9fcGF0aF9yZXRyeSAgICAgICAgICAgICAgIDAKICAgICAgICBmZWF0dXJlcyAgICAgICAgICAgICAgICAgICAgMAogICAgICAgIGRldl9sb3NzX3RtbyAgICAgICAgICAgICAgICA2MAogICAgfQogICAgZGV2aWNlIHsKICAgICAgICB2ZW5kb3IgICAgICAgICAgICAgICAgICAgIlBVUkUiCiAgICAgICAgcHJvZHVjdCAgICAgICAgICAgICAgICAgICJGbGFzaEFycmF5IgogICAgICAgIHBhdGhfc2VsZWN0b3IgICAgICAgICAgICAic2VydmljZS10aW1lIDAiCiAgICAgICAgaGFyZHdhcmVfaGFuZGxlciAgICAgICAgICIxIGFsdWEiCiAgICAgICAgcGF0aF9ncm91cGluZ19wb2xpY3kgICAgIGdyb3VwX2J5X3ByaW8KICAgICAgICBwcmlvICAgICAgICAgICAgICAgICAgICAgYWx1YQogICAgICAgIGZhaWxiYWNrICAgICAgICAgICAgICAgICBpbW1lZGlhdGUKICAgICAgICBwYXRoX2NoZWNrZXIgICAgICAgICAgICAgdHVyCiAgICAgICAgZmFzdF9pb19mYWlsX3RtbyAgICAgICAgIDEwCiAgICAgICAgdXNlcl9mcmllbmRseV9uYW1lcyAgICAgIG5vCiAgICAgICAgbm9fcGF0aF9yZXRyeSAgICAgICAgICAgIDAKICAgICAgICBmZWF0dXJlcyAgICAgICAgICAgICAgICAgMAogICAgICAgIGRldl9sb3NzX3RtbyAgICAgICAgICAgICA2MDAKICAgIH0KfQoKYmxhY2tsaXN0X2V4Y2VwdGlvbnMgewogICAgICAgIHByb3BlcnR5ICIoU0NTSV9JREVOVF98SURfV1dOKSIKfQoKYmxhY2tsaXN0IHsKICAgICAgZGV2bm9kZSAiXnB4ZFswLTldKiIKICAgICAgZGV2bm9kZSAiXnB4ZCoiCiAgICAgIGRldmljZSB7CiAgICAgICAgdmVuZG9yICJWTXdhcmUiCiAgICAgICAgcHJvZHVjdCAiVmlydHVhbCBkaXNrIgogICAgICB9Cn0=filesystem: rootmode: 0644overwrite: truepath: /etc/multipath.conf- contents:source: data:text/plain;charset=utf-8;base64,IyBSZWNvbW1lbmRlZCBzZXR0aW5ncyBmb3IgUHVyZSBTdG9yYWdlIEZsYXNoQXJyYXkuCiMgVXNlIG5vbmUgc2NoZWR1bGVyIGZvciBoaWdoLXBlcmZvcm1hbmNlIHNvbGlkLXN0YXRlIHN0b3JhZ2UgZm9yIFNDU0kgZGV2aWNlcwpBQ1RJT049PSJhZGR8Y2hhbmdlIiwgS0VSTkVMPT0ic2QqWyEwLTldIiwgU1VCU1lTVEVNPT0iYmxvY2siLCBFTlZ7SURfVkVORE9SfT09IlBVUkUiLCBBVFRSe3F1ZXVlL3NjaGVkdWxlcn09Im5vbmUiCkFDVElPTj09ImFkZHxjaGFuZ2UiLCBLRVJORUw9PSJkbS1bMC05XSoiLCBTVUJTWVNURU09PSJibG9jayIsIEVOVntETV9OQU1FfT09IjM2MjRhOTM3KiIsIEFUVFJ7cXVldWUvc2NoZWR1bGVyfT0ibm9uZSIKCiMgUmVkdWNlIENQVSBvdmVyaGVhZCBkdWUgdG8gZW50cm9weSBjb2xsZWN0aW9uCkFDVElPTj09ImFkZHxjaGFuZ2UiLCBLRVJORUw9PSJzZCpbITAtOV0iLCBTVUJTWVNURU09PSJibG9jayIsIEVOVntJRF9WRU5ET1J9PT0iUFVSRSIsIEFUVFJ7cXVldWUvYWRkX3JhbmRvbX09IjAiCkFDVElPTj09ImFkZHxjaGFuZ2UiLCBLRVJORUw9PSJkbS1bMC05XSoiLCBTVUJTWVNURU09PSJibG9jayIsIEVOVntETV9OQU1FfT09IjM2MjRhOTM3KiIsIEFUVFJ7cXVldWUvYWRkX3JhbmRvbX09IjAiCgojIFNwcmVhZCBDUFUgbG9hZCBieSByZWRpcmVjdGluZyBjb21wbGV0aW9ucyB0byBvcmlnaW5hdGluZyBDUFUKQUNUSU9OPT0iYWRkfGNoYW5nZSIsIEtFUk5FTD09InNkKlshMC05XSIsIFNVQlNZU1RFTT09ImJsb2NrIiwgRU5We0lEX1ZFTkRPUn09PSJQVVJFIiwgQVRUUntxdWV1ZS9ycV9hZmZpbml0eX09IjIiCkFDVElPTj09ImFkZHxjaGFuZ2UiLCBLRVJORUw9PSJkbS1bMC05XSoiLCBTVUJTWVNURU09PSJibG9jayIsIEVOVntETV9OQU1FfT09IjM2MjRhOTM3KiIsIEFUVFJ7cXVldWUvcnFfYWZmaW5pdHl9PSIyIgoKIyBTZXQgdGhlIEhCQSB0aW1lb3V0IHRvIDYwIHNlY29uZHMKQUNUSU9OPT0iYWRkfGNoYW5nZSIsIEtFUk5FTD09InNkKlshMC05XSIsIFNVQlNZU1RFTT09ImJsb2NrIiwgRU5We0lEX1ZFTkRPUn09PSJQVVJFIiwgQVRUUntkZXZpY2UvdGltZW91dH09IjYwIg==filesystem: rootmode: 0644overwrite: truepath: /etc/udev/rules.d/99-pure-storage.rulessystemd:units:- enabled: truename: iscsid.service- enabled: truename: multipathd.service -
Add a Credential in
clustersnamespace. This is required for hosted clusters to pull images from private Openshift registries.noteSkip step 7 to create NetworkAttachmentDefinition(NAD) in case you can use the default pod network for storage.
-
Create a NetworkAttachmentDefinition(NAD). The VMs from nodepool will be created in
clusters-<hosted-cluster-name>namespace. Create the NAD in the same namespace. Create the namespace if it does not exist. Here the nodepool and worker VMs for clusterhosted1will be created inclusters-hosted1namespace.apiVersion: k8s.cni.cncf.io/v1kind: NetworkAttachmentDefinitionmetadata:name: storage-networknamespace: clusters-hosted1spec:config: |-{"cniVersion": "0.3.1","type": "bridge","bridge": "br-storage","ipam": {"type": "whereabouts","range": "10.xx.xxx.xxx/20","gateway": "10.xx.xxx.1"}}To get range and gateway, run the following command on management host node.
> ip route show dev br-storage10.xx.xxx.0/20 proto kernel scope link src 10.xx.xxx.xxx metric 425169.xxx.xxx.0/24 proto kernel scope link src 169.xxx.xxx.1 metric 425 -
Create a hosted cluster. Choose Red Hat Openshift Virtualization as infrastructure, and provide Credential created in the step 6. While creating a cluster, ensure the following changes are done:
-
Add machineConfig CM to the NodePool spec.
spec:..config:- name: machine-config-fa -
To enable live migration for KubeVirt-based worker nodes, configure the NodePool to use ReadWriteMany (RWX) raw block volumes for the VM root disks. For reference:
- StorageClass - px-rwx-block-kubevirt
- AccessMode - RWX
- VolumeMode - Block
Here is a StorageClass manifest for the same.
apiVersion: storage.k8s.io/v1kind: StorageClassmetadata:name: px-rwx-block-kubevirtprovisioner: pxd.portworx.comparameters:repl: "3"nodiscard: "true" # Disables discard operations on the block device to help avoid known compatibility issues on OpenShift Container Platform (OCP) versions 4.18 and earlier.volumeBindingMode: ImmediateallowVolumeExpansion: true -
Ensure that each KubeVirt VM in the NodePool is provisioned with sufficient compute resources for Portworx based provisioning. A minimum of 4 vCPUs per VM is required. Check System Requirements to ensure you provision enough resources.
-
Specify an additional network for the hosted cluster by referencing a NetworkAttachmentDefinition (NAD) in the format
<namespace>/<name>created in Step 7. Keep the default Pod network option enabled in the UI.
-
Once the hosted cluster deployment finishes, it shows the console URL and the credentials to access the hosted cluster. The hosted Openshift cluster can be accessed independently of the management cluster.
Deploy Portworx Enterprise in hosted OpenShift cluster
From the hosted cluster console, access to OperatorHub and follow these steps to deploy the Portworx Operator.
Ensure that the following configuration steps are completed as part of the installation process:
-
Create the
px-pure-secretand the StorageCluster CR. -
In the STC configuration, set
PURE_ISCSI_ALLOWED_IFACESto the interface name of the nodepool VM to enable iSCSI traffic. Get the interfaceName corresponding to the network name which connects to the bridge on the host network.(For instance, Network Name -> iface1_clusters-hosted1-storage-network; interfaceName -> enp2s0).oc get vmi <vm-name> -n clusters-<hosted-cluster-name> -o json | jq '.status.interfaces[] | {name,interfaceName,ipAddresses}' -
Get the Prometheus URL for Openshift monitoring and set the monitoring URL for Autopilot.
oc get route thanos-querier -n openshift-monitoring