Automatically deploy PDS on Equinix Metal server using the Terraform module
The Terraform module automates the end-to-end deployment of PDS on the Equinix Metal server. When you run the Terraform module, it:
- provisions the Equinix Metal servers.
- sets up the Kubernetes cluster with Portworx Enterprise as the storage platform.
- integrates the Kubernetes cluster into the PDS portal.
- after successful integration, you can select the database services available in PDS and deploy them.
Prerequisites
Deploy the Equinix Metal server version c3.medium.x86 or newer.
For the current standard server plans offered by Equinix, see Equinix Standard Gen3 Servers.
The Equinix Metal server should have at least a minimum of three disks:
- 1 for the Operating Syetem
- 1 for KVDB
- and 1 or more disks for Portworx storage pools
Create an Equinix Metal account
Create an Equinix Metal accout.
Set up an organization and create a project.
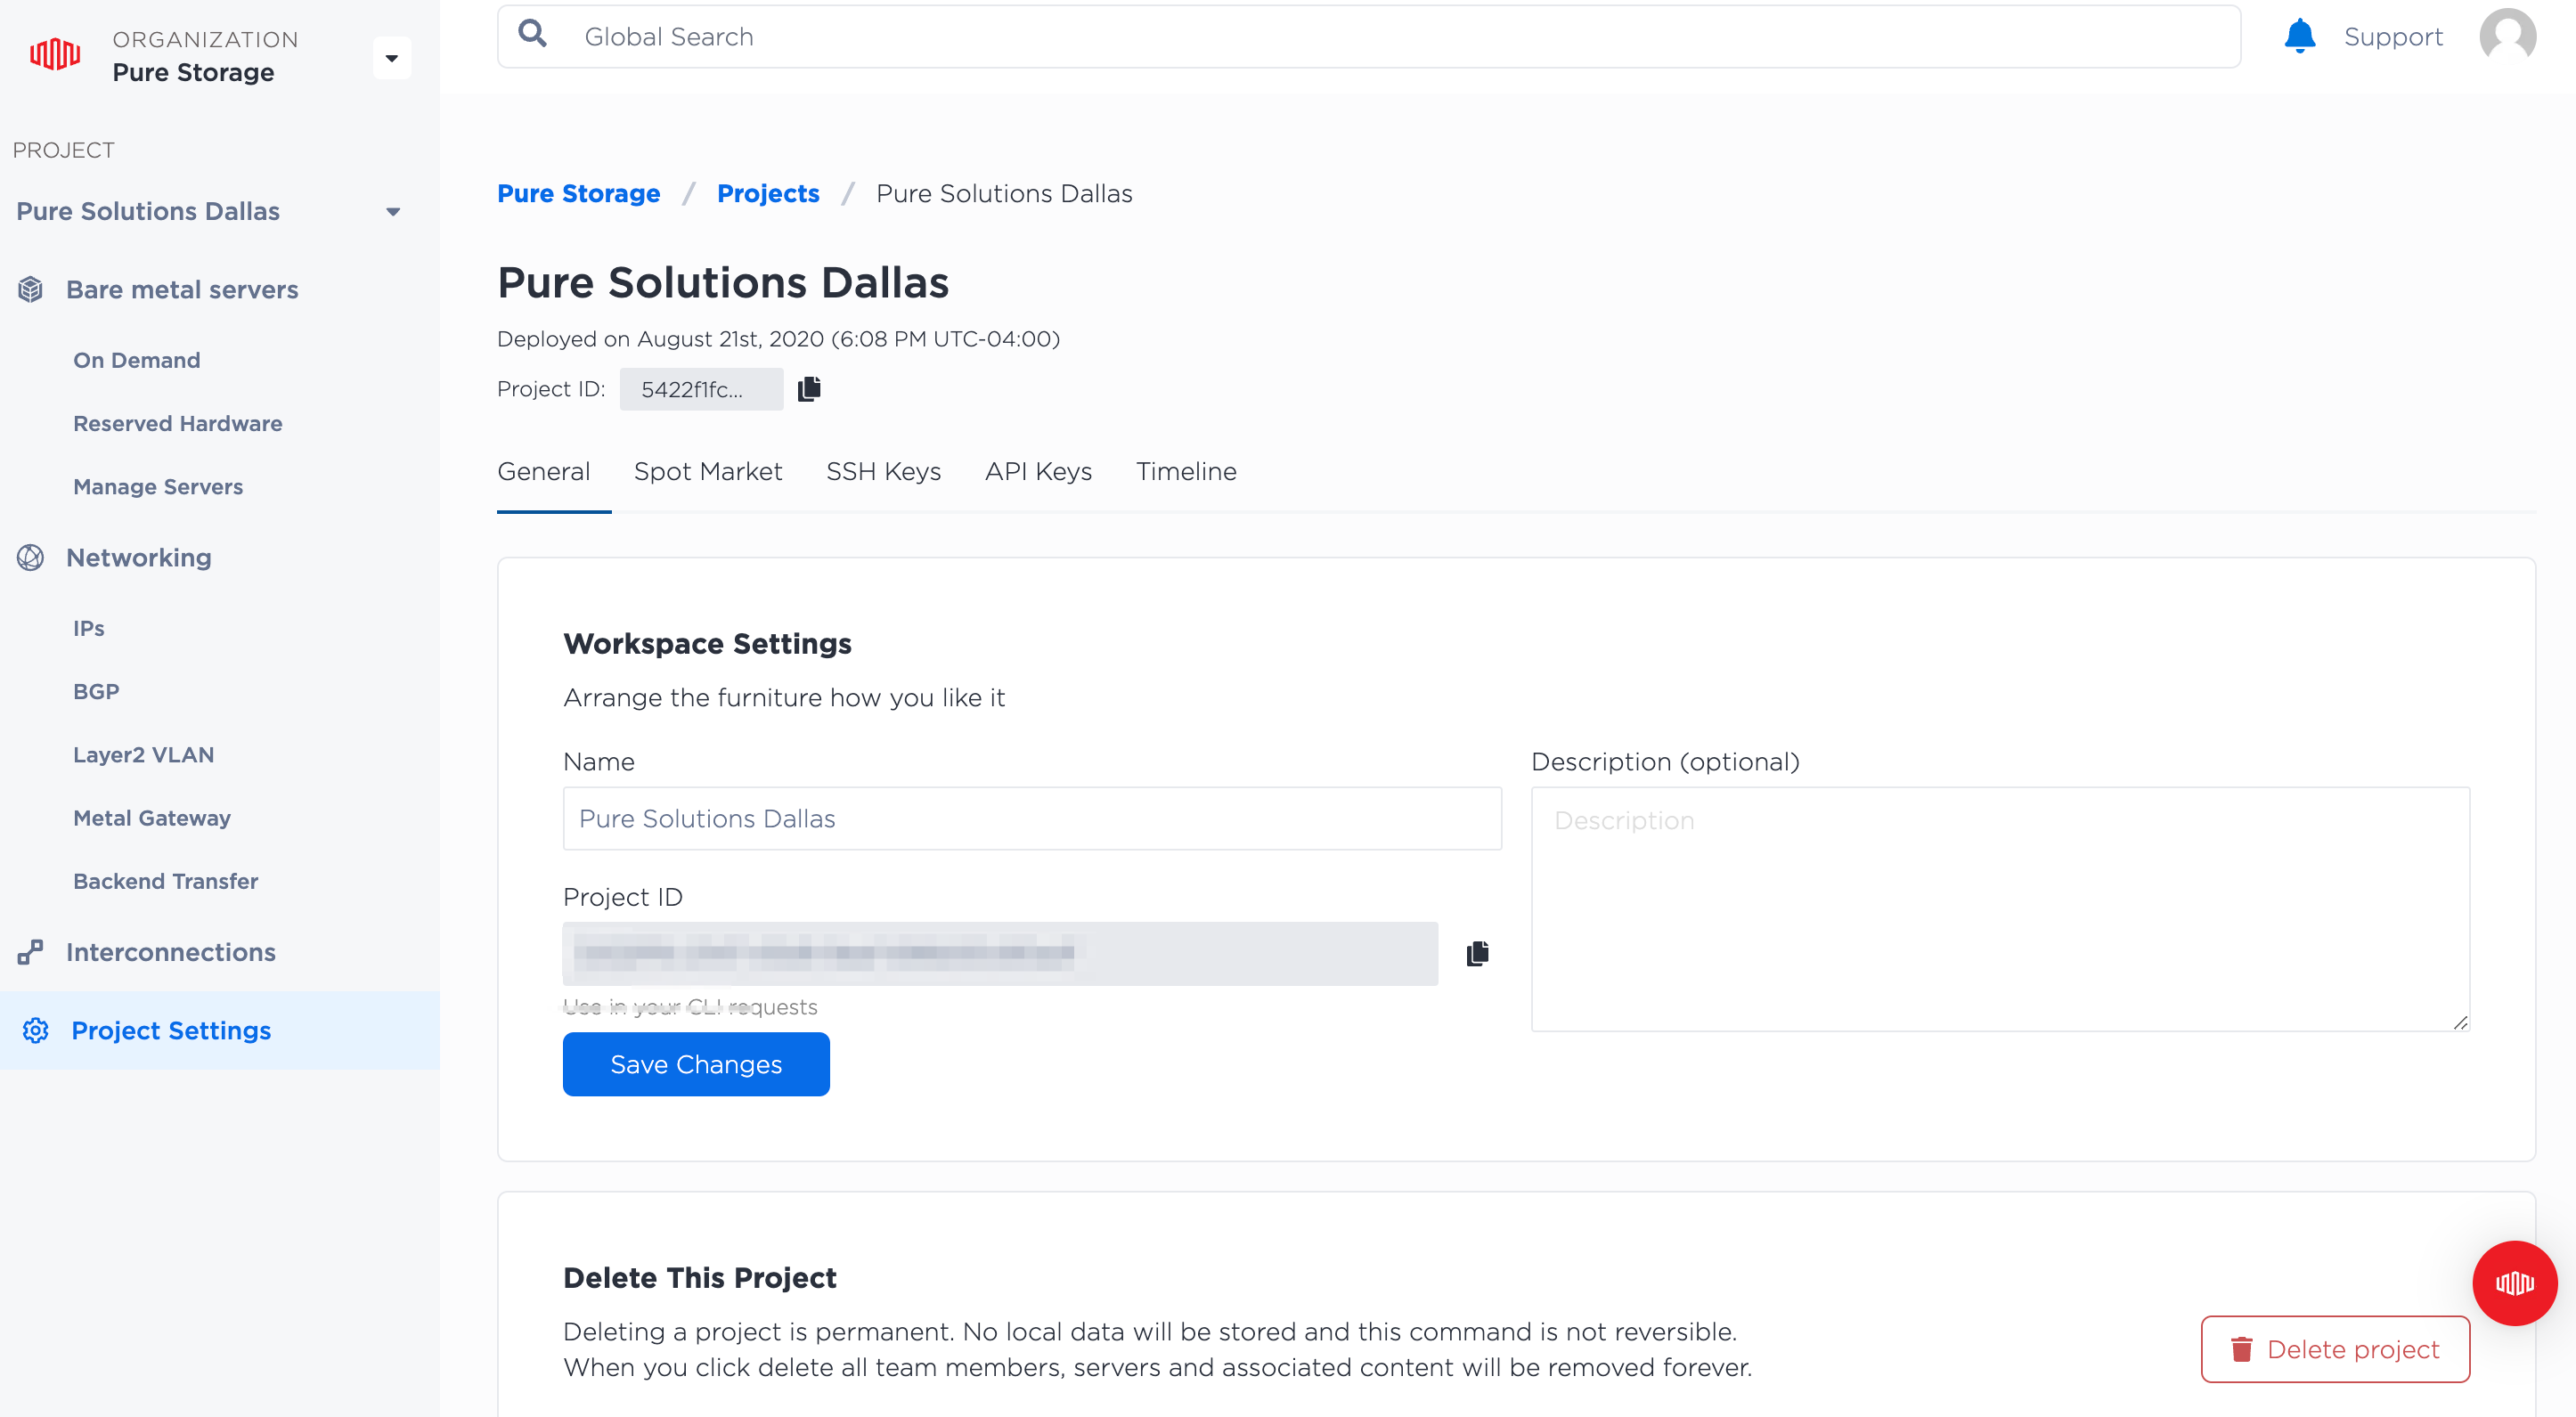
Obtain the following information from Equinix Metal console:
project-id: The Equinix Metal project identifier.api-token: The user API key used to access the Equinix Metal API.metro: The location where you want to provision your server.noteYou can obtain the project ID from the General tab in the Equinix Metal console -> Project Settings screen.
To obtain the user API key:
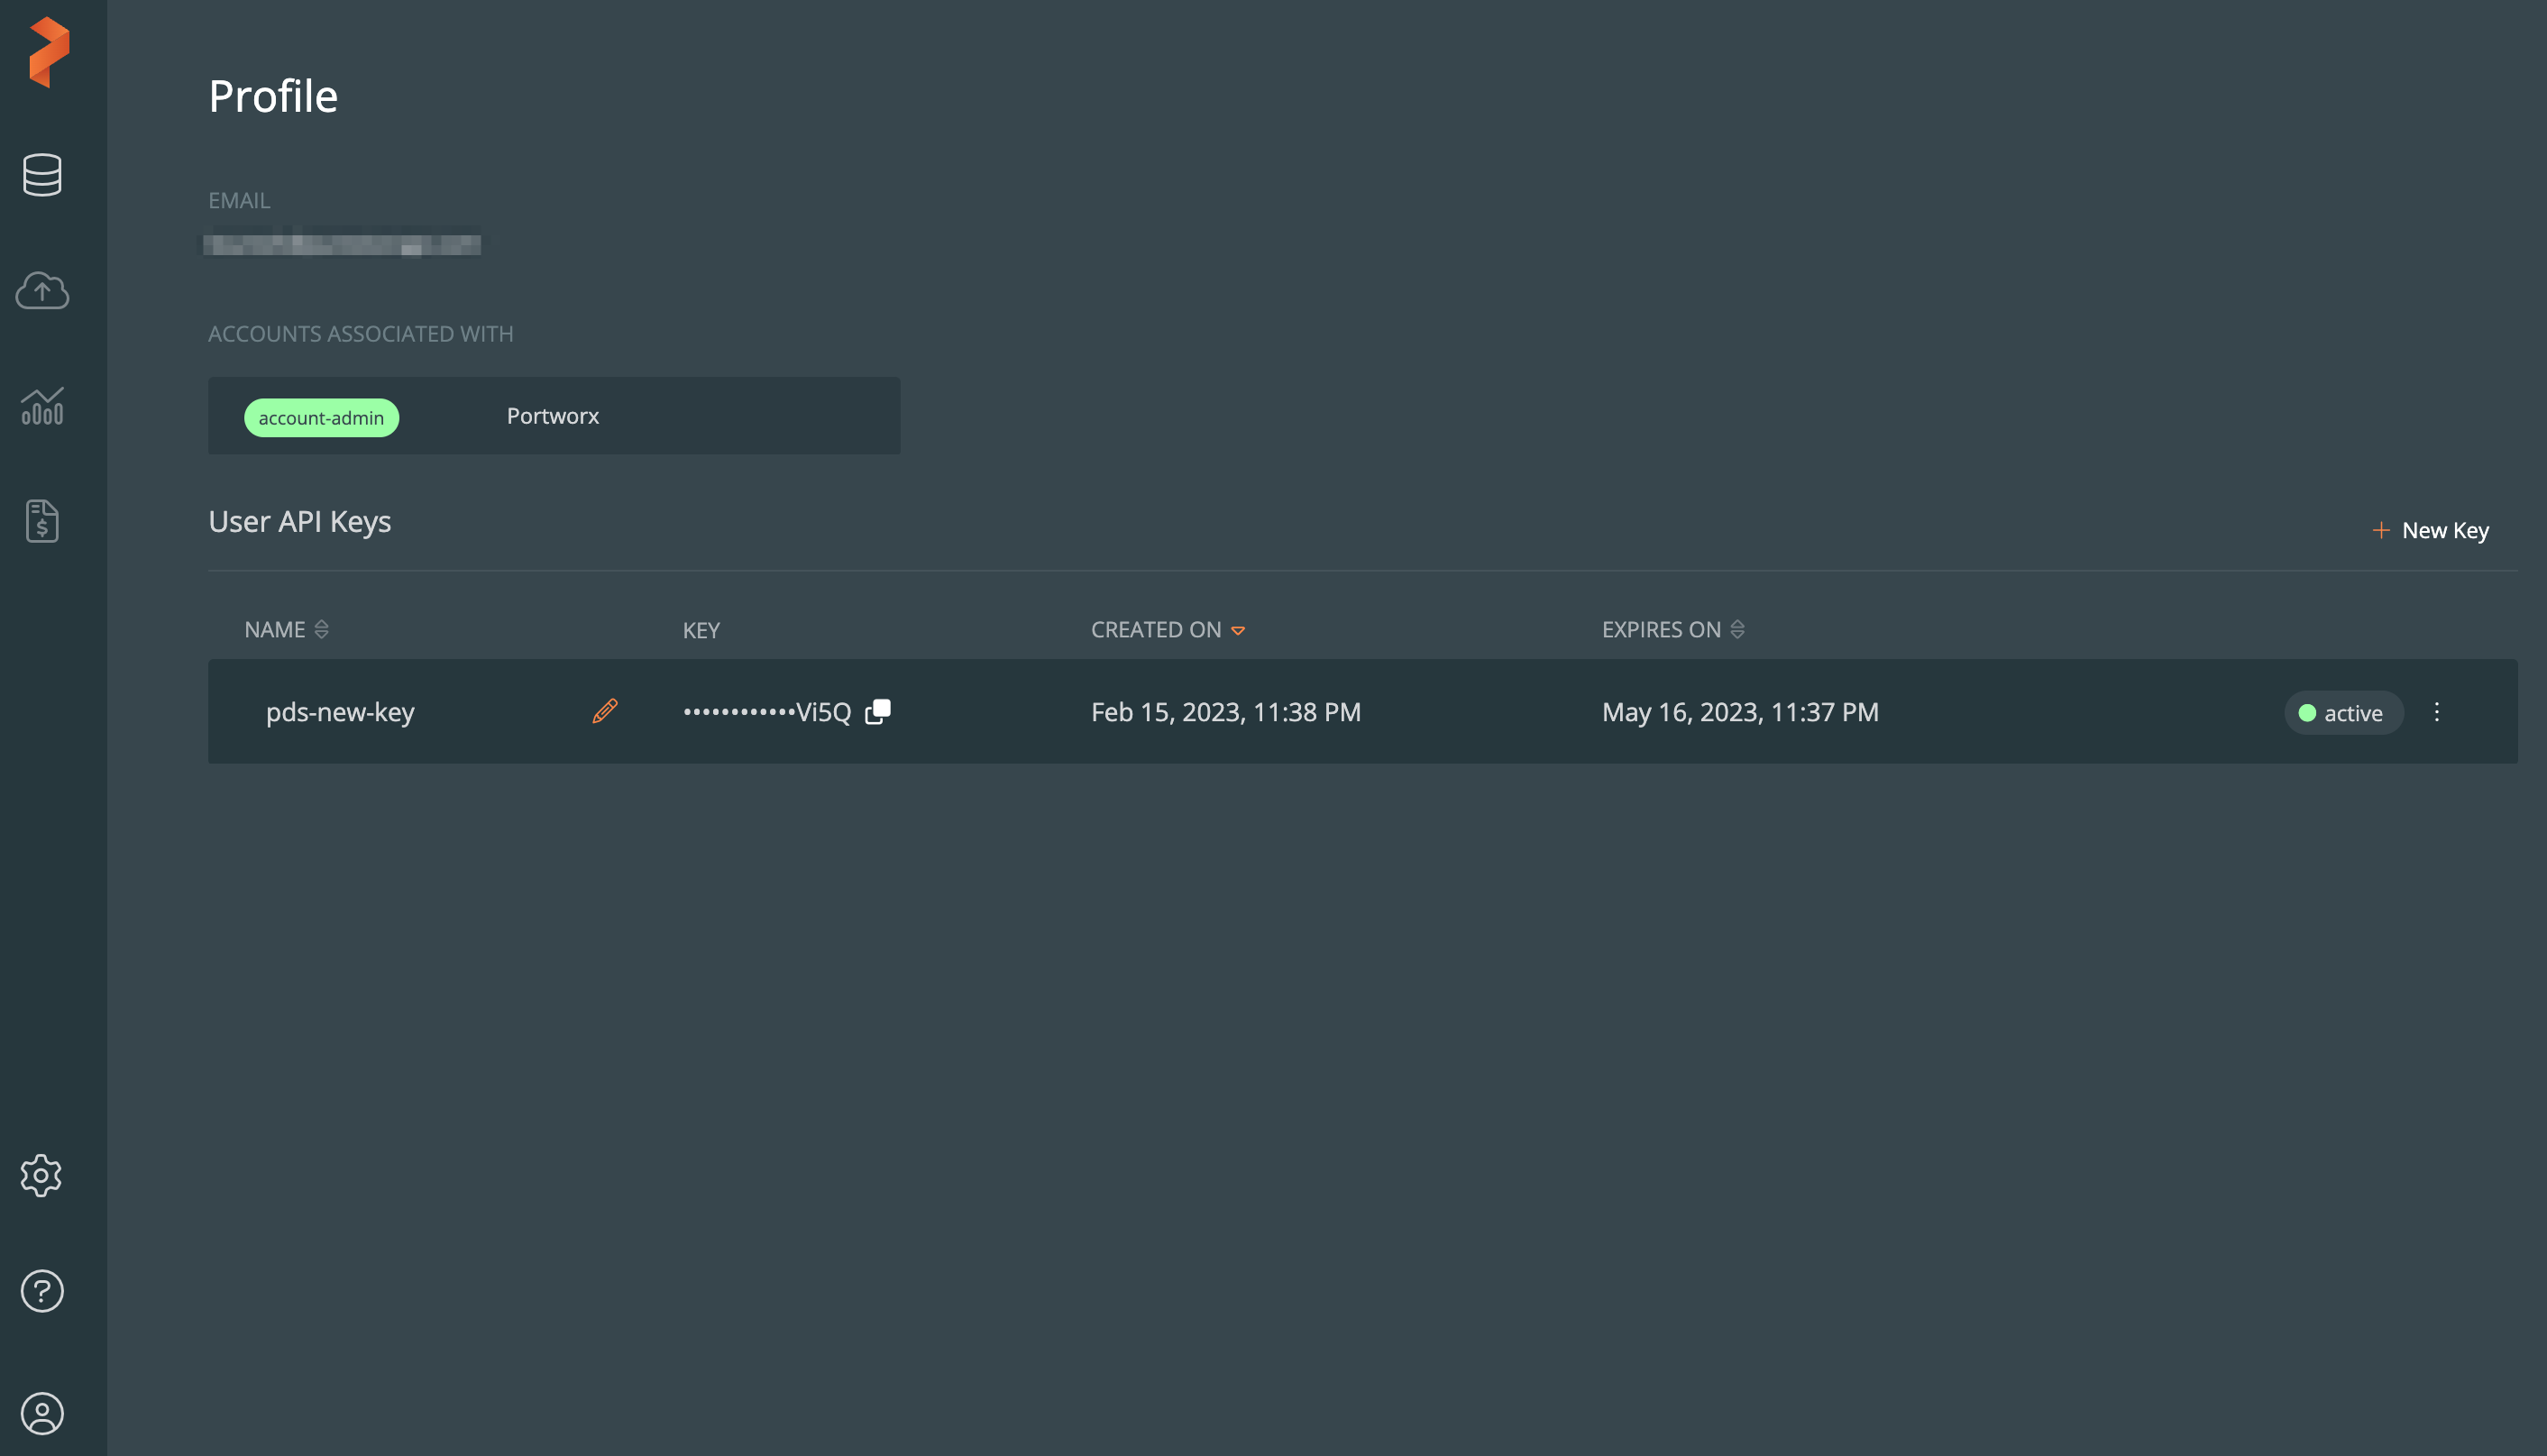
In the Equinix Metal console, select the User icon -> My Profile option.
Select the API Keys tab to view the user API key:

Onboard to PDS
Create a Portworx account.
Contact Portworx sales team to request access to PDS.
After the Portworx sales team signs you up, log in and access the PDS dashboard.
Obtain the API Key from the PDS Profile page. From the PDS dashboard, select the User icon -> Profile option.
Obtain the tenant ID using the PDS REST API.
First, obtain the account ID using the following GET request:
curl -X 'GET' \
'https://prod.pds.portworx.com/api/accounts' \
-H 'accept: application/json' \
-H 'Authorization: Bearer <pds-api-key>'
Sample response:
{
"data": [
{
    "id": "re085742-e92a-4278-b956-4dcacb9x72a",
    "created_at": "2022-04-02T19:57:31.414608Z",
    "updated_at": "2022-08-19T04:23:43.225184Z",
    "name": "Portworx",
    "eula": {
    "accepted": true,
    "accepted_version": "2022-06-01"
    },
    "global_config": {}
}
],
"pagination": null
}
Next, copy the account ID from the output and use it in the following request:
curl -X 'GET' \
'https://prod.pds.portworx.com/api/accounts/<account-id>/tenants' \
-H 'accept: application/json' \
-H 'Authorization: Bearer <pds-api-key>'
Sample response:
{
"data": [
{
    "id": "203xcadc-dd11-42e6-ba1c-563f3056b8da",
    "created_at": "2022-04-02T19:57:31.419869Z",
    "updated_at": "2022-04-02T19:57:31.419869Z",
    "name": "Default",
    "account_id": "re085742-e92a-4278-b956-4dcacb9x72a"
    }
],
"pagination": null
}
Linux control host machine prerequisites
Ensure the following software is installed in the Linux host machine:
Set up PDS on Equinix Metal server
Perform the following steps on the Linux control host machine to set up PDS:
Export the following variables:
export ANSIBLE_PRIVATE_KEY_FILE='~/.ssh/eqx_priv'export ANSIBLE_HOST_KEY_CHECKING=FalsenoteThese variables allow you to run Ansible playbooks from the Terraform module. The
ANSIBLE_PRIVATE_KEY_FILEvariable provides the location of the private key to be used for SSH authentication. TheANSIBLE_HOST_KEY_CHECKINGvariable disables host key checking. You can place these variables inbashrcandbash_profilefiles as well.Clone the GitHub repository:
git clone https://github.com/PureStorage-OpenConnect/terraform-portworx-on-baremetal.gitGo to the directory that contains the Terraform module setup files:
cd terraform-portworx-on-baremetalInstall the prerequisite tools, before installing the Terraform module:
bash scripts/prereq.shnoteThis command installs the following tools: Helm, jq, Terraform, kubectl, and curl.
Check if the tools are installed:
source ~/.bashrcCheck the Terraform version:
terraform versionnoteThe Terraform version should be 1.3.5 or newer.
Initialize the Terraform module:
terraform init(Optional) Review the
variable.tffile. The configuration parameters in thevariable.tffile contain default values. You can change these default settings.For example, the Terraform module sets up a four-node Kubernetes cluster, and sets the metro to Dallas (DA). To change these settings, edit the following parameters:
cp_node_count: modifies the number of master servers in the cluster.nodes_count: modifies the total number of servers in the cluster.metro: modifies the location where you want to provision the server.
noteSecurity sensitive variables are not stored in the
variable.tffile. Instead, they are passed through the CLI.Review the Terraform plan that will be applied to install the setup:
terraform plan -out test.out -var "metal_auth_token=*****" -var "tenant_id=****" -var "pds_token=******" -var "metal_project_id=******"Apply the reviewed plan:
terraform apply test.outThe module provisions the Equinix Metal server, sets up the Kubernetes cluster with Portworx Enterprise as the storage platform, and integrates the Kubernetes cluster into PDS portal. The whole process might take up to 30 minutes. After completion, the Equinix nodes and their IP addresses are displayed.
Verify whether the
kube-config-fileis available:ls -lrt modules/k8s_setup/kube-config-fileExport the following variable to run the
kubectlcommands:export KUBECONFIG=modules/k8s_setup/kube-config-fileVerify the Kubernetes cluster:
# kubectl get nodes
NAME           STATUS                      ROLE                  AGE     VERSION
Example-node-01    Ready,SchedulingDisabled        control-plane,master  35m     v1.23.0
Example-node-02    Ready                       <none>                34m     v1.23.0
Example-node-03    Ready                       <none>                34m     v1.23.0
Example-node-04    Ready                       <none>                34m     v1.23.0
Verify that the scheduling for master is disabled. As you see in the above example output, the status of the master node should be Ready,SchedulingDisabled.
Verify that Portworx is operational using the following commands:
PX_NS_AND_POD=$(kubectl get pods --no-headers -l name=portworx --all-namespaces -o jsonpath='{.items[*].metadata.ownerReferences[?(@.kind=="StorageCluster")]..name}' -o custom-columns="Col-1:metadata.namespace,Col-2:metadata.name" | head -1)This command fetches the running Portworx pod name and namespace, and stores the data in a variable.
kubectl exec -n ${PX_NS_AND_POD% *} ${PX_NS_AND_POD#* } -c portworx -- /opt/pwx/bin/pxctl status | grep -w Status:This command determines the Portworx status using the previously stored variables.
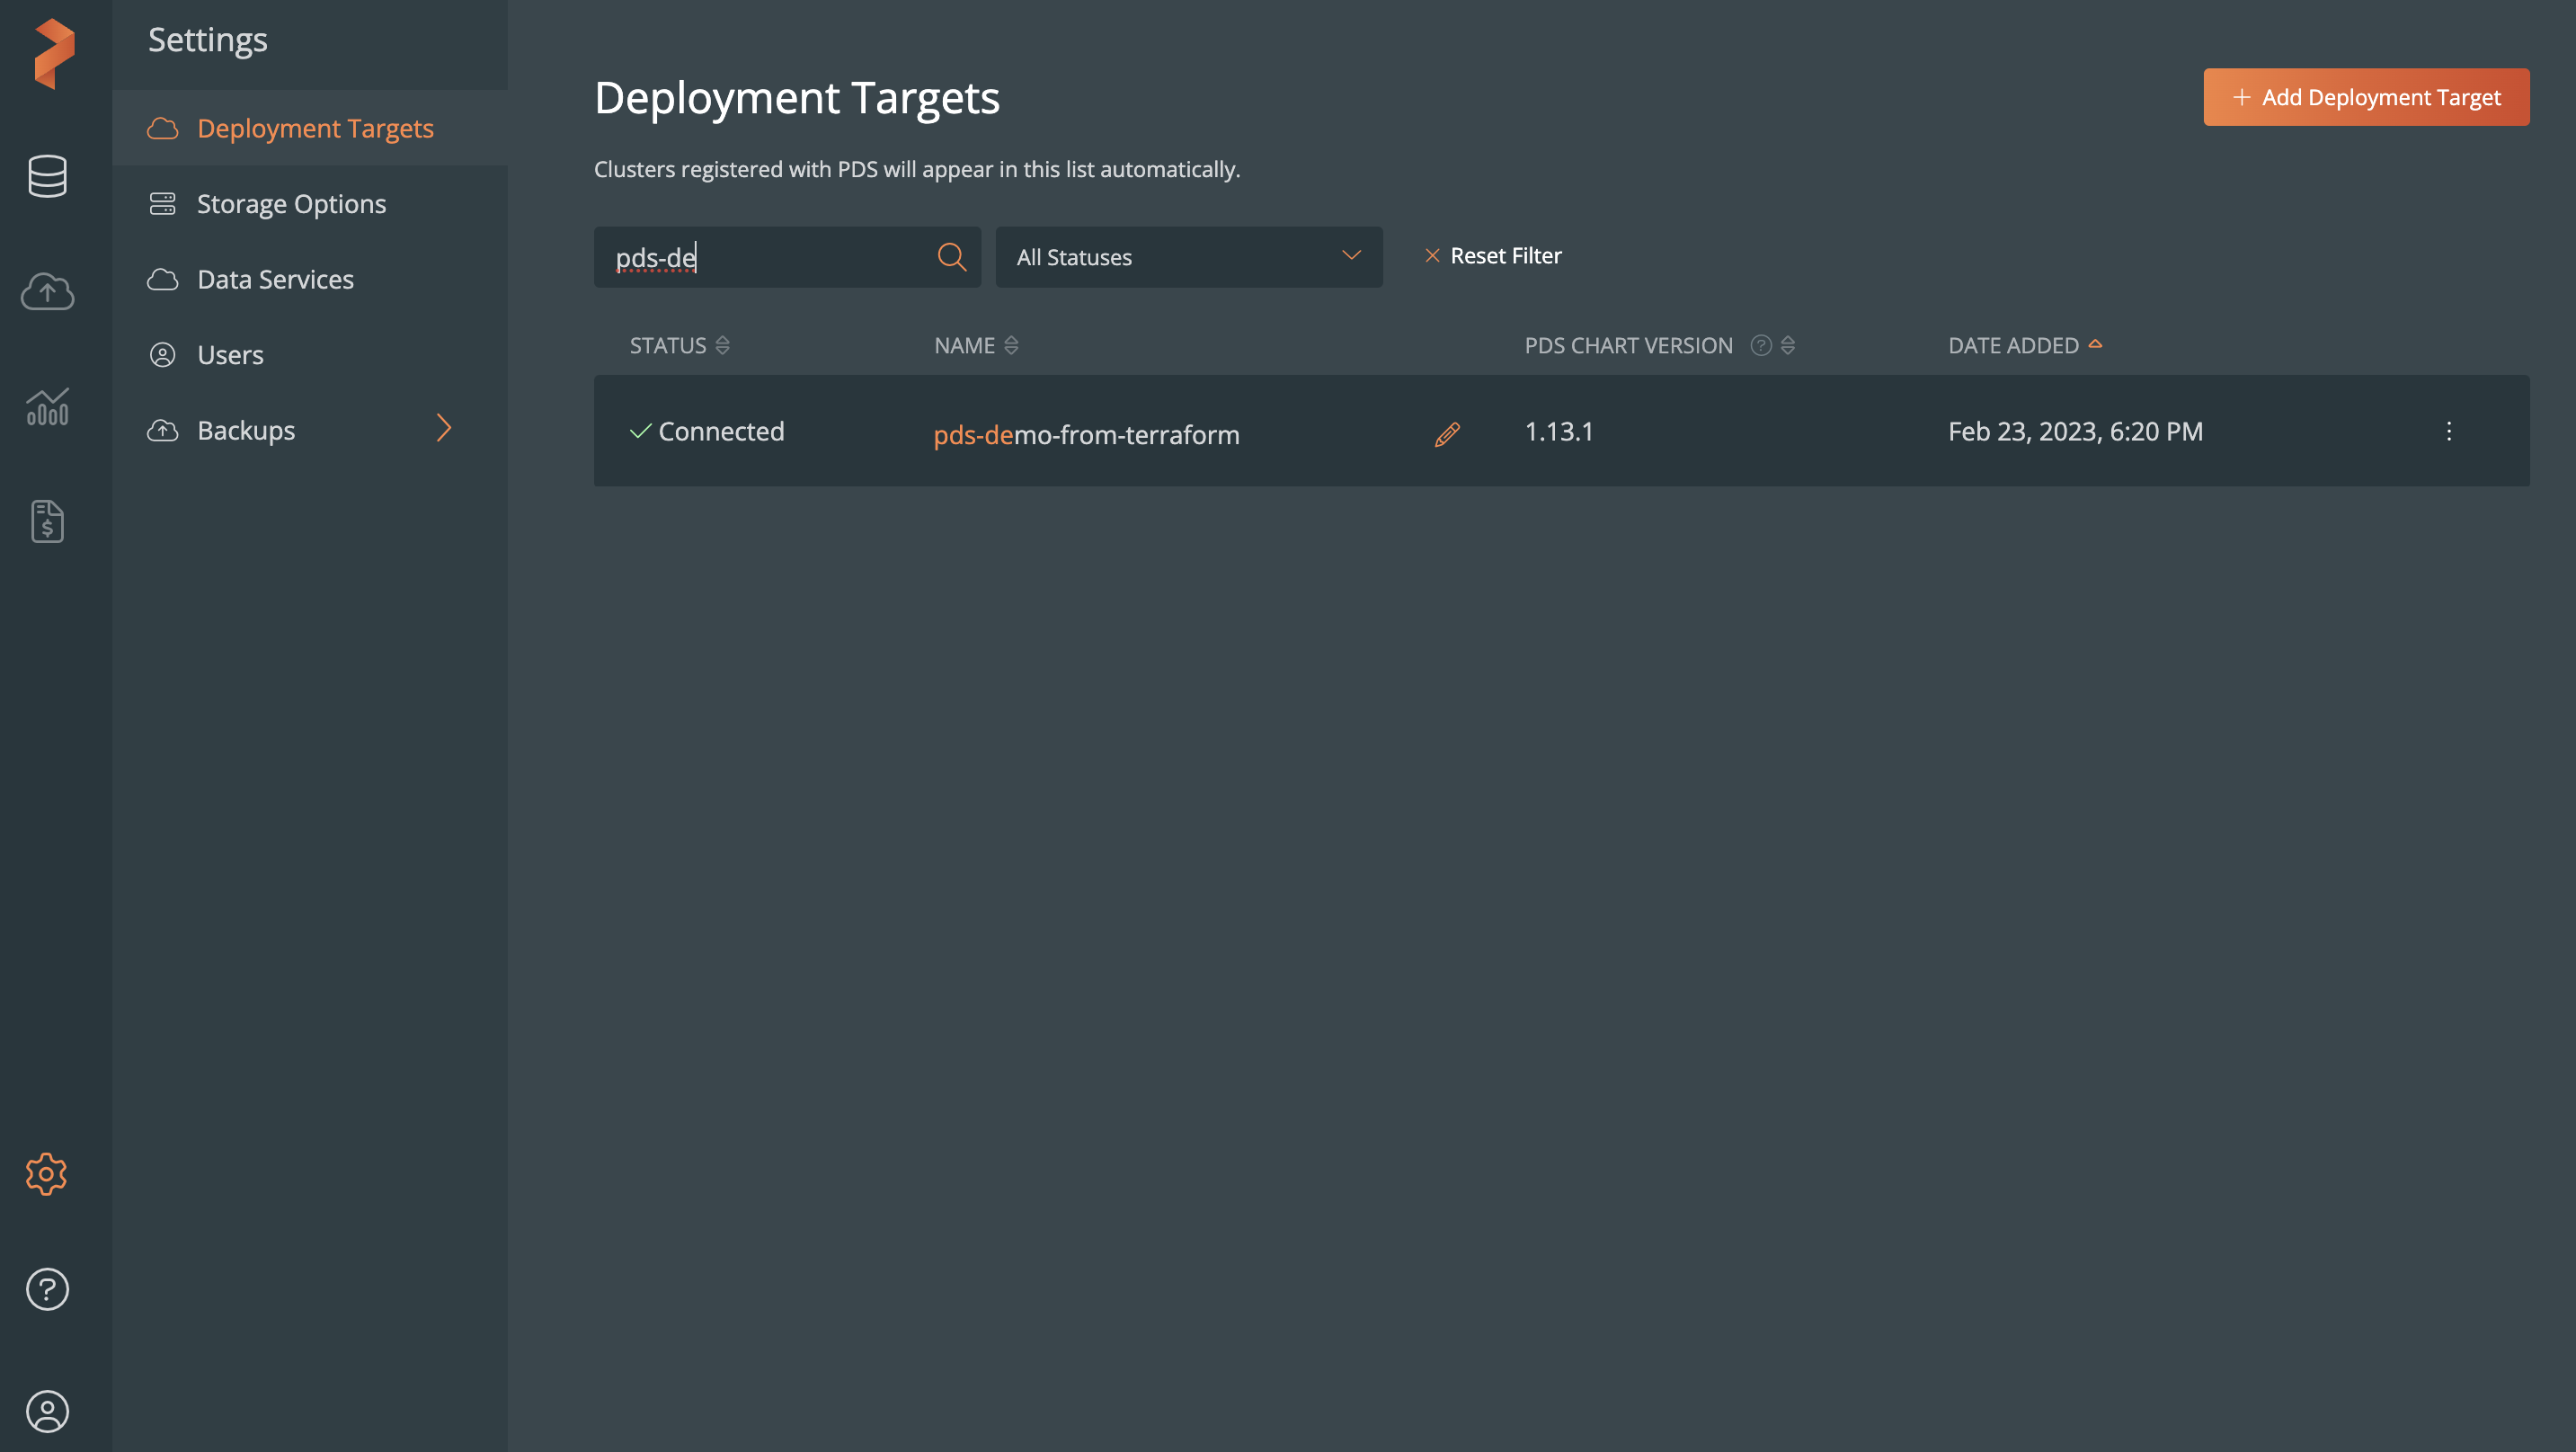
Sign in to the PDS portal and verify whether the Kubernetes cluster is added as a deployment target. In the PDS portal, select Settings -> Deployment Targets to view the Kubernetes cluster:
Deploy data services in PDS
Sign in to PDS portal.
Browse to the Deployment Overview page.
In the Deploy Data Service section, select the data service you want to deploy.
Follow the on-screen instructions to manually deploy available data services. See, Deploy a data service for more information.
Destroy the environment
Run the following command to destroy the environment completely:
terraform destroy -var "metal_auth_token=*****" -var "tenant_id=****" -var "pds_token=******" -var "metal_project_id=******"