Install Portworx on OpenShift on vSphere with PX-StoreV2
PX-StoreV2 is a Portworx datastore optimized for supporting IO intensive workloads for configurations utilizing high performance NVMe class devices. It efficiently manages and balances workload across nodes by dynamically assigning tasks to the most suitable nodes based on their available resources. Hence, improving performance and scalability of your cluster.
Follow the instructions on this page to install Portworx on vSphere with PX-StoreV2.
- Upgrading from a previous Portworx version to deploy PX-StoreV2 datastore with cloud drives is not supported.
- Once Portworx is deployed with the PX-StoreV2 datastore, you can use all of Portworx's features except for the following:
- XFS volumes
- Aggregated volumes
- PX-Cache
Prerequisites
-
Your cluster must be running OpenShift 4.13 or higher.
-
You must have an OpenShift cluster deployed on infrastructure that meets the minimum requirements for Portworx.
-
Ensure that any underlying nodes used for Portworx in OCP have Secure Boot disabled.
-
You must have supported disk types.
-
Linux kernel version: 4.20 or newer (minimum), 5.0 or newer (recommended), with the Rhel: packages:
- device-mapper mdadm lvm2 device-mapper-persistent-data augeas
noteDuring installation, Portworx will automatically try to pull the required packages from distribution specific repositories. This is a mandatory requirement and installation will fail if this prerequisite is not met.
-
A minimum of 64 GB system metadata device on each node where you want to deploy Portworx. If you do not provide a metadata device, one will be automatically added to the spec.
-
An SD/NVME drive type with a memory of more than 8 GB per node.
-
A minimum of 8 cores CPU per node.
Create a monitoring ConfigMap
Newer OpenShift versions do not support the Portworx Prometheus deployment. As a result, you must enable monitoring for user-defined projects before installing the Portworx Operator. Use the instructions in this section to configure the OpenShift Prometheus deployment to monitor Portworx metrics.
To integrate OpenShift’s monitoring and alerting system with Portworx, create a cluster-monitoring-config ConfigMap in the openshift-monitoring namespace:
apiVersion: v1
kind: ConfigMap
metadata:
  name: cluster-monitoring-config
  namespace: openshift-monitoring
data:
  config.yaml: |
    enableUserWorkload: true
The enableUserWorkload parameter enables monitoring for user-defined projects in the OpenShift cluster. This creates a prometheus-operated service in the openshift-user-workload-monitoring namespace.
Install the Portworx Operator
Before you can install Portworx on your OpenShift cluster, you must first install the Portworx Operator. Perform the following steps to prepare your OpenShift cluster by installing the Operator.
-
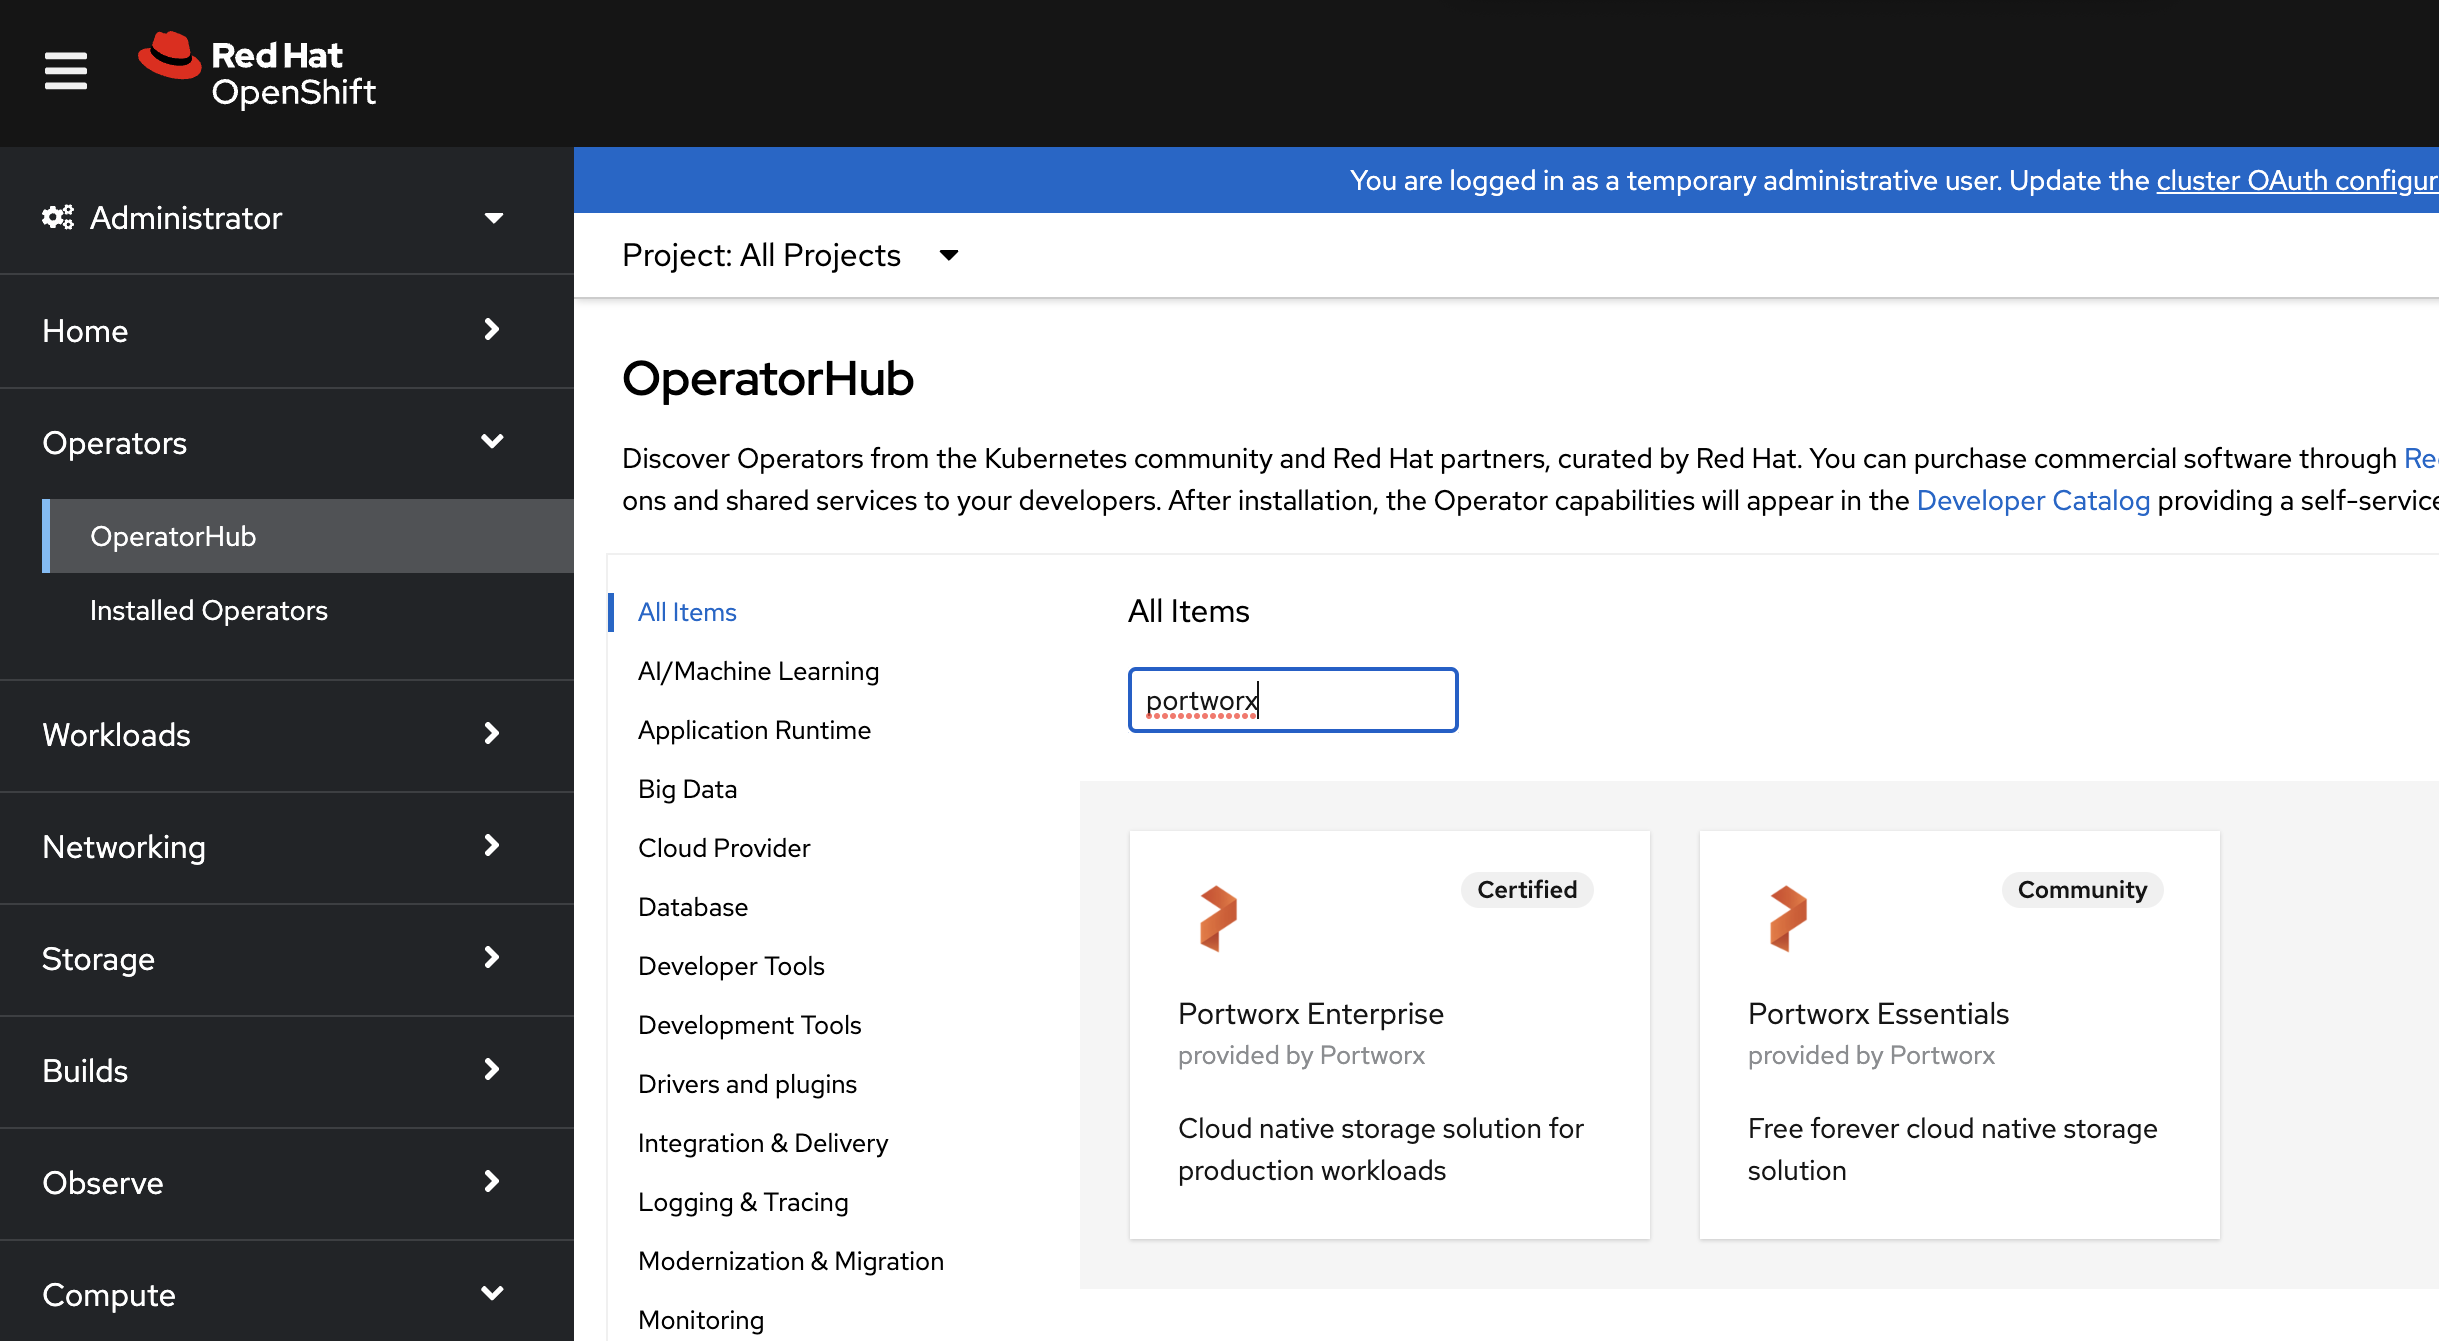
From your OpenShift UI, select OperatorHub in the left pane.
-
On the OperatorHub page, search for Portworx and select the Portworx Enterprise card:
-
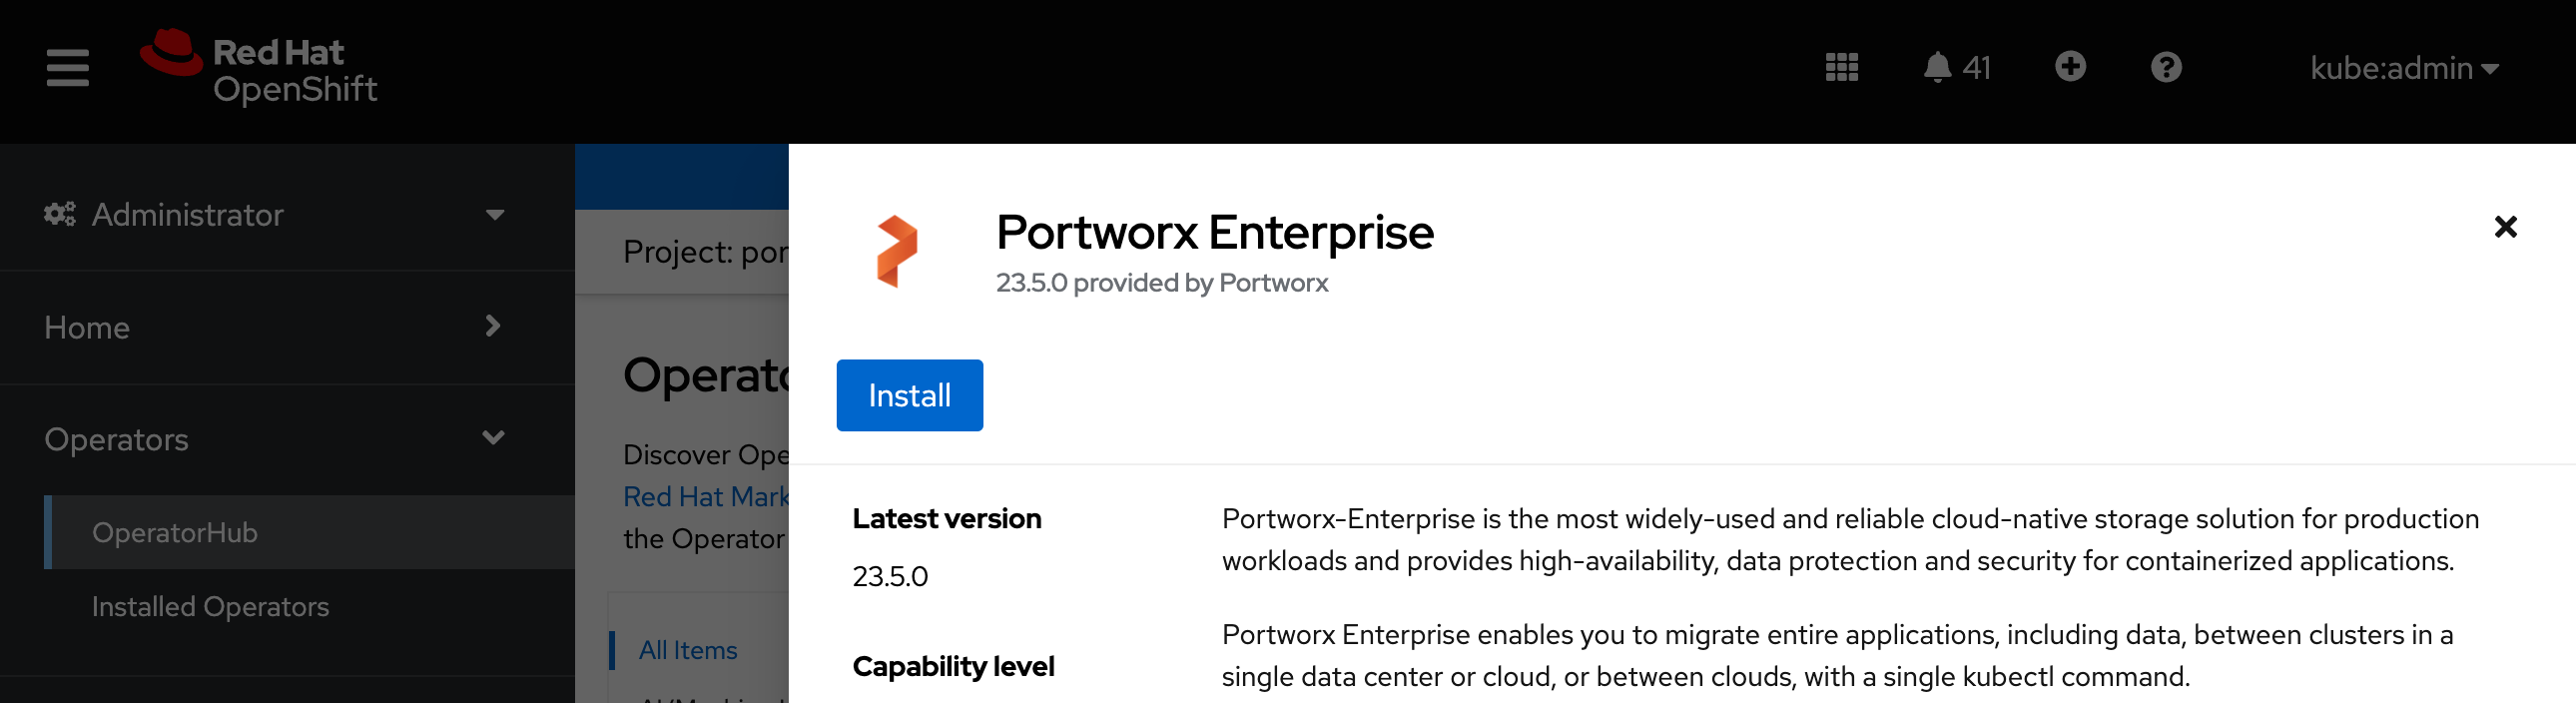
Click Install to install Portworx Operator:
-
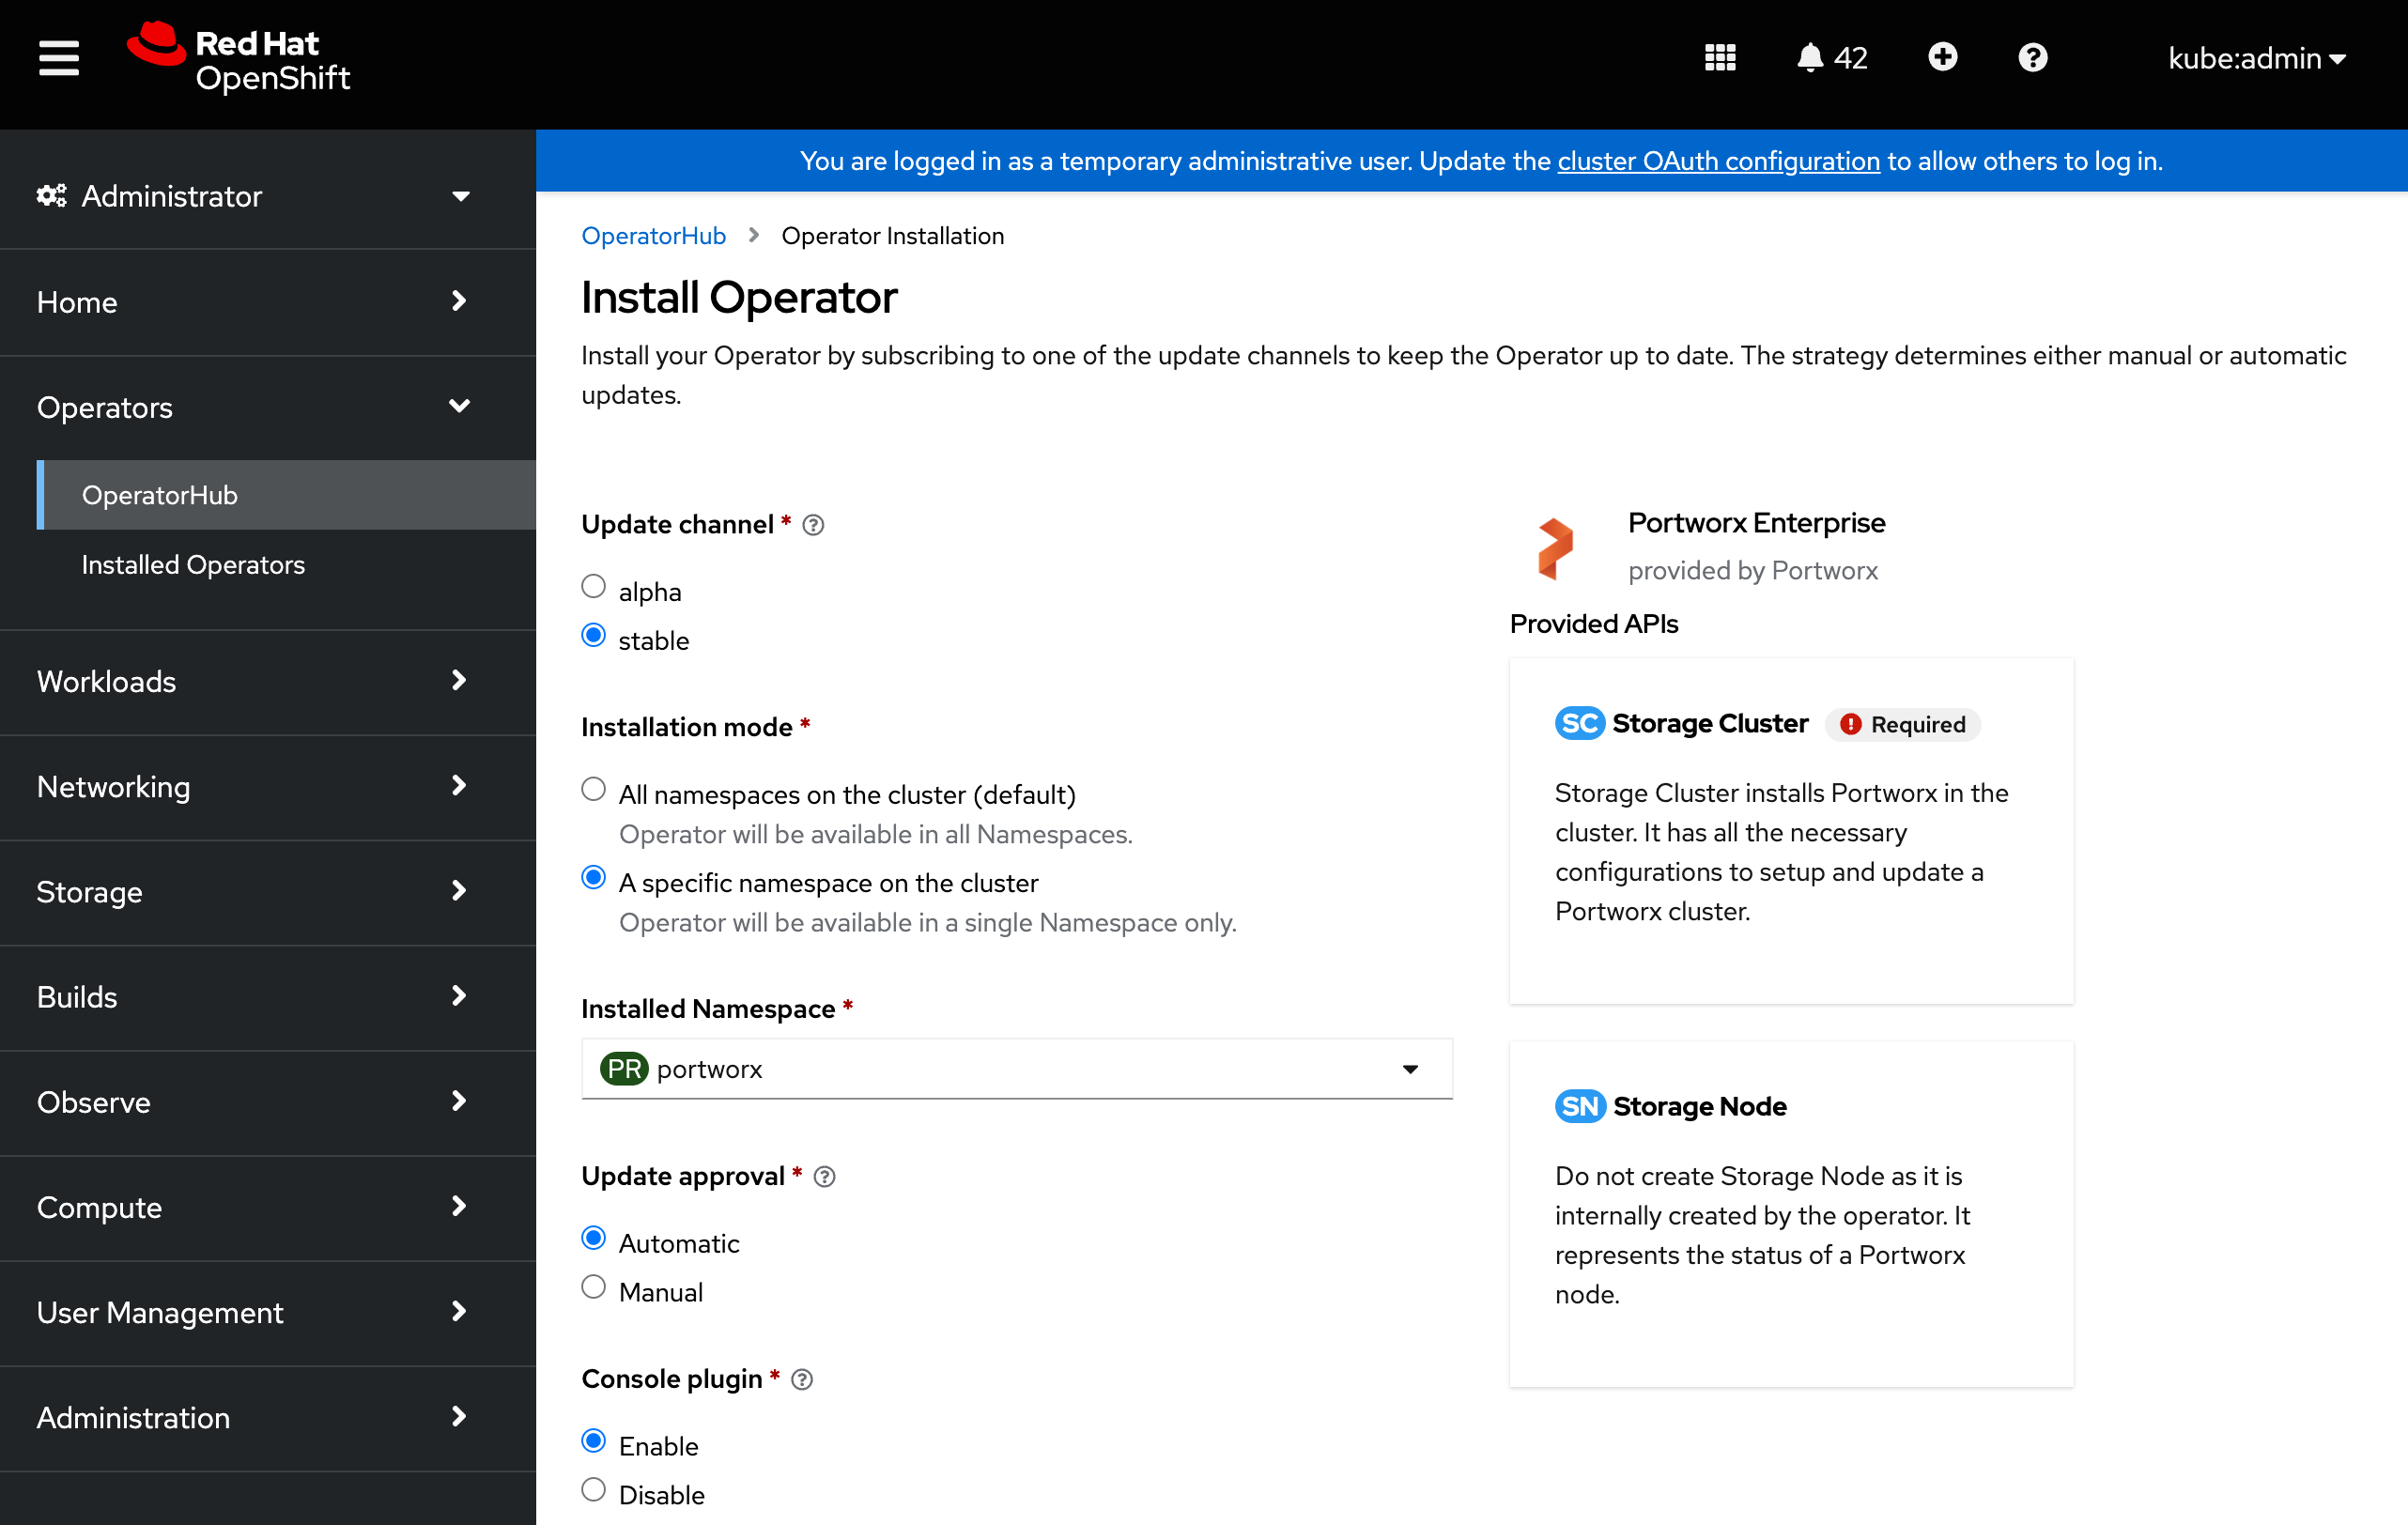
Portworx Operator begins to install and takes you to the Install Operator page. On this page:
- Select the A specific namespace on the cluster option for Installation mode.
- Choose the Create Project option from the Installed Namespace dropdown.
-
In the Create Project window, provide the name
portworxand click Create to create a namespace called portworx. -
To manage your Portworx cluster using the Portworx dashboard within the OpenShift UI, select Enable for the Console plugin option.
If you've already installed the Portworx Operator and did not enable the OpenShift console plugin, or if it was previously disabled, you can re-enable it by running the following command.
oc patch console.operator cluster --type=json -p='[{"op":"add","path":"/spec/plugins/-","value":"portworx"}]'
- Click Install to deploy Portworx Operator in the
portworxnamespace.
Deploy Portworx
The Portworx Enterprise Operator takes a custom Kubernetes resource called StorageCluster as input. The StorageCluster is a representation of your Portworx cluster configuration. Once the StorageCluster object is created, the Operator will deploy a Portworx cluster corresponding to the specification in the StorageCluster object. The Operator will watch for changes on the StorageCluster and update your cluster according to the latest specifications.
For more information about the StorageCluster object and how the Operator manages changes, refer to the StorageCluster article.
Configure Storage DRS settings
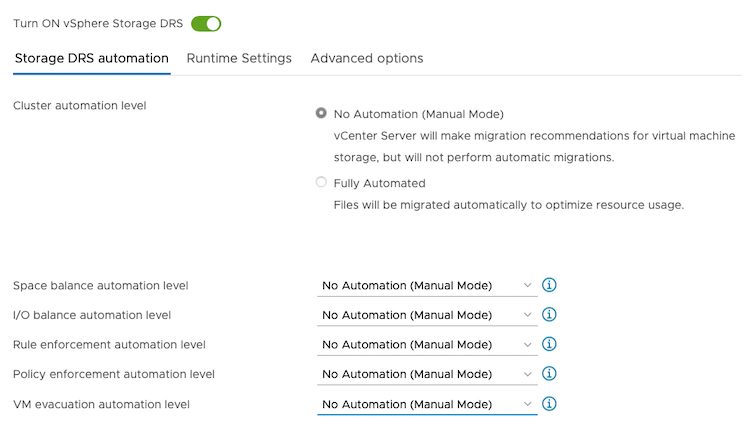
Portworx does not support the movement of VMDK files from the datastores on which they were created. Do not move them manually or have any settings that would result in a movement of these files. To prevent Storage DRS from moving VMDK files, configure the Storage DRS settings as follows using your vSphere console.
From the Edit Storage DRS Settings window of your selected datastore cluster, edit the following settings:
-
For Storage DRS automation, choose the No Automation (Manual Mode) option, and set the same for other settings, as shown in the following screencapture:
-
For Runtime Settings, clear the Enable I/O metric for SDRS recommendations option.
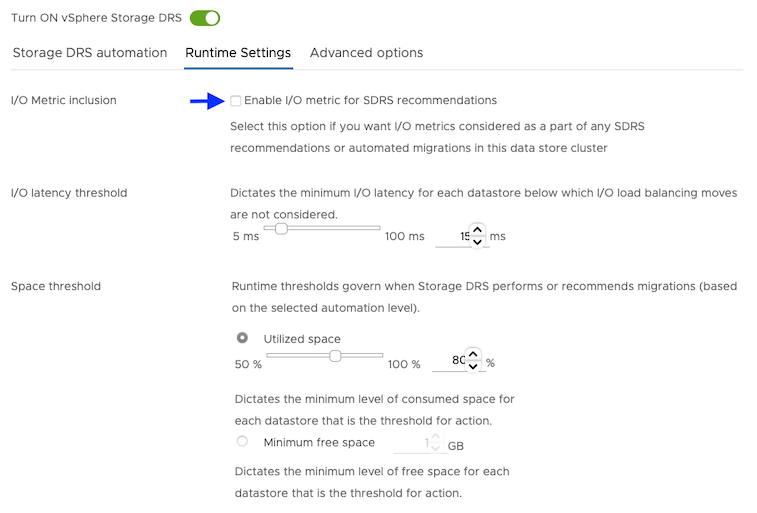
-
For Advanced options, clear the Keep VMDKs together by default options.
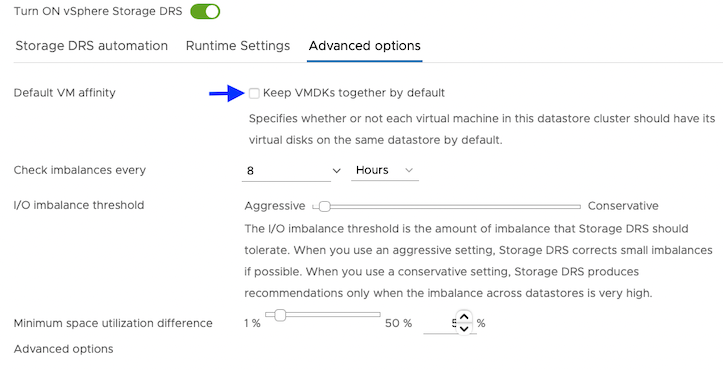
Grant the required cloud permissions
Grant permissions Portworx requires by creating a secret with user credentials:
- Provide Portworx with a vCenter server user that has the following minimum vSphere privileges at vCenter datacenter level using your vSphere console:
-
Datastore
- Allocate space
- Browse datastore
- Low level file operations
- Remove file
-
Host
- Local operations
- Reconfigure virtual machine
-
Virtual machine
- Change Configuration
- Add existing disk
- Add new disk
- Add or remove device
- Advanced configuration
- Change Settings
- Extend virtual disk
- Modify device settings
- Remove disk
If you create a custom role as above, make sure to select Propagate to children when assigning the user to the role.
Why selectPropagate to Children?In vSphere, resources are organized hierarchically. By selecting "Propagate to Children," you ensure that the permissions granted to the custom role are automatically applied not just to the targeted object, but also to all objects within its sub-tree. This includes VMs, datastores, networks, and other resources nested under the selected resource.
- Create a secret using the following steps.
- Kubernetes Secret
- Vault Secret
Retrieve the credentials from your own environment and specify them under the data section:
 apiVersion: v1
 kind: Secret
 metadata:
   name: px-vsphere-secret
   namespace: portworx
 type: Opaque
 data:
   VSPHERE_USER: <your-vcenter-server-user>
   VSPHERE_PASSWORD: <your-vcenter-server-password>
-
VSPHERE_USER: to find your base64-encoded vSphere user, enter the following command:
echo '<vcenter-server-user>' | base64 -
VSPHERE_PASSWORD: to find your base64-encoded vSphere password, enter the following command:
echo '<vcenter-server-password>' | base64
Once you've updated the template with your user and password, apply the spec:
oc apply -f <your-spec-name>
To configure and store secret key for vSphere in Vault refer to Vault Secret Provider section
Ensure that the correct vSphere credentials are securely stored in Vault before Portworx installation.
- Ensure ports 17001-17020 on worker nodes are reachable from the control plane node and other worker nodes.
Generate the StorageCluster spec
To install Portworx with OpenShift, you must generate a StorageCluster spec that you will deploy in your cluster.
-
Sign in to the Portworx Central console.
The system displays the Welcome to Portworx Central! page. -
In the Portworx Enterprise section, select Generate Cluster Spec.
The system displays the Generate Spec page. -
From the Portworx Version dropdown menu, select the Portworx version to install.
-
Select vSphere from the Platform dropdown.
-
Specify your hostname or the IP address of the vSphere server in the vCenter endpoint field.
-
Specify the datastore name(s) or datastore cluster name(s) available for Portworx in the vCenter datastore prefix field. To specify multiple datastore names or datastore cluster names, enter a generic prefix common to all the datastores or datastore clusters. For example, if you want Portworx to use three datastores named
px-datastore-01,px-datastore-02, andpx-datastore-03, specifypxorpx-datastore. -
Click Customize at the bottom of the Summary section.
-
Navigate to the Storage window by clicking Next.
-
Select PX-StoreV2 check box in the Configure storage devices section.
noteDuring installation, selecting the PX-StoreV2 option creates four 50GB volumes and, by default, an additional 64GB volume for metadata. If needed, you can separate metadata and KVDB data by creating a dedicated volume for KVDB with a specified size. To do this, add the following line to the install spec:
kvdbDevicespeceagerzeroedthick, size=<required-size-in-GB> -
Enter the vCenter Endpoint details and click Next.
-
Navigate to the Network and then Customize window and click Finish to generate the specs.
Apply the spec
-
Once the Operator is installed successfully, create a StorageCluster object from the OpenShidt UI by clicking the Create StorageCluster button on the same page:
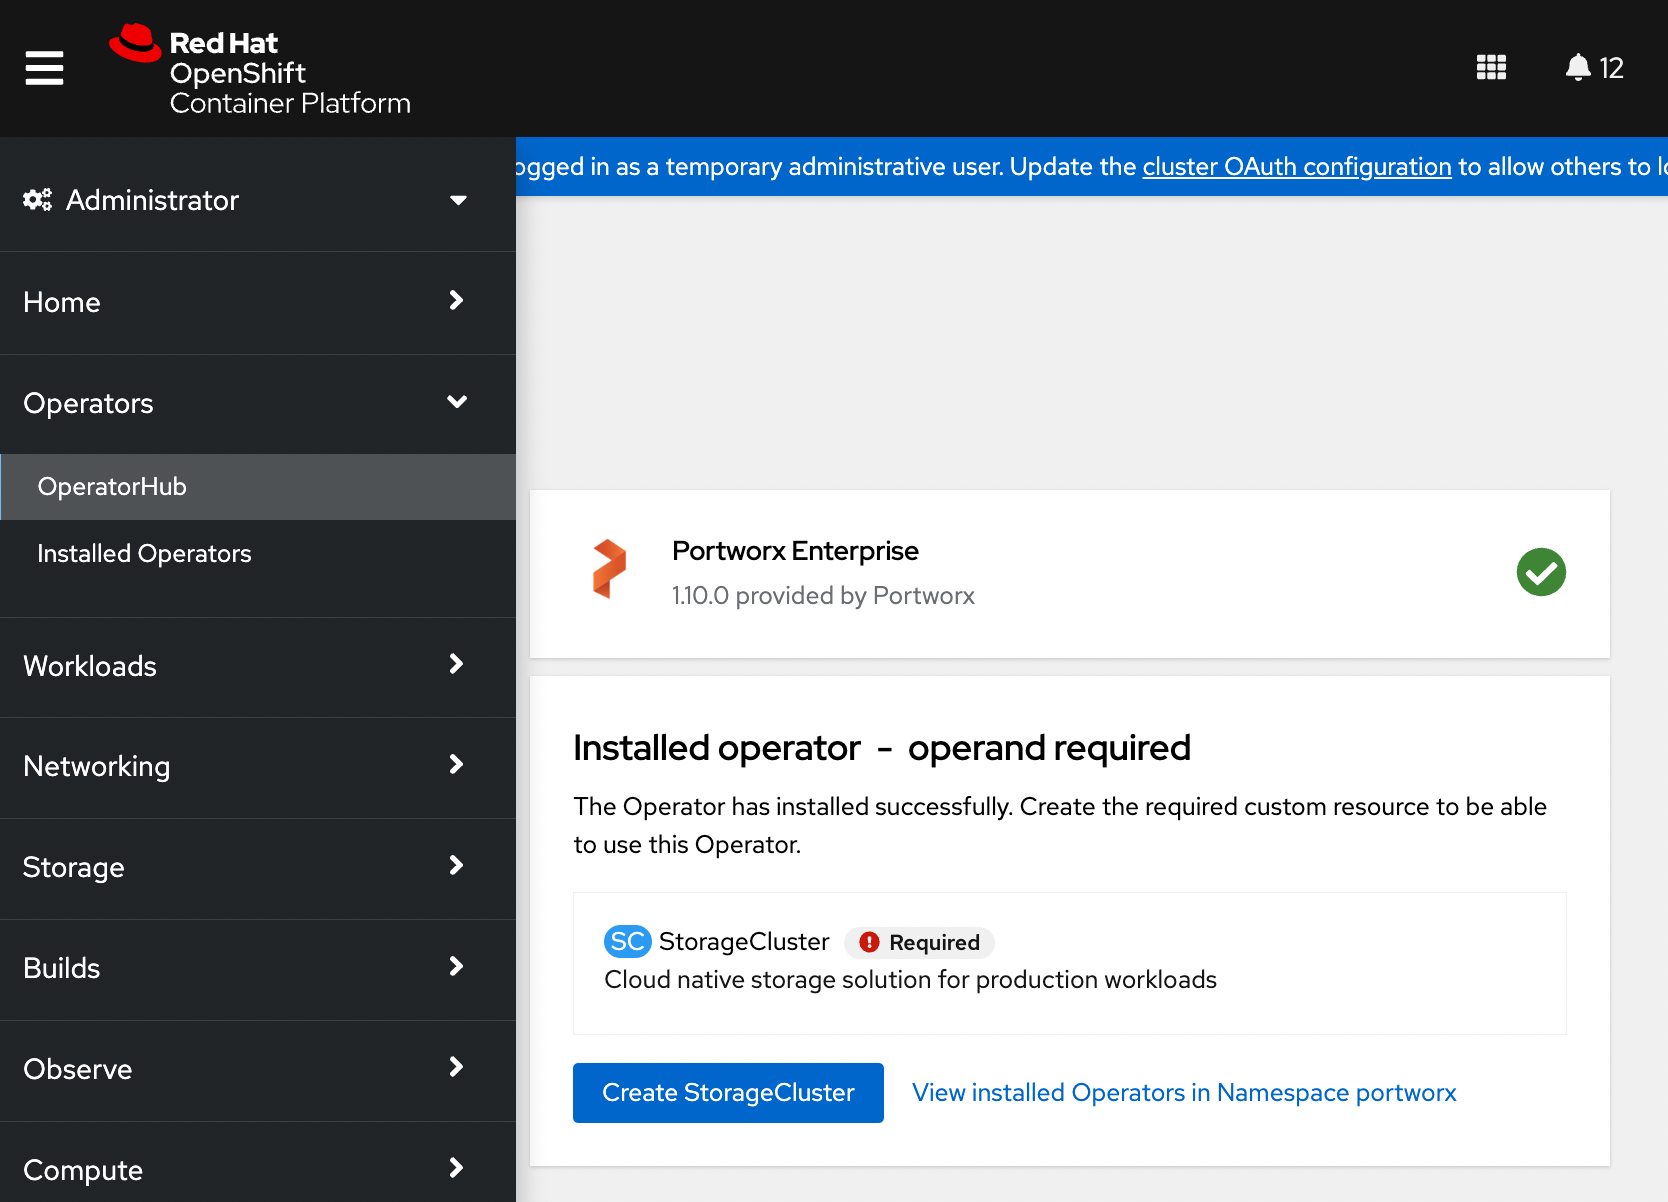
-
The spec displayed here represents a very basic default spec. Copy the spec you created with the spec generator and paste it over the default spec in the YAML view, and click Create to deploy Portworx:
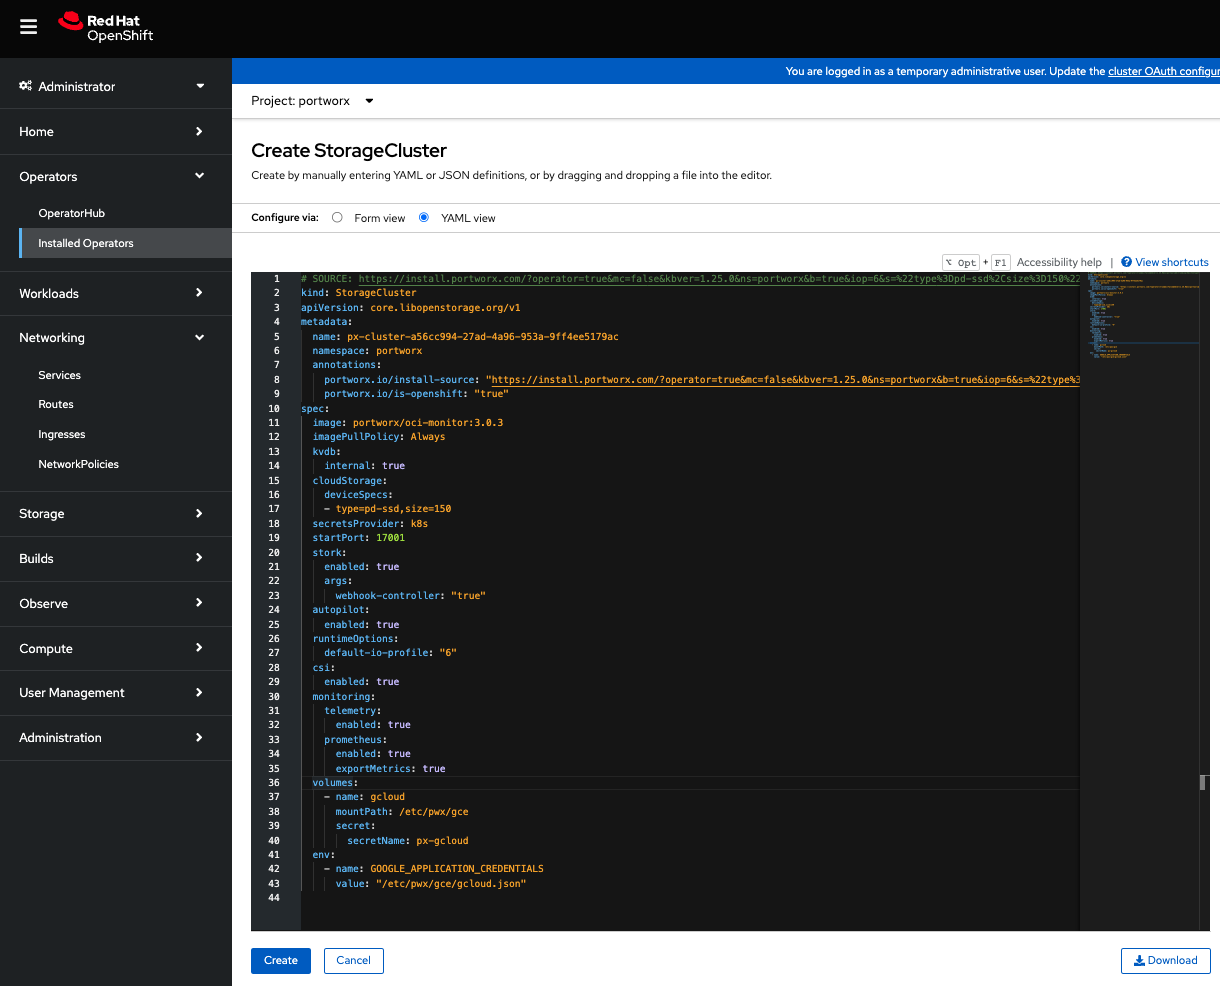
-
Verify that Portworx has deployed successfully by navigating to the Storage Cluster tab of the Installed Operators page:
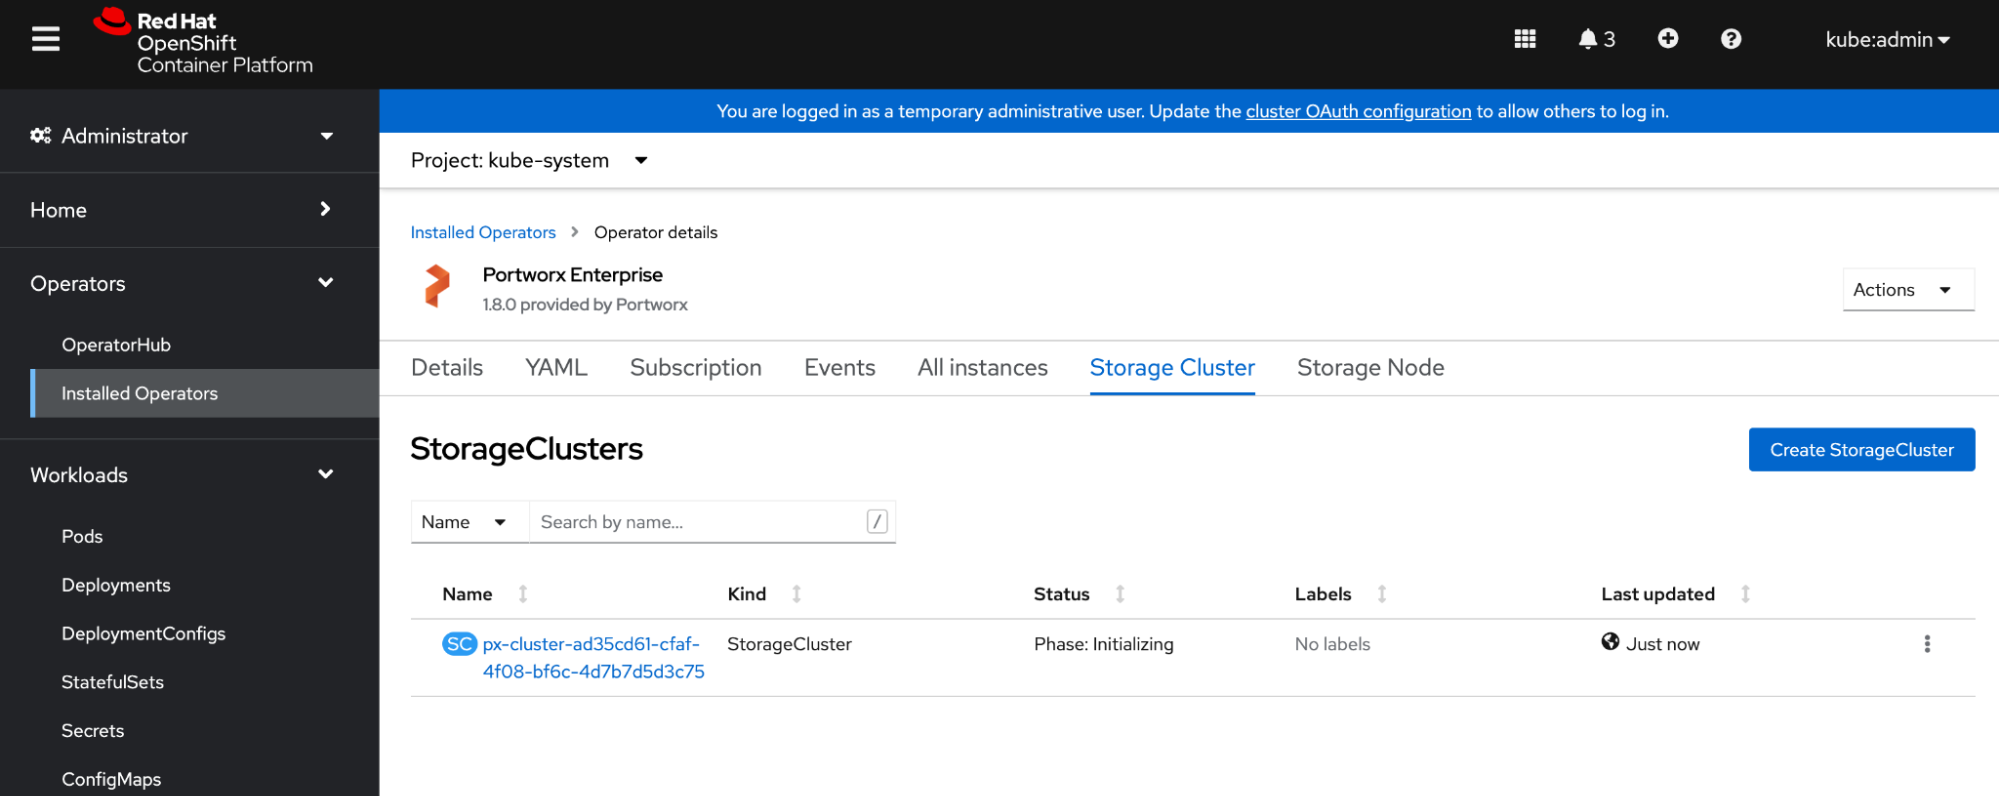
Once Portworx has fully deployed, the status will show as Online:
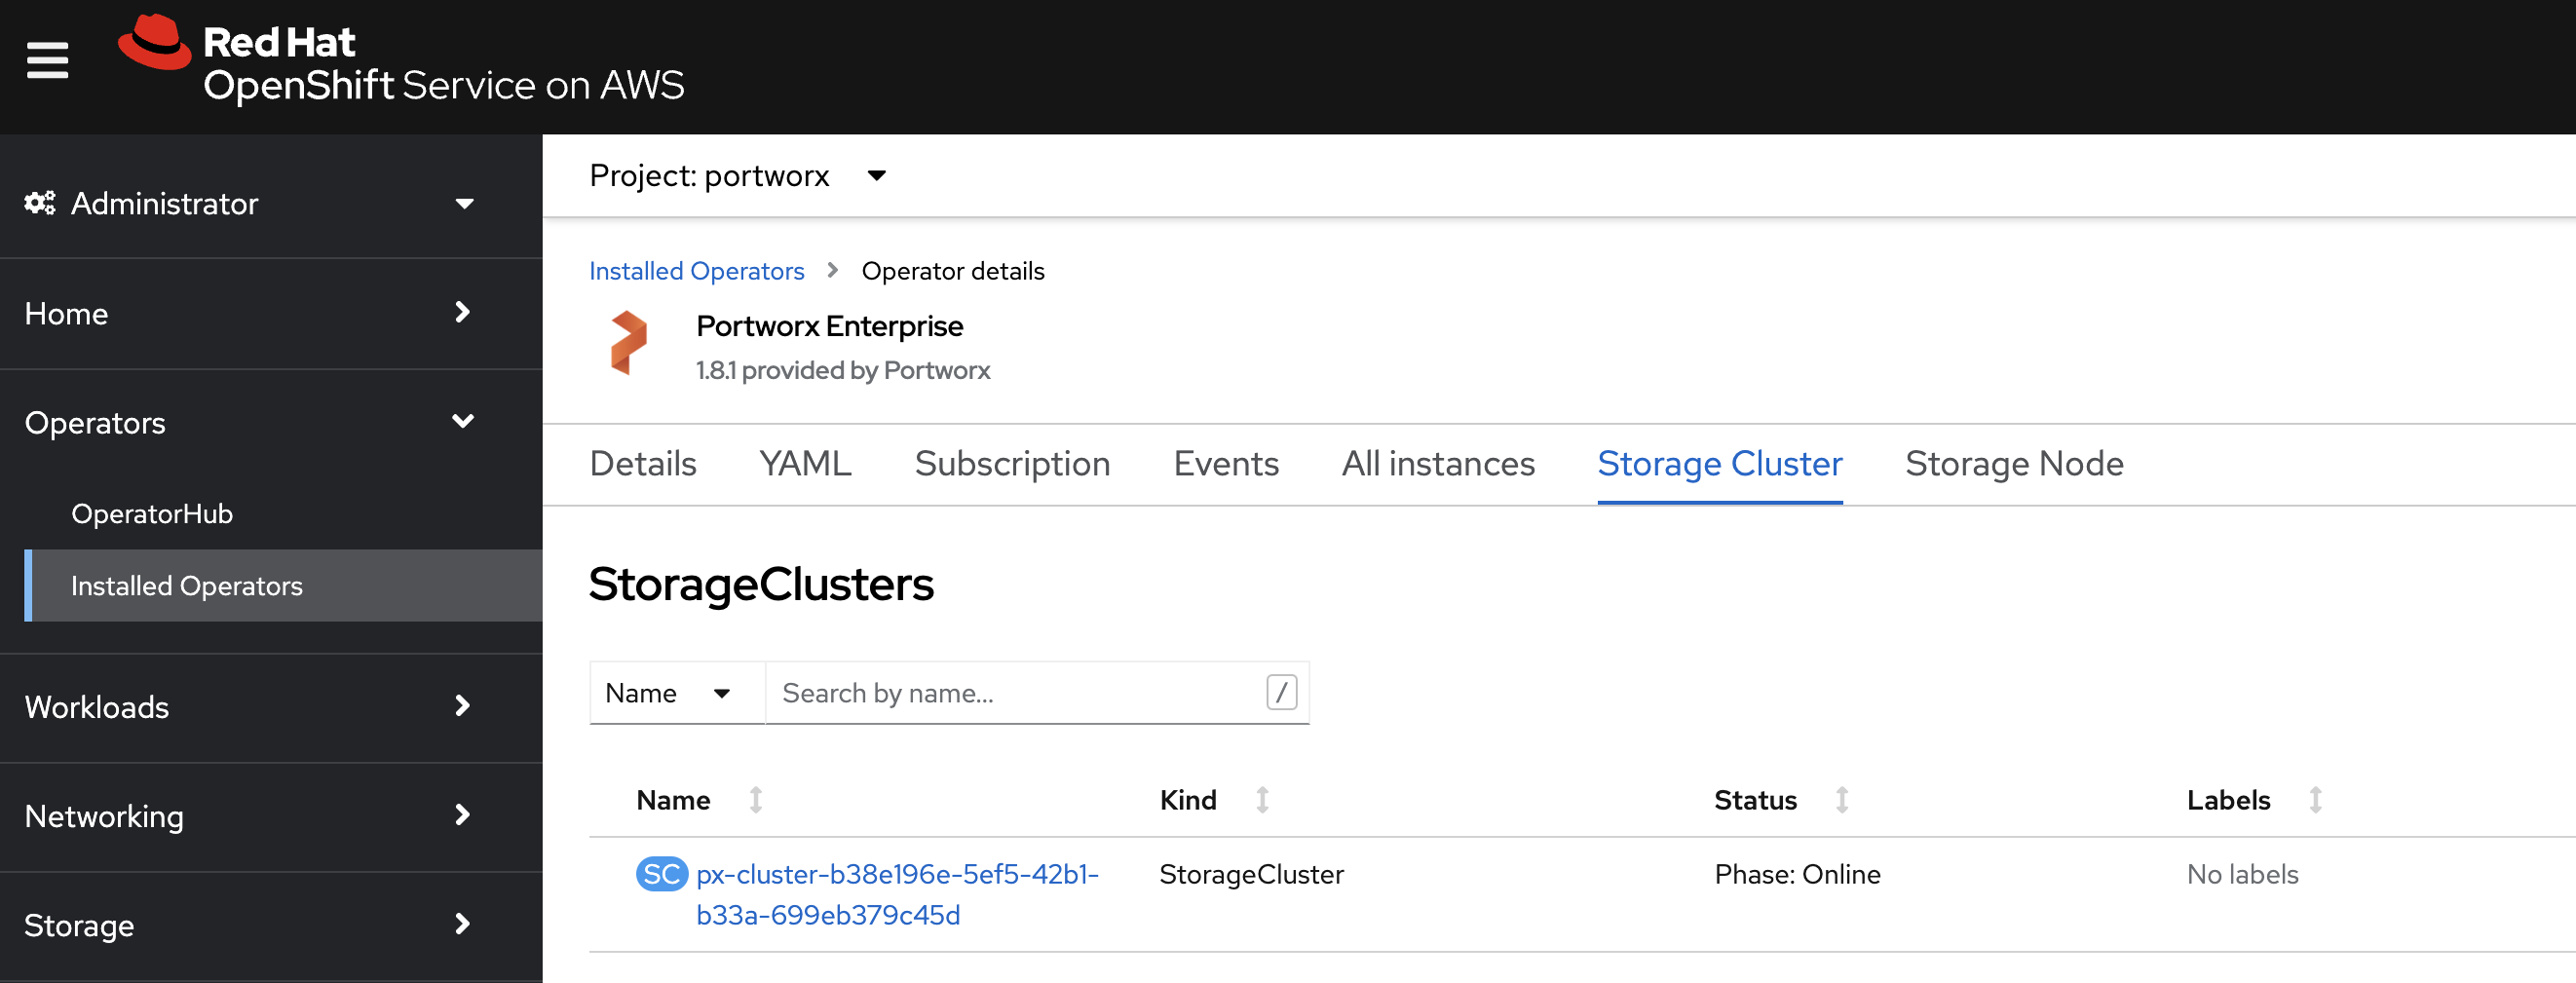
-
Refresh your browser to see the Portworx option in the left pane. Click the Cluster sub-tab to access the Portworx dashboard.
Pre-flight check
After you applying the specs, the Portworx Operator performs a pre-flight check across the cluster and must pass for each node. This check determines whether each node in your cluster is compatible with the PX-StoreV2 datastore. If each node in the cluster meets the following hardware and software requirements, PX-StoreV2 will be automatically set as your default datastore during Portworx installation:
- Hardware:
- CPU: A minimum of 8 cores CPU per node.
- Drive type: SD/NVME drive with a memory of more than 8 GB per node.
- Metadata device: A minimum of 64 GB system metadata device on each node.
- Software:
- Linux kernel version: 4.20 or newer with the Rhel packages:
- device-mapper mdadm lvm2 device-mapper-persistent-data augeas
- Linux kernel version: 4.20 or newer with the Rhel packages:
Verify your Portworx installation
Once you've installed Portworx, you can perform the following tasks to verify that Portworx is correctly installed and using the PX-StoreV2 datastore.
Verify if all pods are running
Enter the following command to list and filter the results for Portworx pods and specify the namespace where you have deployed Portworx:
oc get pods -n <px-namespace> -o wide | grep -e portworx -e px
NAME                                                    READY   STATUS    RESTARTS         AGE     IP              NODE                         NOMINATED NODE   READINESS GATES
portworx-api-8scq2                                      1/1     Running   0                5h1m    xx.xx.xxx.xxx   username-vms-silver-sight-0   <none>           <none>
portworx-api-f24b9                                      1/1     Running   0                5h1m    xx.xx.xxx.xxx   username-vms-silver-sight-3   <none>           <none>
portworx-api-f95z5                                      1/1     Running   0                5h1m    xx.xx.xxx.xxx   username-vms-silver-sight-2   <none>           <none>
portworx-kvdb-558g5                                     1/1     Running   0                3m46s   xx.xx.xxx.xxx   username-vms-silver-sight-2   <none>           <none>
portworx-kvdb-9tfjd                                     1/1     Running   0                2m57s   xx.xx.xxx.xxx   username-vms-silver-sight-0   <none>           <none>
portworx-kvdb-cjcxg                                     1/1     Running   0                3m7s    xx.xx.xxx.xxx   username-vms-silver-sight-3   <none>           <none>
portworx-operator-548b8d4ccc-qgnkc                      1/1     Running   0                5h2m    xx.xx.xxx.xxx   username-vms-silver-sight-0   <none>           <none>
portworx-pvc-controller-ff669698-62ngd                  1/1     Running   0                5h1m    xx.xx.xxx.xxx   username-vms-silver-sight-3   <none>           <none>
portworx-pvc-controller-ff669698-6b4zj                  1/1     Running   0                5h1m    xx.xx.xxx.xxx   username-vms-silver-sight-2   <none>           <none>
portworx-pvc-controller-ff669698-pffvl                  1/1     Running   0                5h1m    xx.xx.xxx.xxx   username-vms-silver-sight-0   <none>           <none>
prometheus-px-prometheus-0                              2/2     Running   0                5h      xx.xx.xxx.xxx   username-vms-silver-sight-0   <none>           <none>
px-cluster-378d7ae1-f4ca-xxxx-xxxx-xxxxxxxxxxxx-2qsp4   2/2     Running   0                3h20m   xx.xx.xxx.xxx   username-vms-silver-sight-3   <none>           <none>
px-cluster-378d7ae1-f4ca-xxxx-xxxx-xxxxxxxxxxxx-5vnzv   2/2     Running   0                3h20m   xx.xx.xxx.xxx   username-vms-silver-sight-0   <none>           <none>
px-cluster-378d7ae1-f4ca-xxxx-xxxx-xxxxxxxxxxxx-lxzd5   2/2     Running   0                3h20m   xx.xx.xxx.xxx   username-vms-silver-sight-2   <none>           <none>
px-csi-ext-77fbdcdcc9-7hkpm                             4/4     Running   0                3h19m   xx.xx.xxx.xxx   username-vms-silver-sight-3   <none>           <none>
px-csi-ext-77fbdcdcc9-9ck26                             4/4     Running   0                3h18m   xx.xx.xxx.xxx   username-vms-silver-sight-0   <none>           <none>
px-csi-ext-77fbdcdcc9-ddmjr                             4/4     Running   0                3h20m   xx.xx.xxx.xxx   username-vms-silver-sight-2   <none>           <none>
px-prometheus-operator-7d884bc8bc-5sv9r                 1/1     Running   0                5h1m    xx.xx.xxx.xxx   username-vms-silver-sight-0   <none>           <none>
Note the name of one of your px-cluster pods. You'll run pxctl commands from these pods in following steps.
Verify Portworx cluster status
You can find the status of the Portworx cluster by running pxctl status commands from a pod. Enter the following oc exec command, specifying the pod name you retrieved in the previous section:
oc exec <px-pod> -n <px-namespace> -- /opt/pwx/bin/pxctl status
Defaulted container "portworx" out of: portworx, csi-node-driver-registrar
Status: PX is operational
Telemetry: Disabled or Unhealthy
Metering: Disabled or Unhealthy
License: Trial (expires in 31 days)
Node ID: 24508311-e2fe-xxxx-xxxx-xxxxxxxxxxxx
	IP: xx.xx.xxx.xxx
 	Local Storage Pool: 1 pool
	POOL	IO_PRIORITY	RAID_LEVEL	USABLE	USED	STATUS	ZONE	REGION
	0	HIGH		raid0		25 GiB	33 MiB	Online	default	default
	Local Storage Devices: 1 device
	Device	Path		Media Type		Size		Last-Scan
	0:0	/dev/sda	STORAGE_MEDIUM_SSD	32 GiB		10 Oct 22 23:45 UTC
	total			-			32 GiB
	Cache Devices:
	 * No cache devices
	Kvdb Device:
	Device Path	Size
	/dev/sdc	1024 GiB
	 * Internal kvdb on this node is using this dedicated kvdb device to store its data.
	Metadata Device:
	1	/dev/sdd	STORAGE_MEDIUM_SSD	64 GiB
Cluster Summary
	Cluster ID: px-cluster-378d7ae1-f4ca-xxxx-xxxx-xxxxxxxxxxxx
	Cluster UUID: 482b18b1-2a8b-xxxx-xxxx-xxxxxxxxxxxx
	Scheduler: kubernetes
	Nodes: 3 node(s) with storage (3 online)
	IP		ID					SchedulerNodeName		Auth		StorageNode		Used	Capacity	Status	StorageStatus	Version		Kernel				OS
	xx.xx.xxx.xxx	24508311-e2fe-xxxx-xxxx-xxxxxxxxxxxx	username-vms-silver-sight-3	Disabled	Yes(PX-StoreV2)	33 MiB	25 GiB		Online	Up (This node)	3.2.0-28944c8	5.4.217-1.el7.elrepo.x86_64	CentOS Linux 7 (Core)
	xx.xx.xxx.xxx	1e89102f-0510-xxxx-xxxx-xxxxxxxxxxxx	username-vms-silver-sight-0	Disabled	Yes(PX-StoreV2)	33 MiB	25 GiB		Online	Up		3.2.0-28944c8	5.4.217-1.el7.elrepo.x86_64	CentOS Linux 7 (Core)
	xx.xx.xxx.xxx	0c99e1f2-9d49-xxxx-xxxx-xxxxxxxxxxxx	username-vms-silver-sight-2	Disabled	Yes(PX-StoreV2)	33 MiB	25 GiB		Online	Up		3.2.0-28944c8	5.4.217-1.el7.elrepo.x86_64	CentOS Linux 7 (Core)
Global Storage Pool
	Total Used    	:  99 MiB
	Total Capacity	:  74 GiB
The Portworx status will display PX is operational, and the StorageNode entries for each node will read Yes(PX-StoreV2).
Verify Portworx pool status
Run the following command to view the Portworx drive configurations for your pod:
oc exec <px-pod> -n <px-namespace> -- /opt/pwx/bin/pxctl service pool show
Defaulted container "portworx" out of: portworx, csi-node-driver-registrar
PX drive configuration:
Pool ID: 0
	Type:  PX-StoreV2
	UUID:  58ab2e3f-a22e-xxxx-xxxx-xxxxxxxxxxxx
	IO Priority:  HIGH
	Labels:  kubernetes.io/arch=amd64,kubernetes.io/hostname=username-vms-silver-sight-3,kubernetes.io/os=linux,medium=STORAGE_MEDIUM_SSD,beta.kubernetes.io/arch=amd64,beta.kubernetes.io/os=linux,iopriority=HIGH
	Size: 25 GiB
	Status: Online
	Has metadata:  No
	Balanced:  Yes
	Drives:
	0: /dev/sda, Total size 32 GiB, Online
	Cache Drives:
	No Cache drives found in this pool
Metadata  Device:
	1: /dev/sdd, STORAGE_MEDIUM_SSD
The Type: PX-StoreV2 output shows that your pod is using the PX-StoreV2 datastore.
Verify pxctl cluster provision status
-
Find the storage cluster using the following command; the status should show the cluster is
Online:oc -n <px-namespace> get storageclusterNAME CLUSTER UUID STATUS VERSION AGEpx-cluster-378d7ae1-f4ca-xxxx-xxxx-xxxxxxxxxxxx 482b18b1-2a8b-xxxx-xxxx-xxxxxxxxxxxx Online 3.2.0-dev-rc1 5h6m -
Find the storage nodes, whose statuses should show as
Online:oc -n <px-namespace> get storagenodesNAME ID STATUS VERSION AGEusername-vms-silver-sight-0 1e89102f-0510-xxxx-xxxx-xxxxxxxxxxxx Online 3.2.0-28944c8 3h25musername-vms-silver-sight-2 0c99e1f2-9d49-xxxx-xxxx-xxxxxxxxxxxx Online 3.2.0-28944c8 3h25musername-vms-silver-sight-3 24508311-e2fe-xxxx-xxxx-xxxxxxxxxxxx Online 3.2.0-28944c8 3h25m -
Verify the Portworx cluster provision status. Enter the following
oc execcommand, specifying the pod name you retrieved in the previous section:oc exec <px-pod> -n <px-namespace> -- /opt/pwx/bin/pxctl cluster provision-statusNODE NODE STATUS POOL POOL STATUS IO_PRIORITY SIZE AVAILABLE USED PROVISIONED ZONE REGION RACK0c99e1f2-9d49-xxxx-xxxx-xxxxxxxxxxxx Up 0 ( 8ec9e6aa-7726-xxxx-xxxx-xxxxxxxxxxxx ) Online HIGH 32 GiB 32 GiB 33 MiB 0 B default default default1e89102f-0510-xxxx-xxxx-xxxxxxxxxxxx Up 0 ( 06fcc73a-7e2f-xxxx-xxxx-xxxxxxxxxxxx ) Online HIGH 32 GiB 32 GiB 33 MiB 0 B default default default24508311-e2fe-xxxx-xxxx-xxxxxxxxxxxx Up 0 ( 58ab2e3f-a22e-xxxx-xxxx-xxxxxxxxxxxx ) Online HIGH 32 GiB 32 GiB 33 MiB 0 B default default default
Create your first PVC
For your apps to use persistent volumes powered by Portworx, you must use a StorageClass that references Portworx as the provisioner. Portworx includes a number of default StorageClasses, which you can reference with PersistentVolumeClaims (PVCs) you create. For a more general overview of how storage works within Kubernetes, refer to the Persistent Volumes section of the Kubernetes documentation.
Perform the following steps to create a PVC:
-
Create a PVC referencing the
px-csi-dbdefault StorageClass and save the file:kind: PersistentVolumeClaimapiVersion: v1metadata:name: px-check-pvcspec:storageClassName: px-csi-dbaccessModes:- ReadWriteOnceresources:requests:storage: 2Gi -
Run the
oc applycommand to create a PVC:oc apply -f <your-pvc-name>.yamlpersistentvolumeclaim/example-pvc created
Verify your StorageClass and PVC
-
Enter the
oc get storageclasscommand:oc get storageclassNAME PROVISIONER RECLAIMPOLICY VOLUMEBINDINGMODE ALLOWVOLUMEEXPANSION AGEpx-csi-db pxd.portworx.com Delete Immediate true 43dpx-csi-db-cloud-snapshot pxd.portworx.com Delete Immediate true 43dpx-csi-db-cloud-snapshot-encrypted pxd.portworx.com Delete Immediate true 43dpx-csi-db-encrypted pxd.portworx.com Delete Immediate true 43dpx-csi-db-local-snapshot pxd.portworx.com Delete Immediate true 43dpx-csi-db-local-snapshot-encrypted pxd.portworx.com Delete Immediate true 43dpx-csi-replicated pxd.portworx.com Delete Immediate true 43dpx-csi-replicated-encrypted pxd.portworx.com Delete Immediate true 43dpx-db kubernetes.io/portworx-volume Delete Immediate true 43dpx-db-cloud-snapshot kubernetes.io/portworx-volume Delete Immediate true 43dpx-db-cloud-snapshot-encrypted kubernetes.io/portworx-volume Delete Immediate true 43dpx-db-encrypted kubernetes.io/portworx-volume Delete Immediate true 43dpx-db-local-snapshot kubernetes.io/portworx-volume Delete Immediate true 43dpx-db-local-snapshot-encrypted kubernetes.io/portworx-volume Delete Immediate true 43dpx-replicated kubernetes.io/portworx-volume Delete Immediate true 43dpx-replicated-encrypted kubernetes.io/portworx-volume Delete Immediate true 43dstork-snapshot-sc stork-snapshot Delete Immediate true 43docreturns details about the StorageClasses available to you. Verify thatpx-csi-dbappears in the list. -
Enter the
oc get pvccommand. If this is the only StorageClass and PVC that you've created, you should see only one entry in the output:oc get pvc <your-pvc-name>NAME STATUS VOLUME CAPACITY ACCESS MODES STORAGECLASS AGEexample-pvc Bound pvc-dce346e8-ff02-xxxx-xxxx-xxxxxxxxxxxx 2Gi RWO example-storageclass 3m7socreturns details about your PVC if it was created correctly. Verify that the configuration details appear as you intended.